Features
Explanation of terms
Some terms you have to know before reading this documentation.
Cashier
A cashier is the user of the cashregister application and is the person who works in a retail store. This documentation is based on the view of a cashier and will be mainly addressed as "cashier" or "user"
Cashregister
Cashregister is the application, running on tablets as a PWA. It is only the website/software which is called as "cashregister". Possible hardware cash registers are named as "devicehub".
Devicehub
Devicehub is an application running on a computer (also called station) to control different kind of peripherials. The cashregister application is communicating bidirectionally to the devicehub via WebSocket. Peripherals are:
- Hand scanner, scanning barcodes from products, gift cards or receipts.
- Printer, printing receipts for the customer and notes for the cashier.
- Customerdisplay, current sum of the cart and what the customer has to pay will be displayed.
- Pinpad, card terminal which handles different kind of card payments (Mastercard, visa, giro, etc.)
- Cash drawer, contains the cash money.
Store
The cashregister is used in retail stores. Each store has an unique storeId, with which the store can be identified.
Station
Each store contains at least one station, which runs with the devicehub application. The stations are identified with the stationId, which is unique per store.
Vault
In each store there is a vault, to keep the cash money safe. Money can be moved from and into the vault.
Settlements
Before starting a working day, cashiers have to open a settlement, where every cash money movement will be protocolled. Settlements are necessary for each station, because the money is counted per cash drawer. At the end of the day, the money in the drawer has to be counted and entered in the settlement closing process. Settlements have three different states:
OPEN- Settlement which can be used for transactions.COUNTING- Initialized for counting, cashier can provide the amount of the drawer. New transactions are not possible any more.CLOSED- Finished settlement. Transactions and money entry not possible.
SKU
Stock Keeping Unit, it is used to identify products.
Legacy receipt
Receipts which where used before the introduction of One Experience.
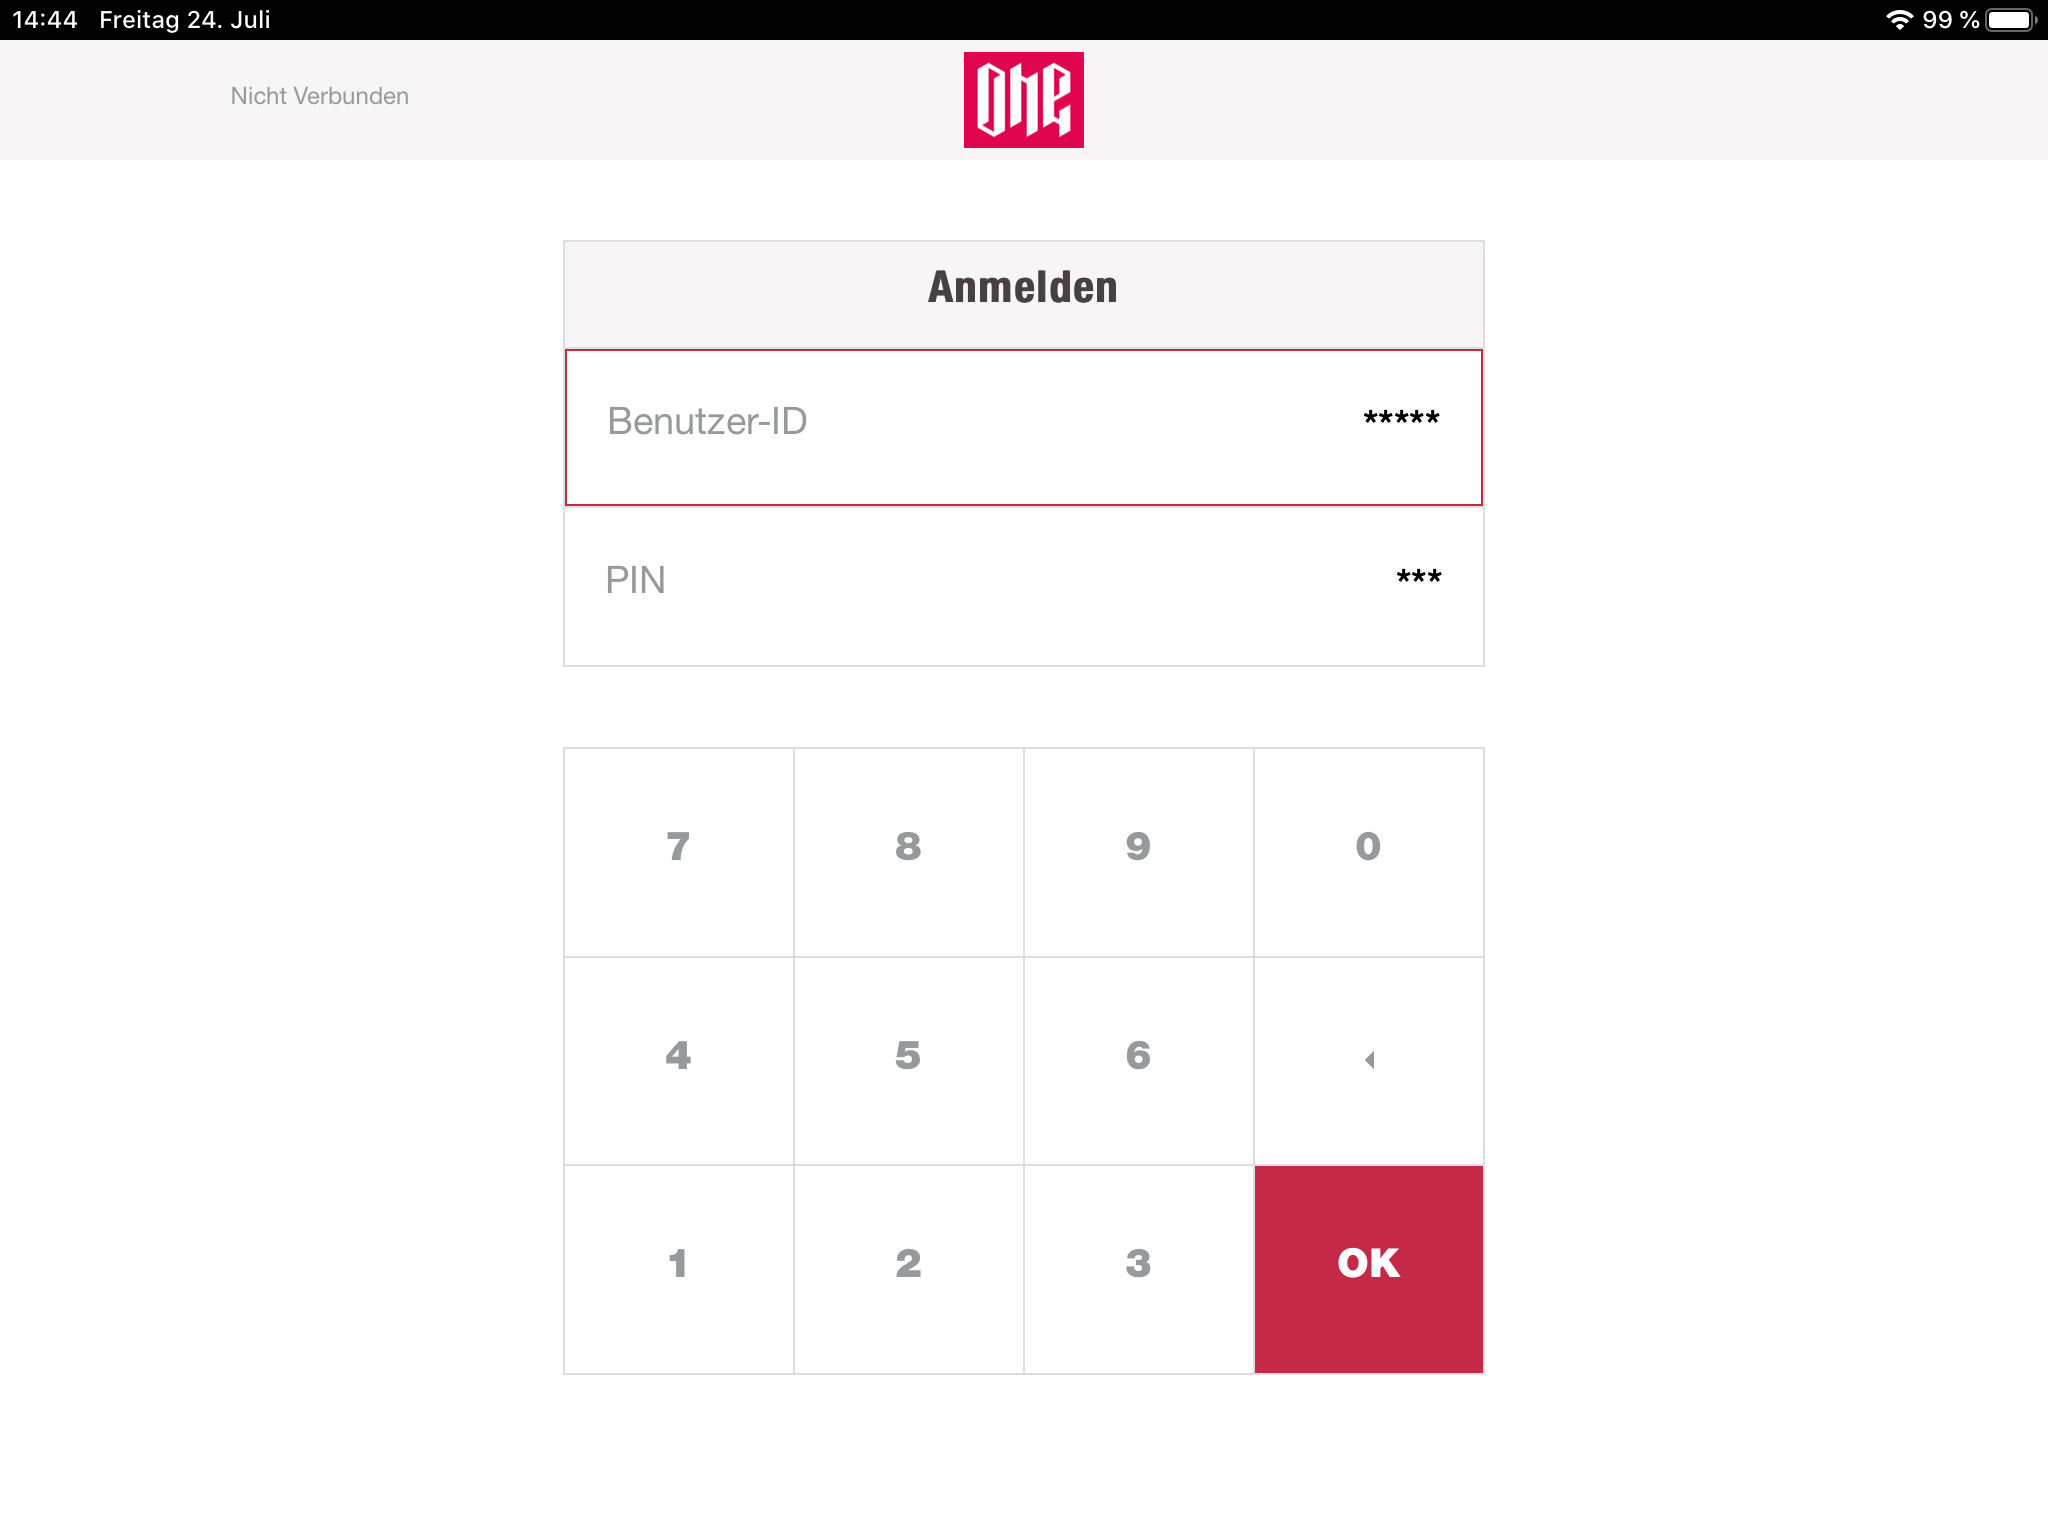
Login
The cashiers have to login with their credentials, which contain the userId and a pin. After entering the data, the cashiers have to submit their data with "OK". If the provided data are valid, the cashier is logged in and has access to the application. Invalid data are displayed in an error notification.
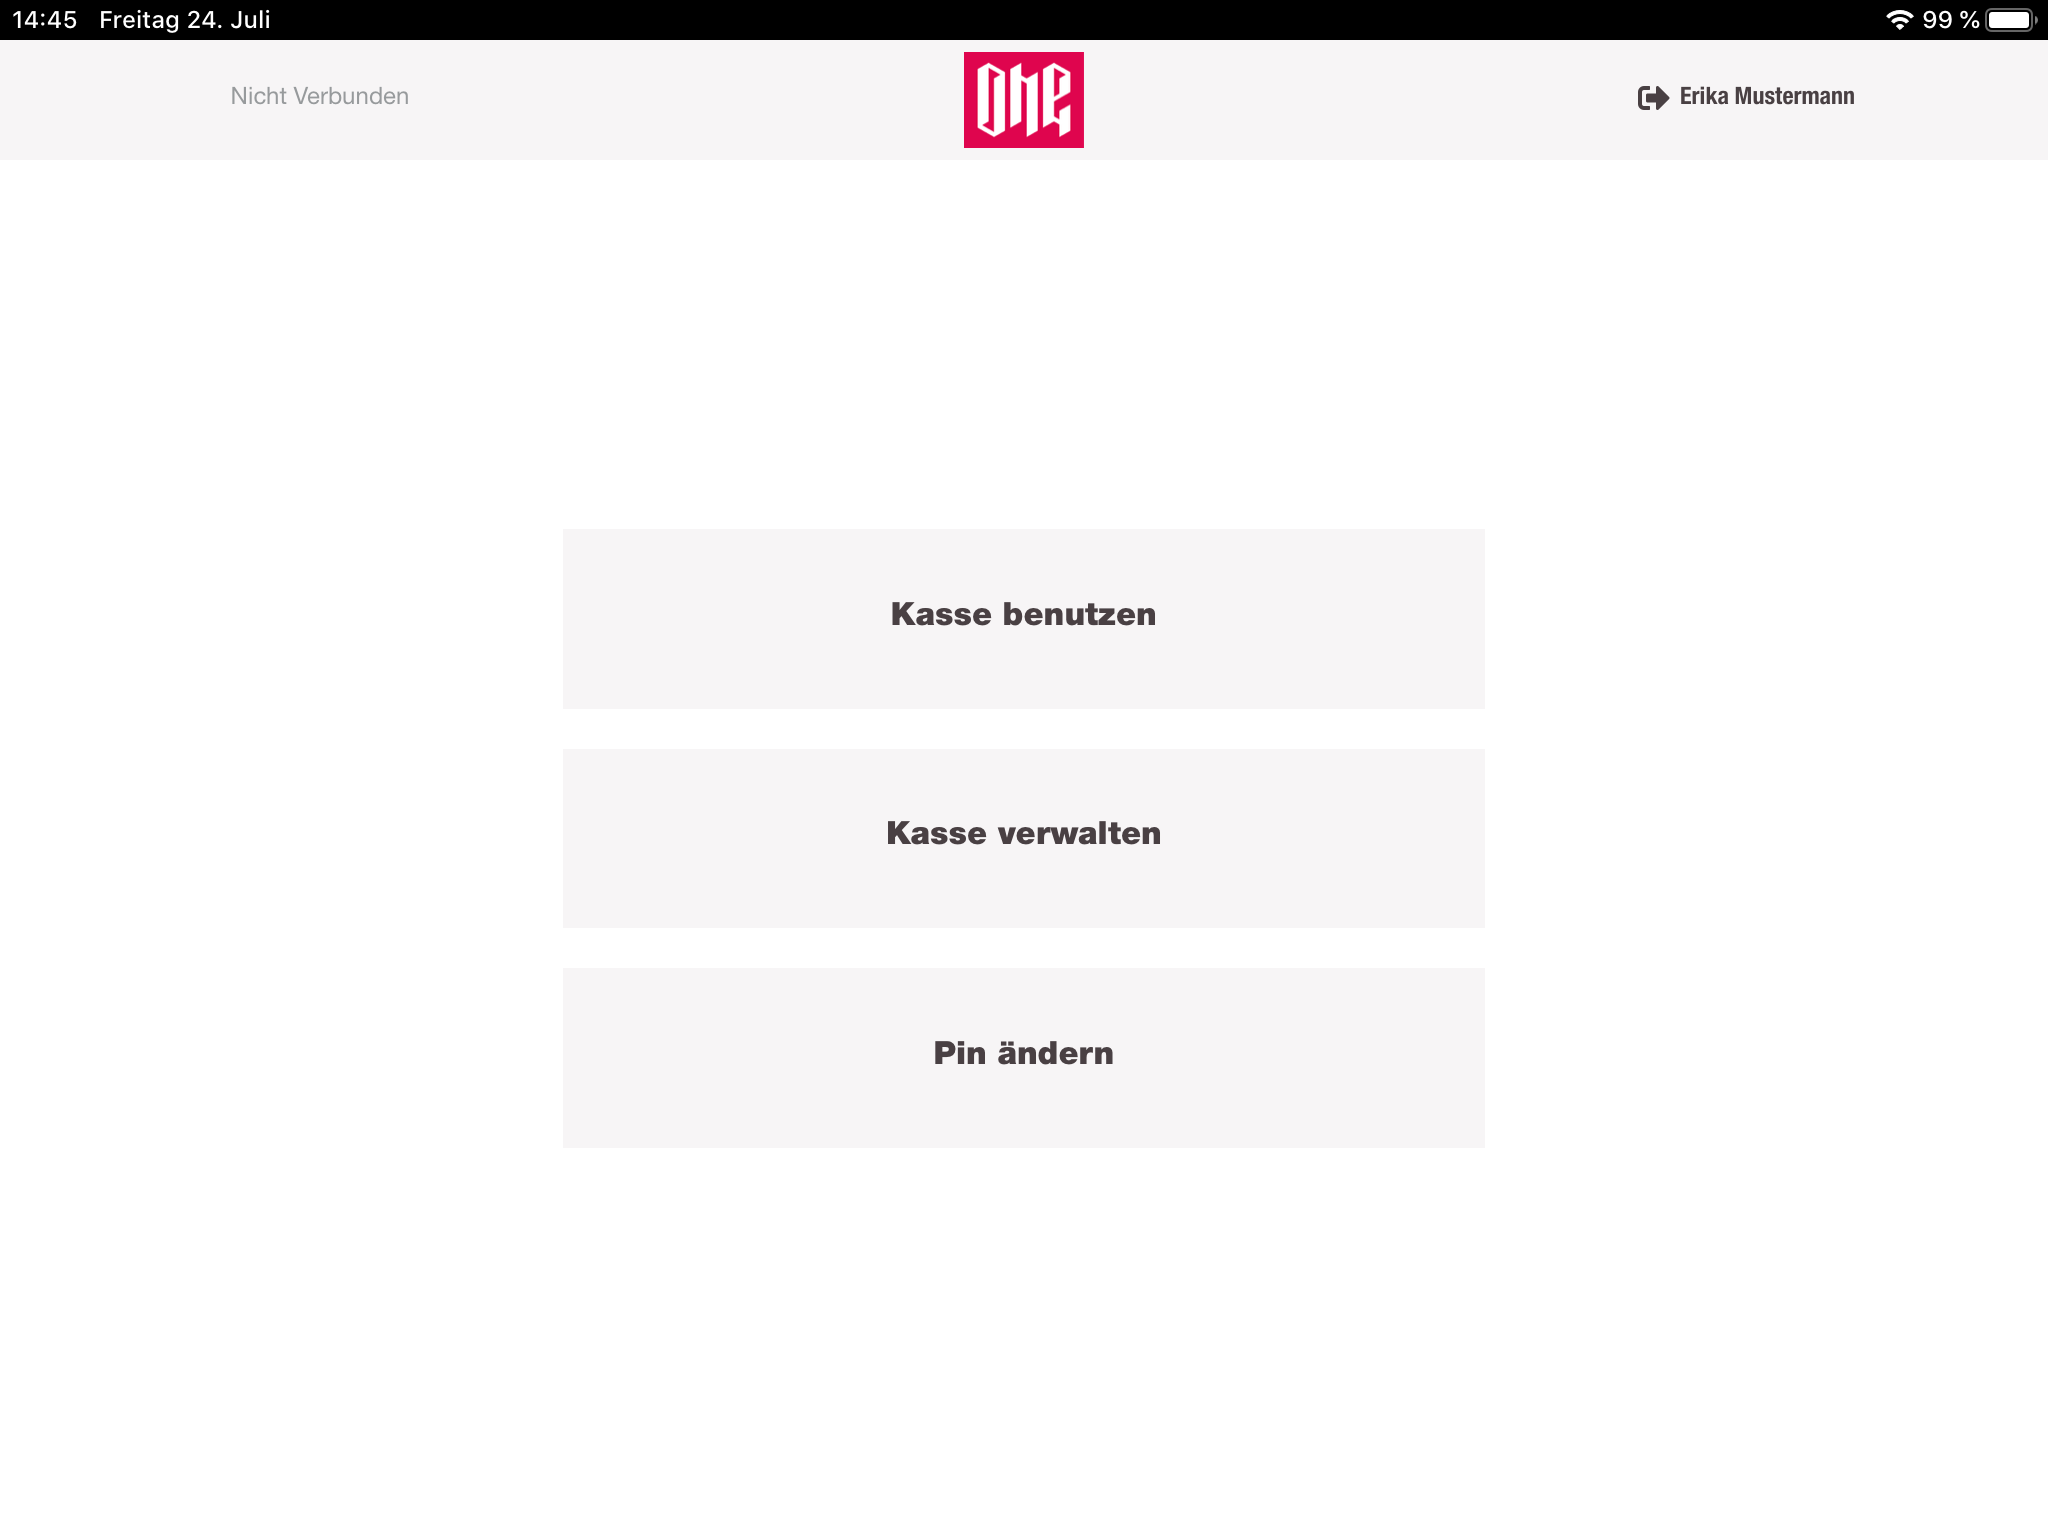
Usage selection
After a successful login the cashier has three options to continue in the application:
- Use cash register
- Manage cash register
- Change pin
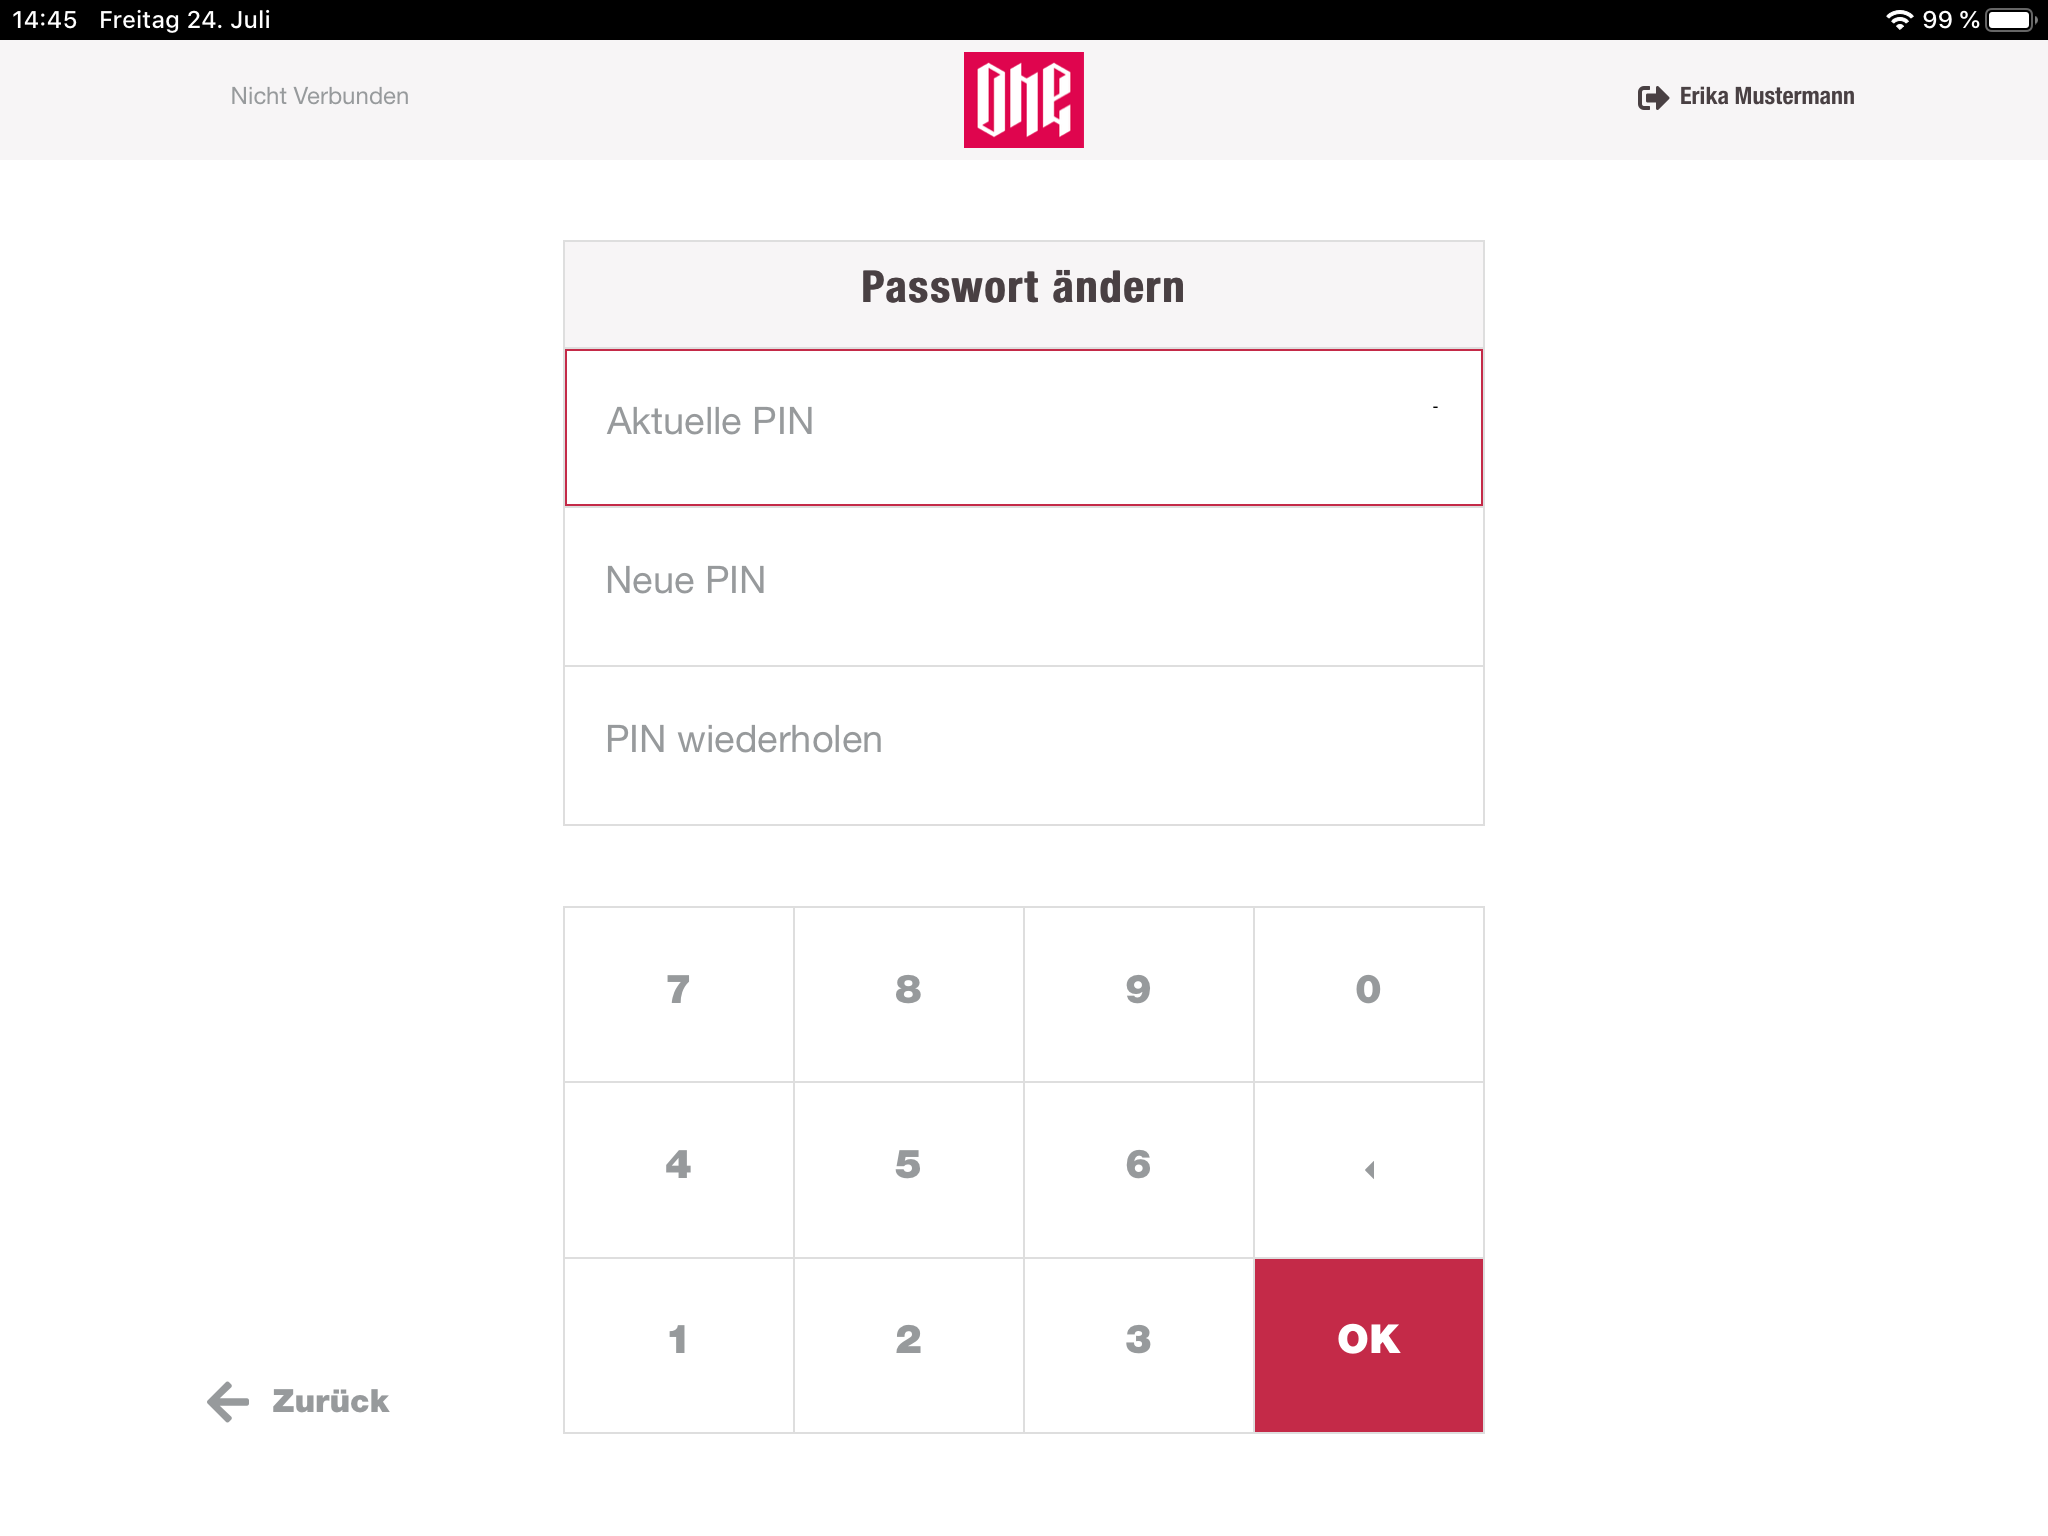
Change Pin
Initially, all users are created with a default pin. Informed by the management, they have to change this default pin to any pin they want to use. To change their pin, the cashier has to provide the current pin and the new pin. The new pin has to be entered twice, to make sure that it does not contain a typo. Of course the user can change their pin whenever they want, not only to change the initial pin.
Manage cashregister
When the user is not connected to a devicehub, the cashregister application does not have any information about the current store. Because of that reason the cashier has to provide the storeId manually. Once the storeId is entered the cashier has following options:
- Money supply/disposal
- Count the vault
- Close settlement
- Reports
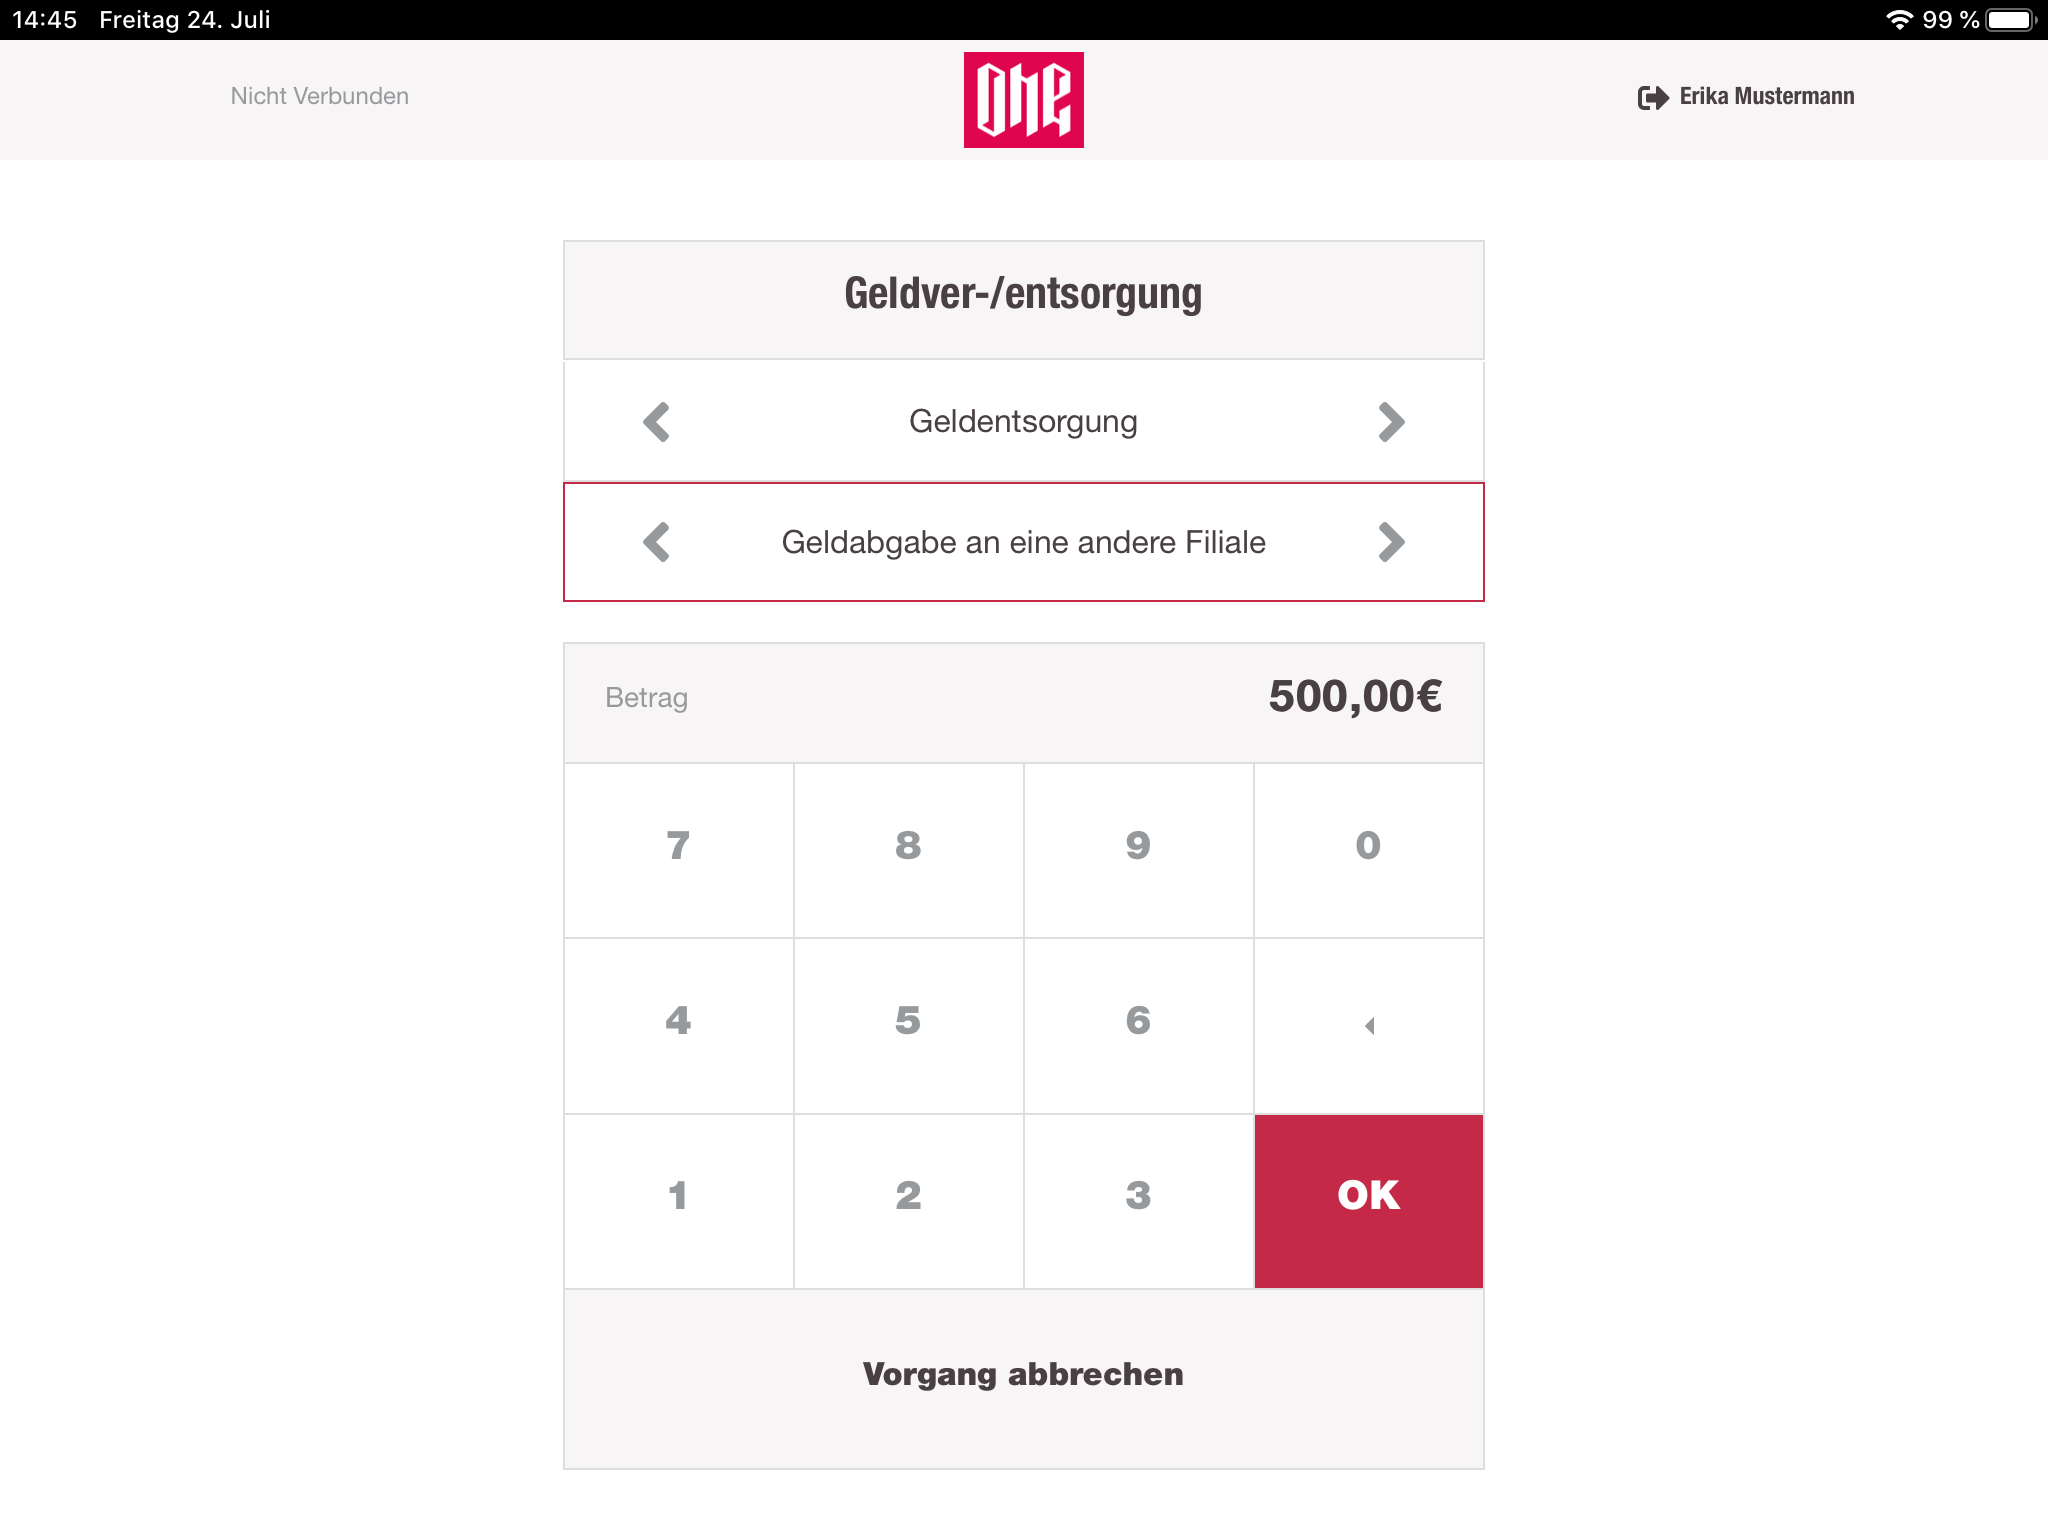
Money supply/disposal
In this menu the cashier has to fill out the form with information about the transaction type (supply or disposal) and the reason for the transaction, for example: "Handing over money to another store". Also, the cashier has to enter the amount of the money.
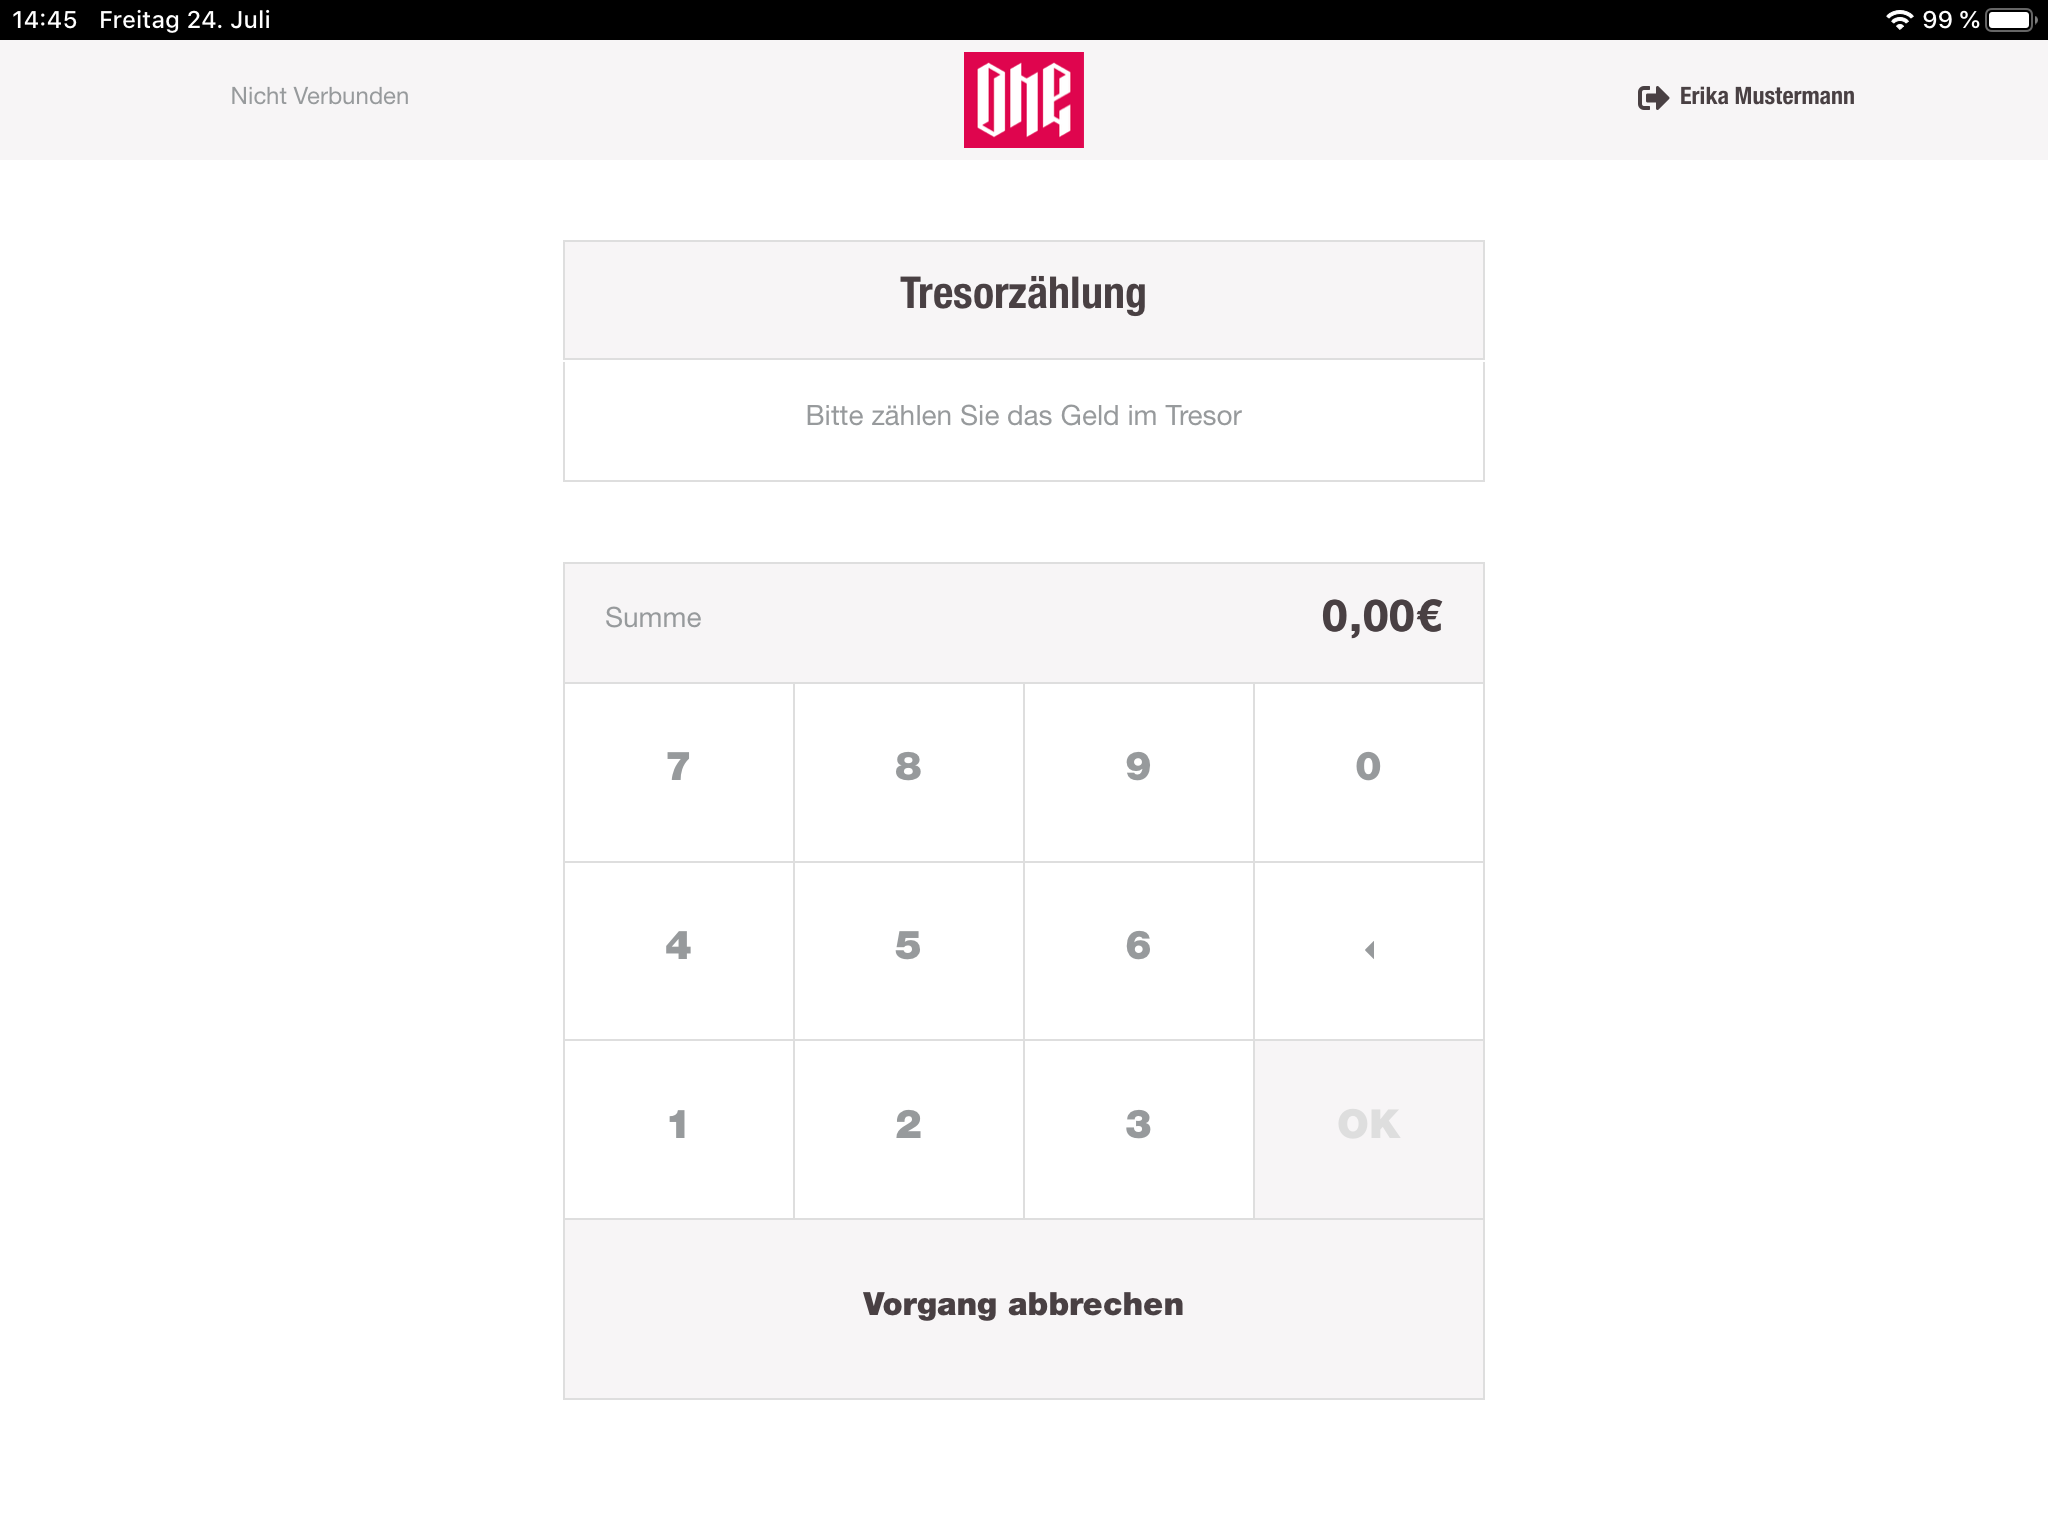
Count the vault
In this view the cashier has to provide the current amount which is inside of the vault from the store. Usually, they provide this information at the end of the working day.
When the provided amount does not match the amount counted in the cashbook-service the cashier will be informed about the mismatch, but not with the exact difference.
Now the cashier has the possibility to continue with the difference or recount and reenter the amount.
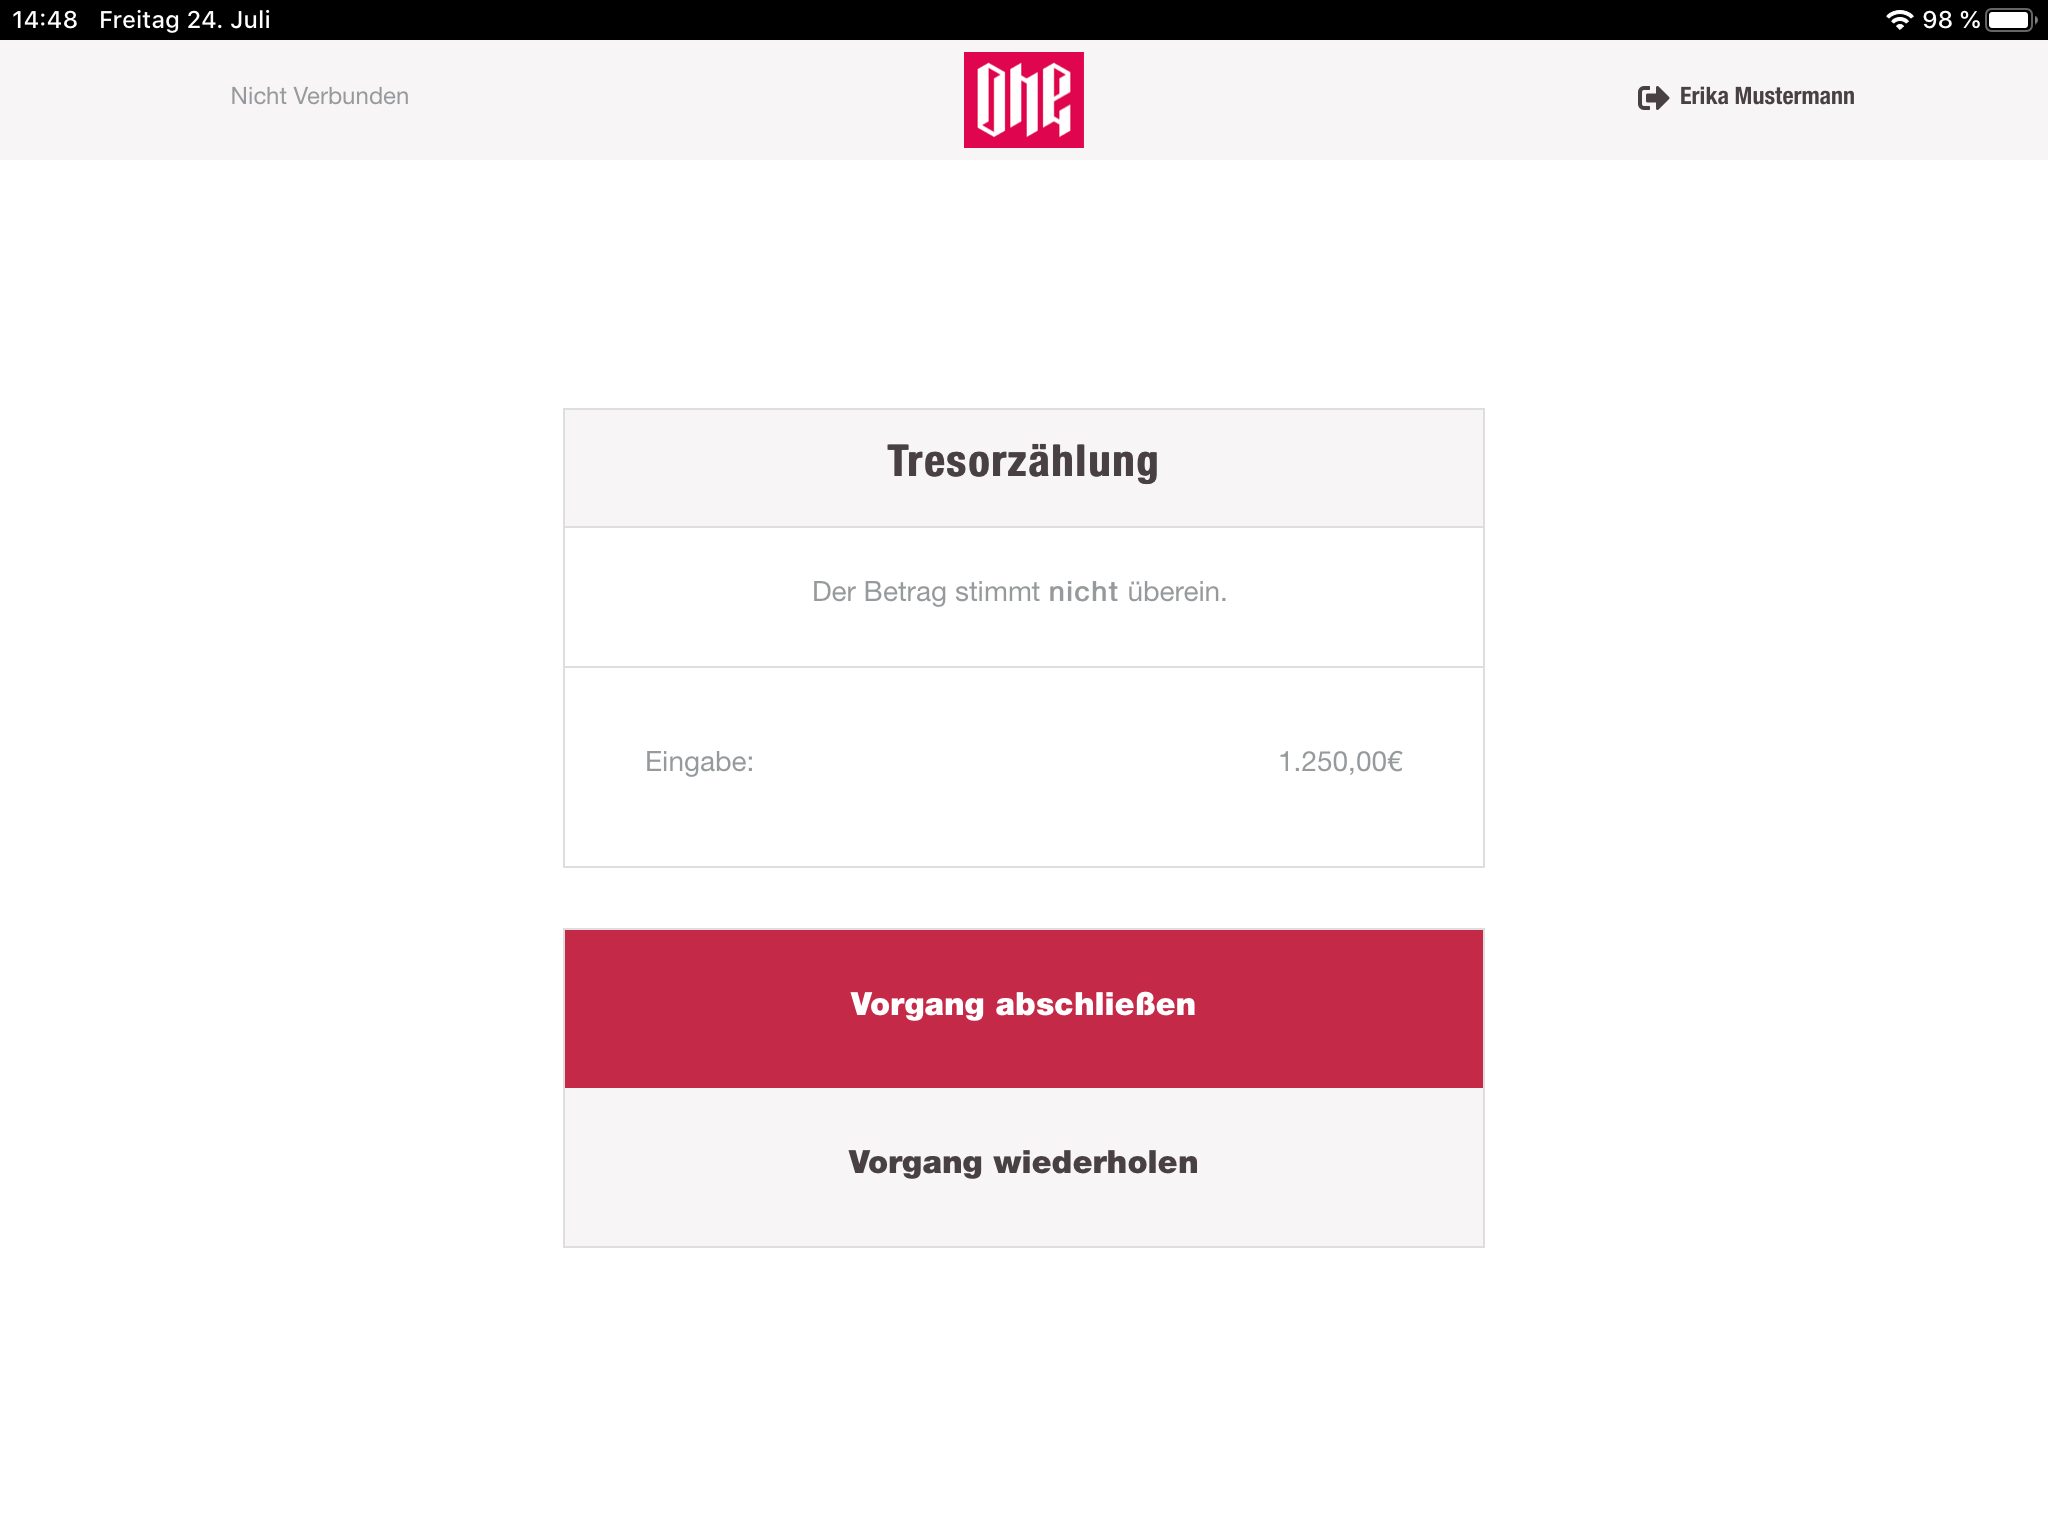
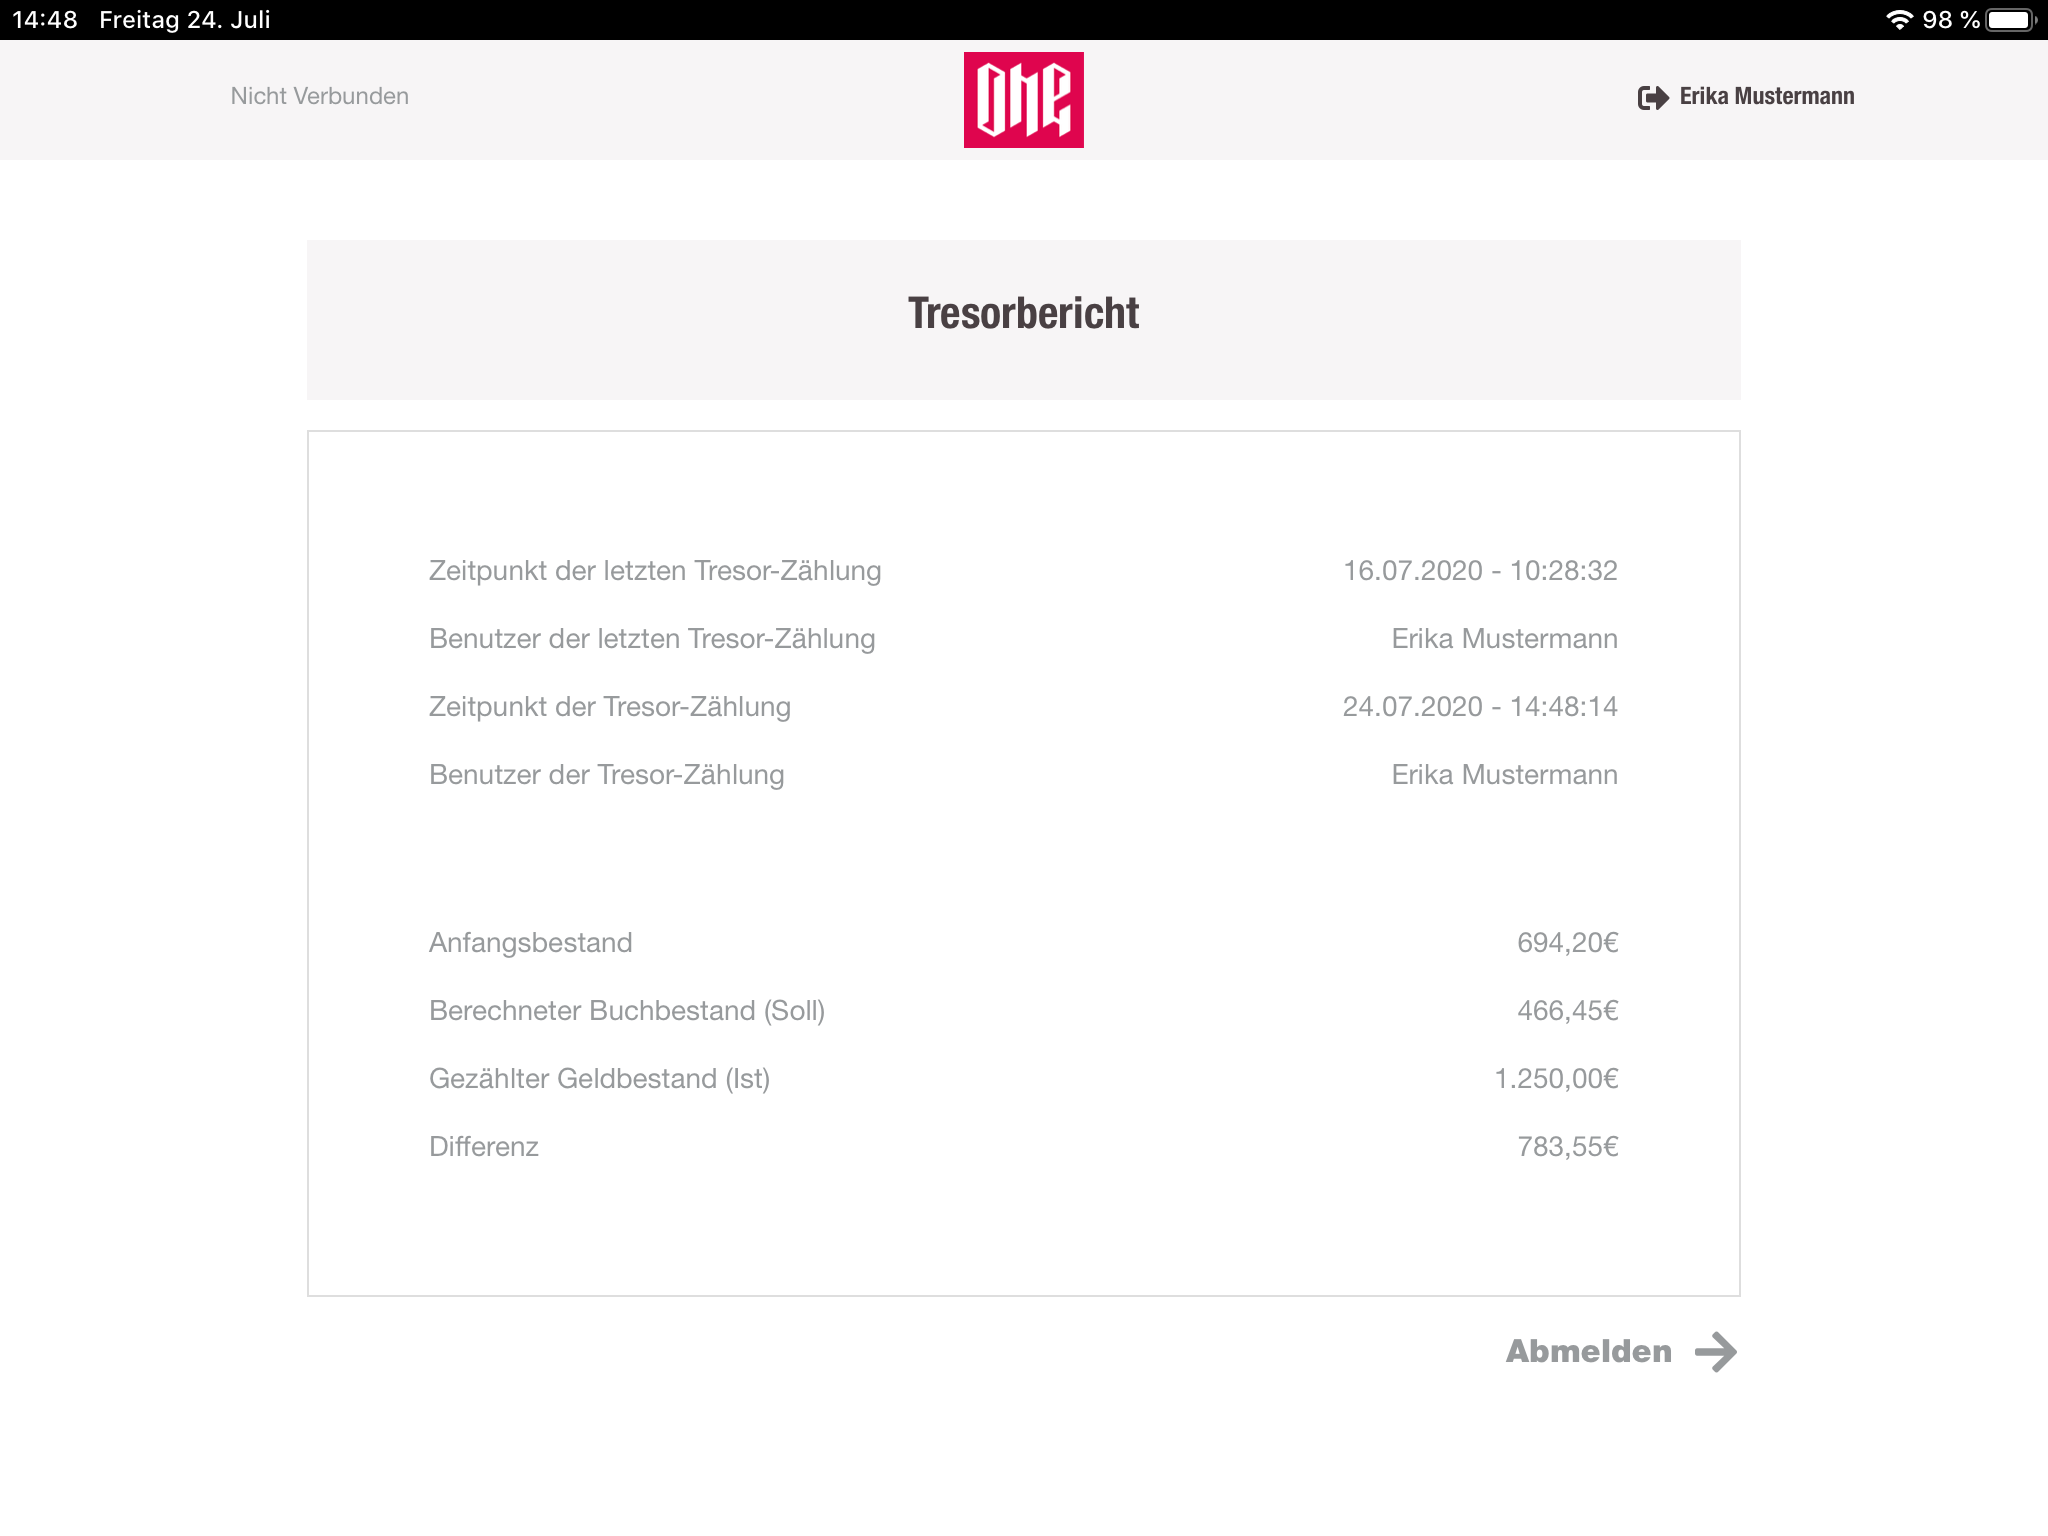
Once the counting process is done, the cashregister shows a report to the cashier. This report contains information about the last vault counting and the current one. Here the cashier also can see the difference if there is one. After the report the cashier can only log out of the application.
Close settlement
At the end of a day the chashier has to close the current settlement. In this view the cashier can see all settlement of the entered store which are in the COUNT state. The cashier can select any of those and proceed with the entry of the amount.
Reports
Initially, the cashier again sees a list of options to select. Each entry contains a different kind of report. The options are:
- Journal
- Cashregister report
- Financial bookings
- Daily report

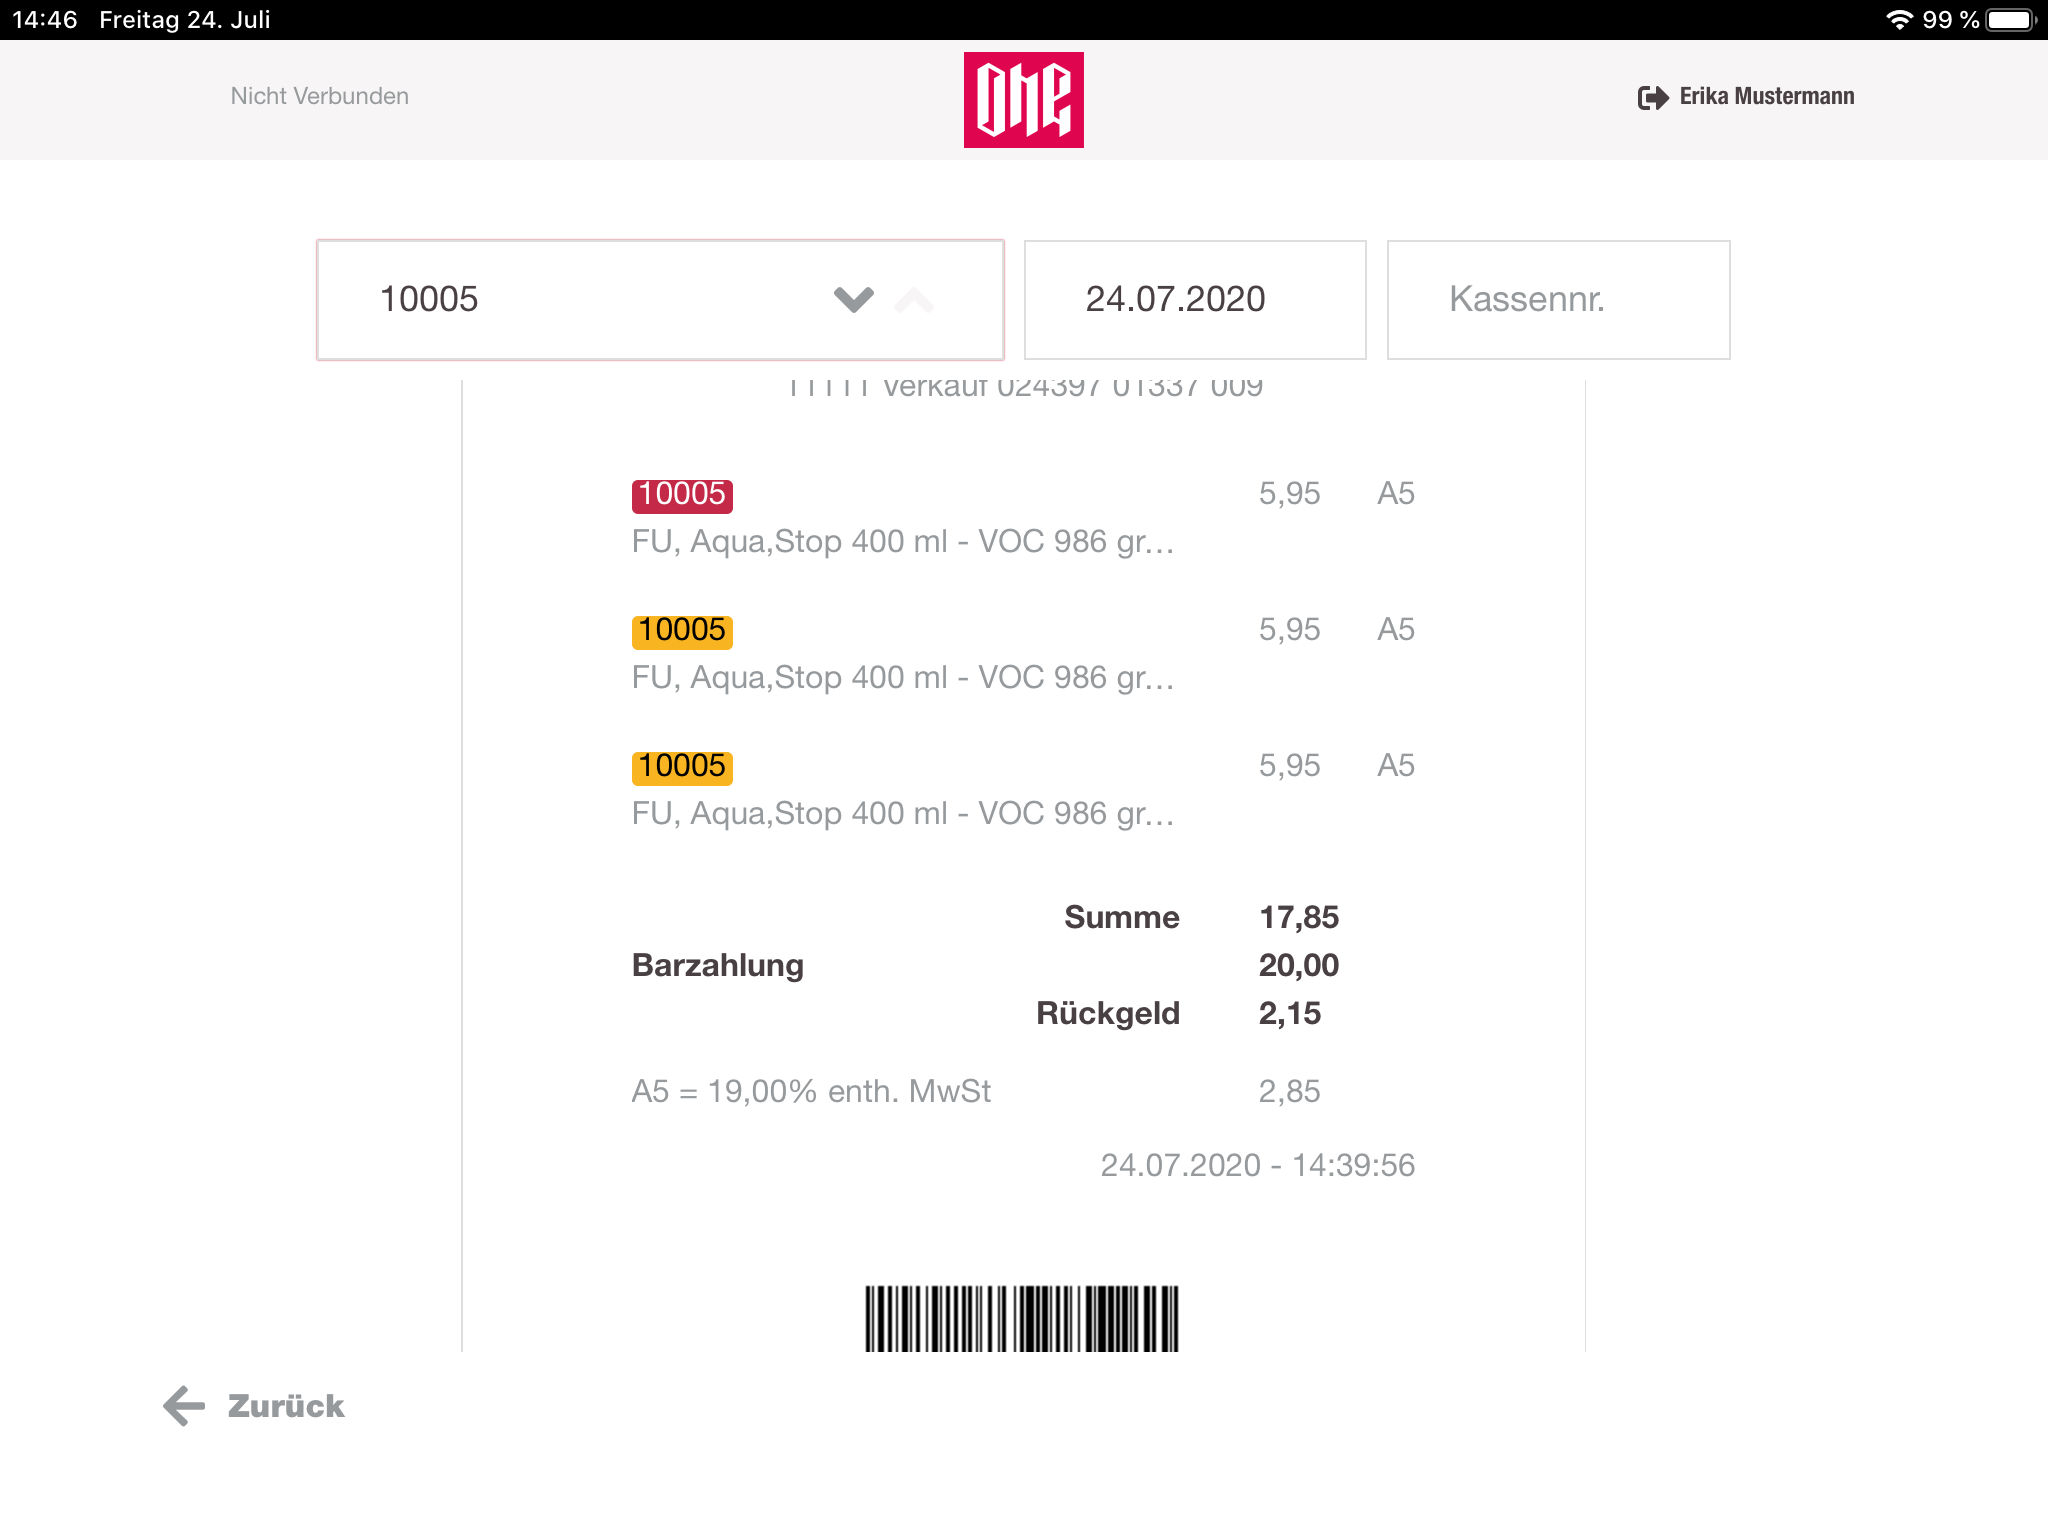
Journal
The journal contains a list of receipt, based on the selected day. Displayed receipts are similar to the printed receipts. They contain information about the transaction, items, payments, date, etc.
By default the current date is selected. When the cashier selects the date input-field, a calendar pops up and the cashier can select any date in past until 2 years. Also, the cashier can filter the list of receipts by the stationId.
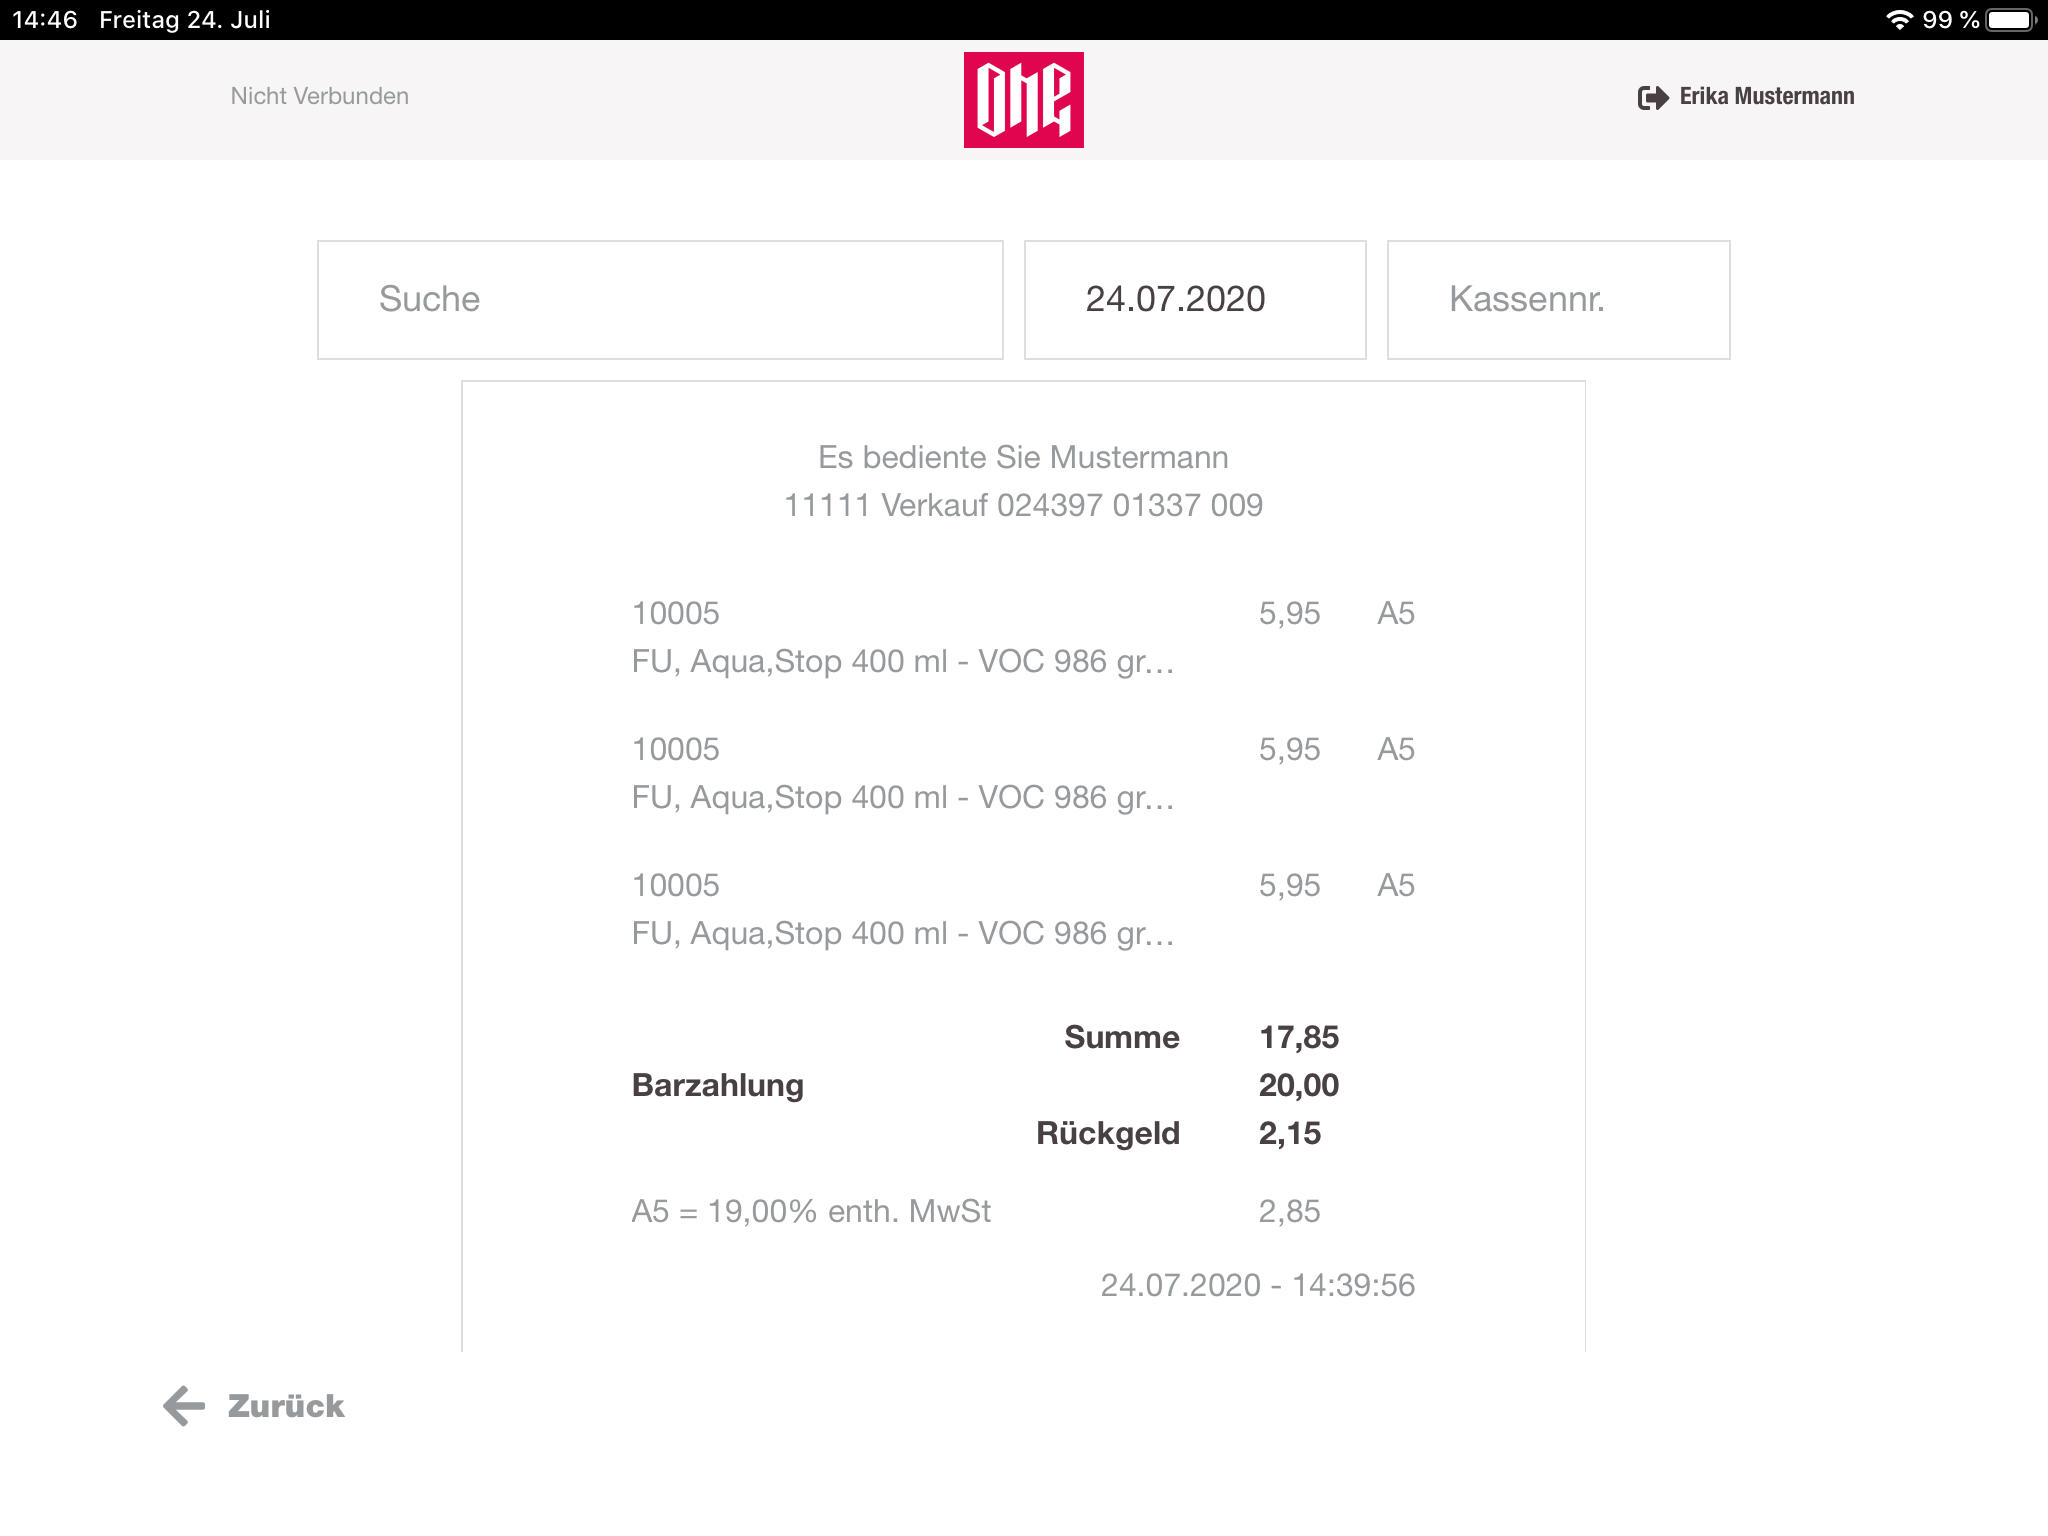
Another feature in the journal view is the search. A cashier can search in the list of receipts of the selected date by any character. For example the cashier can search for a SKU of an item. Matches will be highlighted in the view.
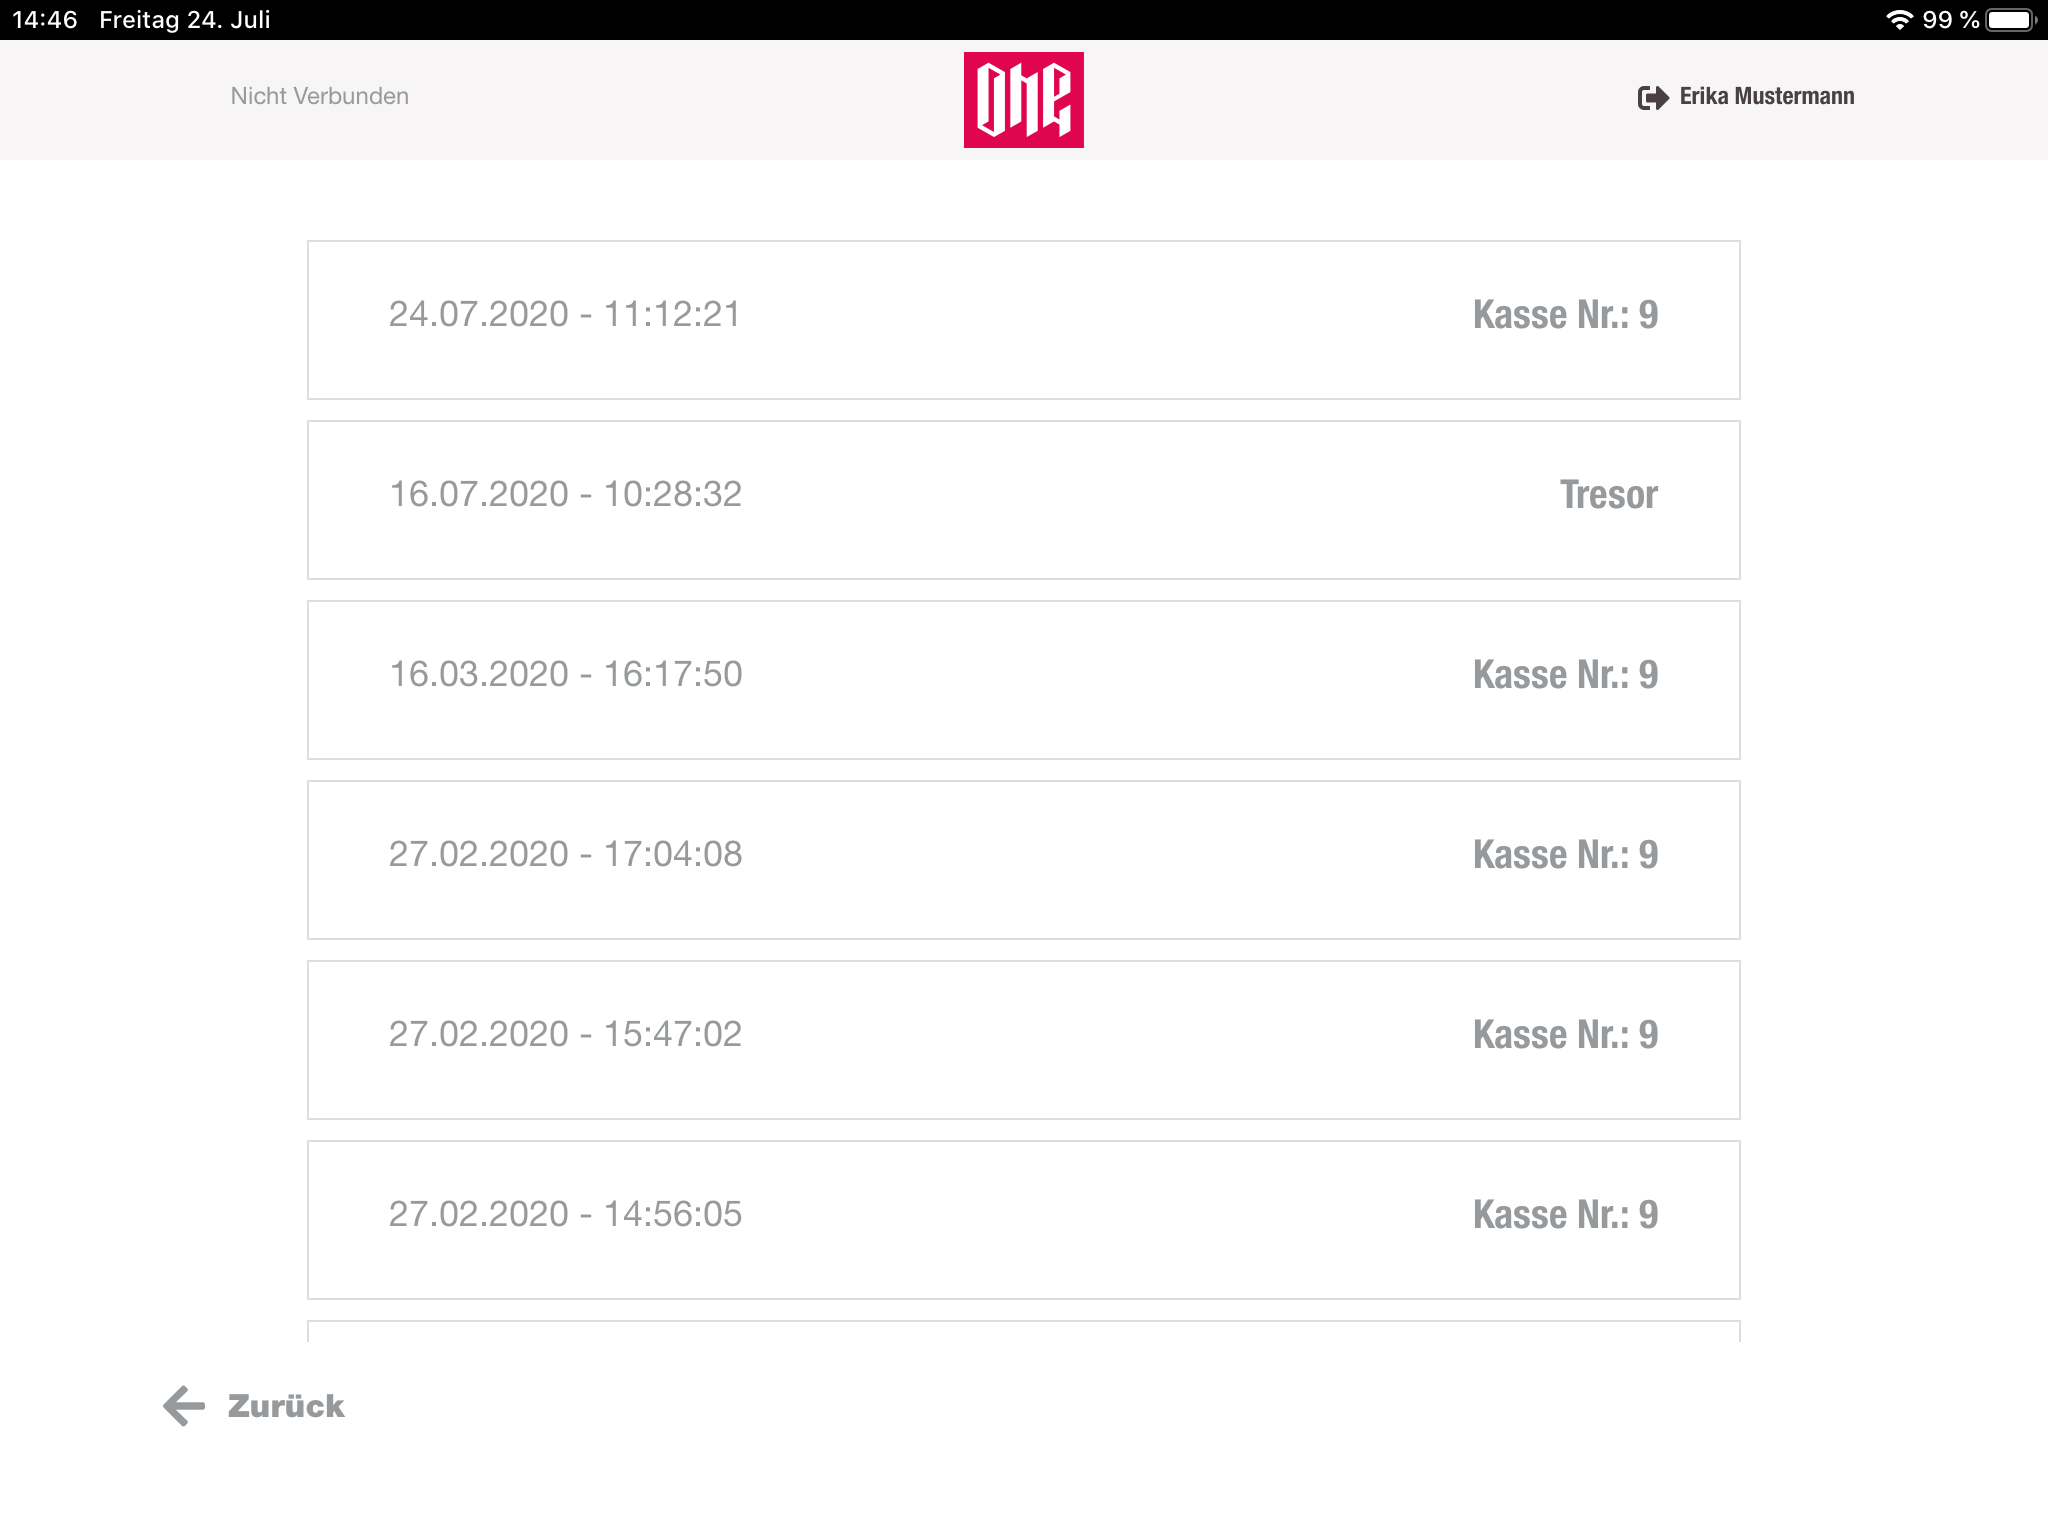
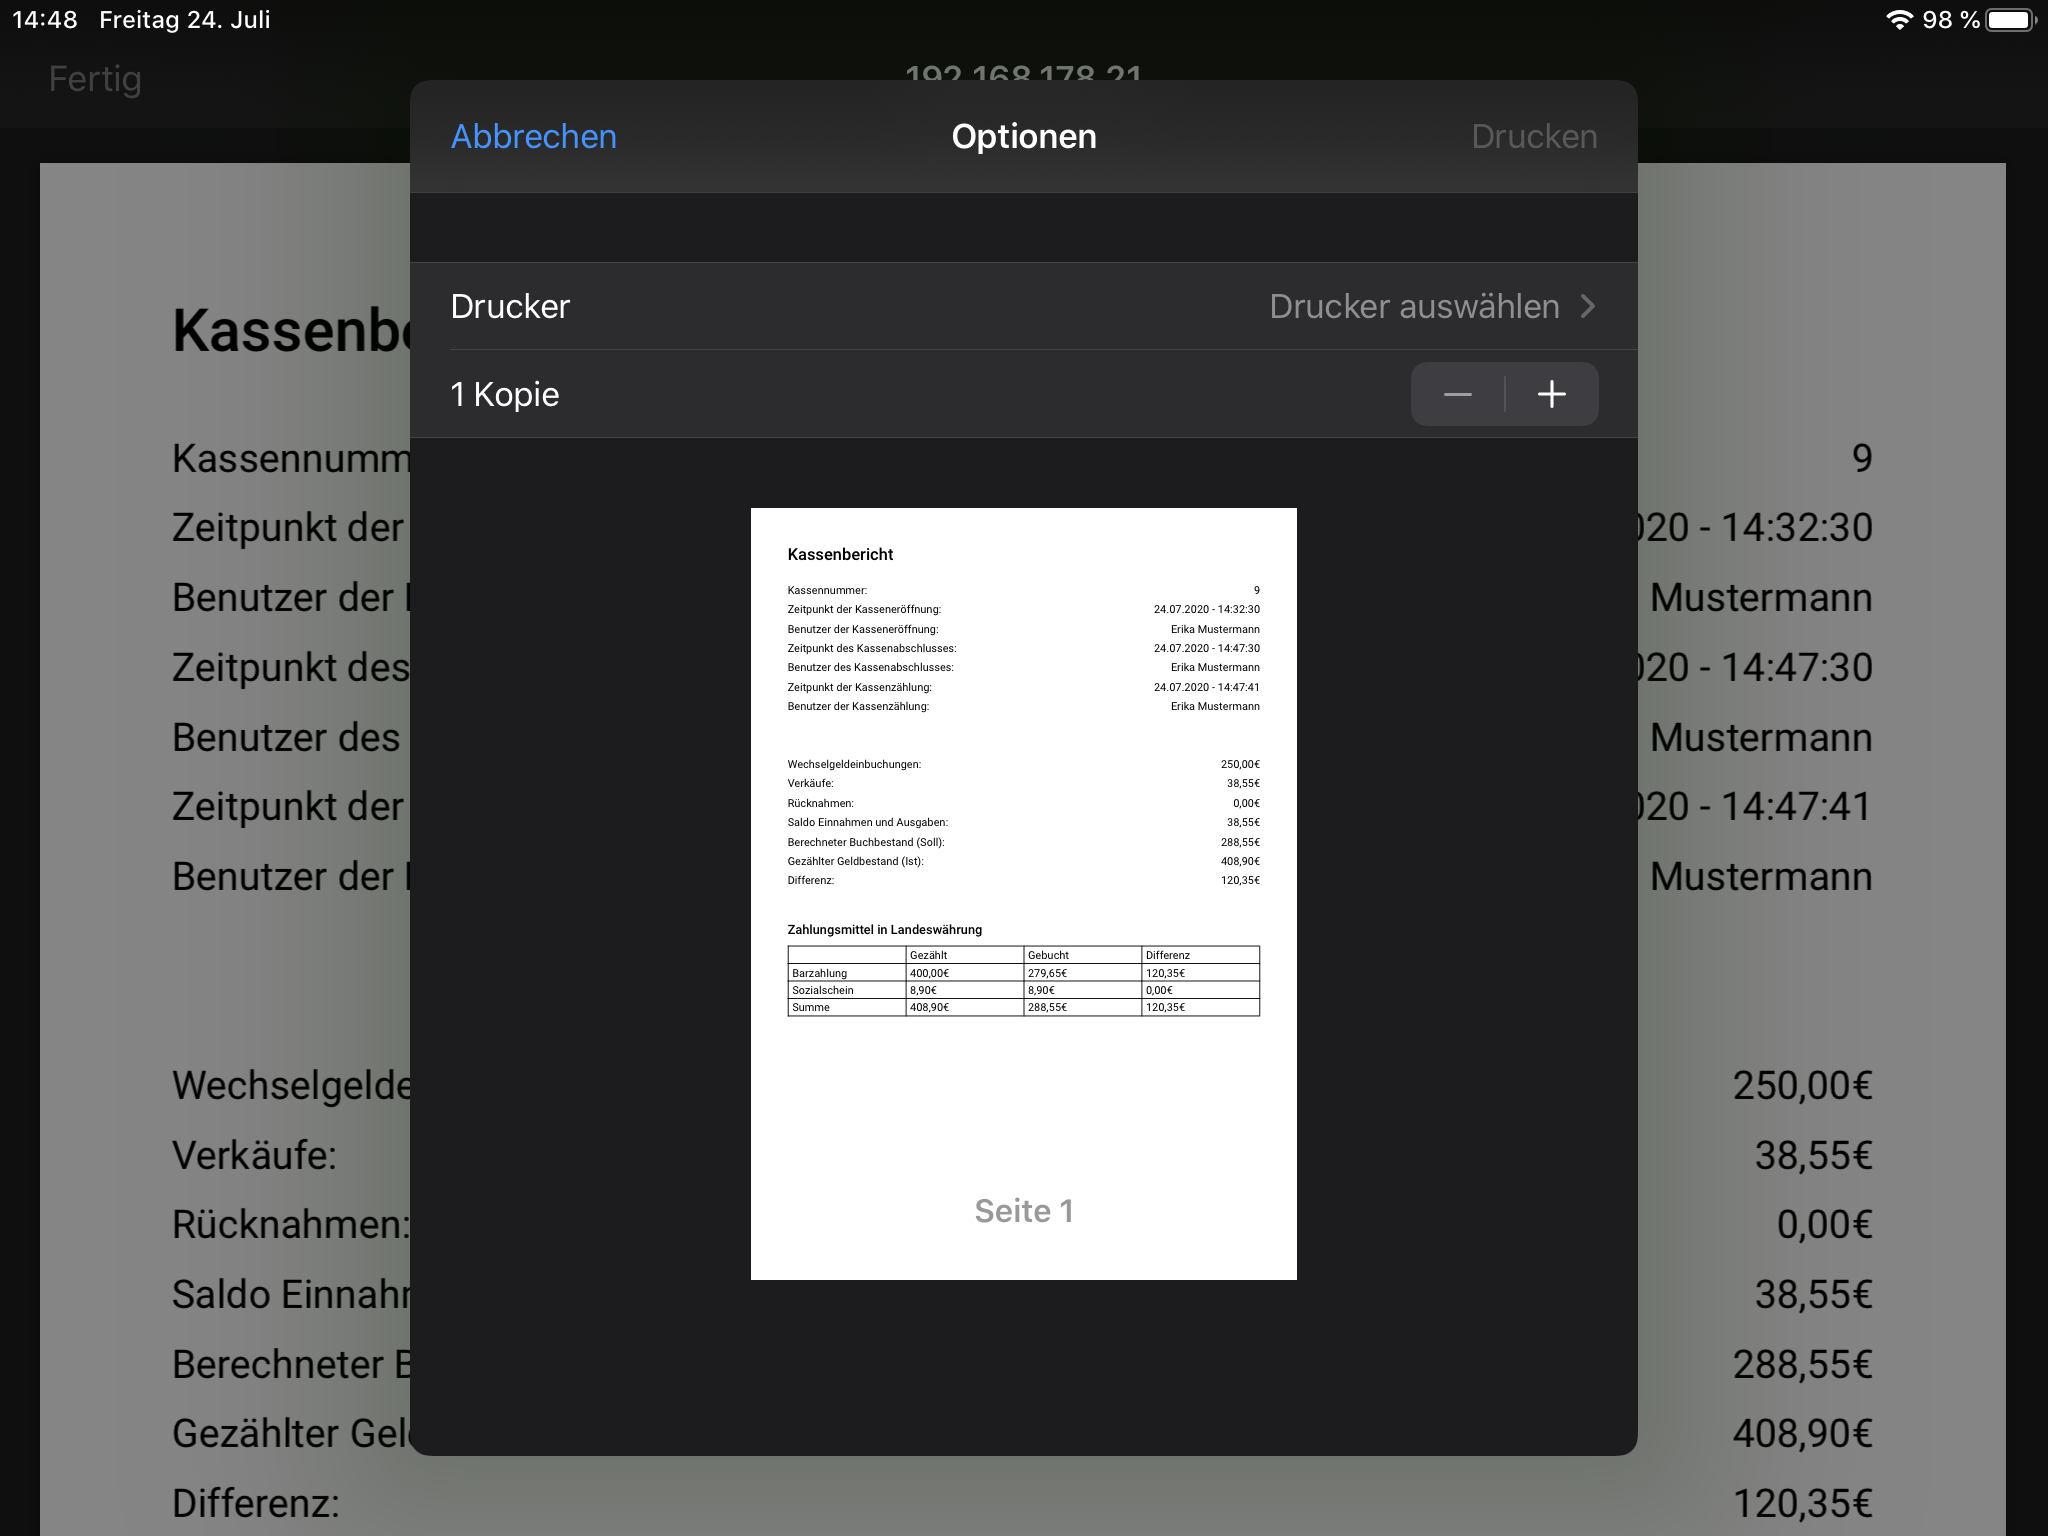
Cashregister report
Here the cashier have the possibility to look up reports of each settlement, done for the selected store. This list also contains the settlement reports for the vault.
When a report is selected, the user sees all information for the selected settlement. For example timestamps related to the settlement, money movements, differences, supplies & disposals, type of payment-methods, etc.
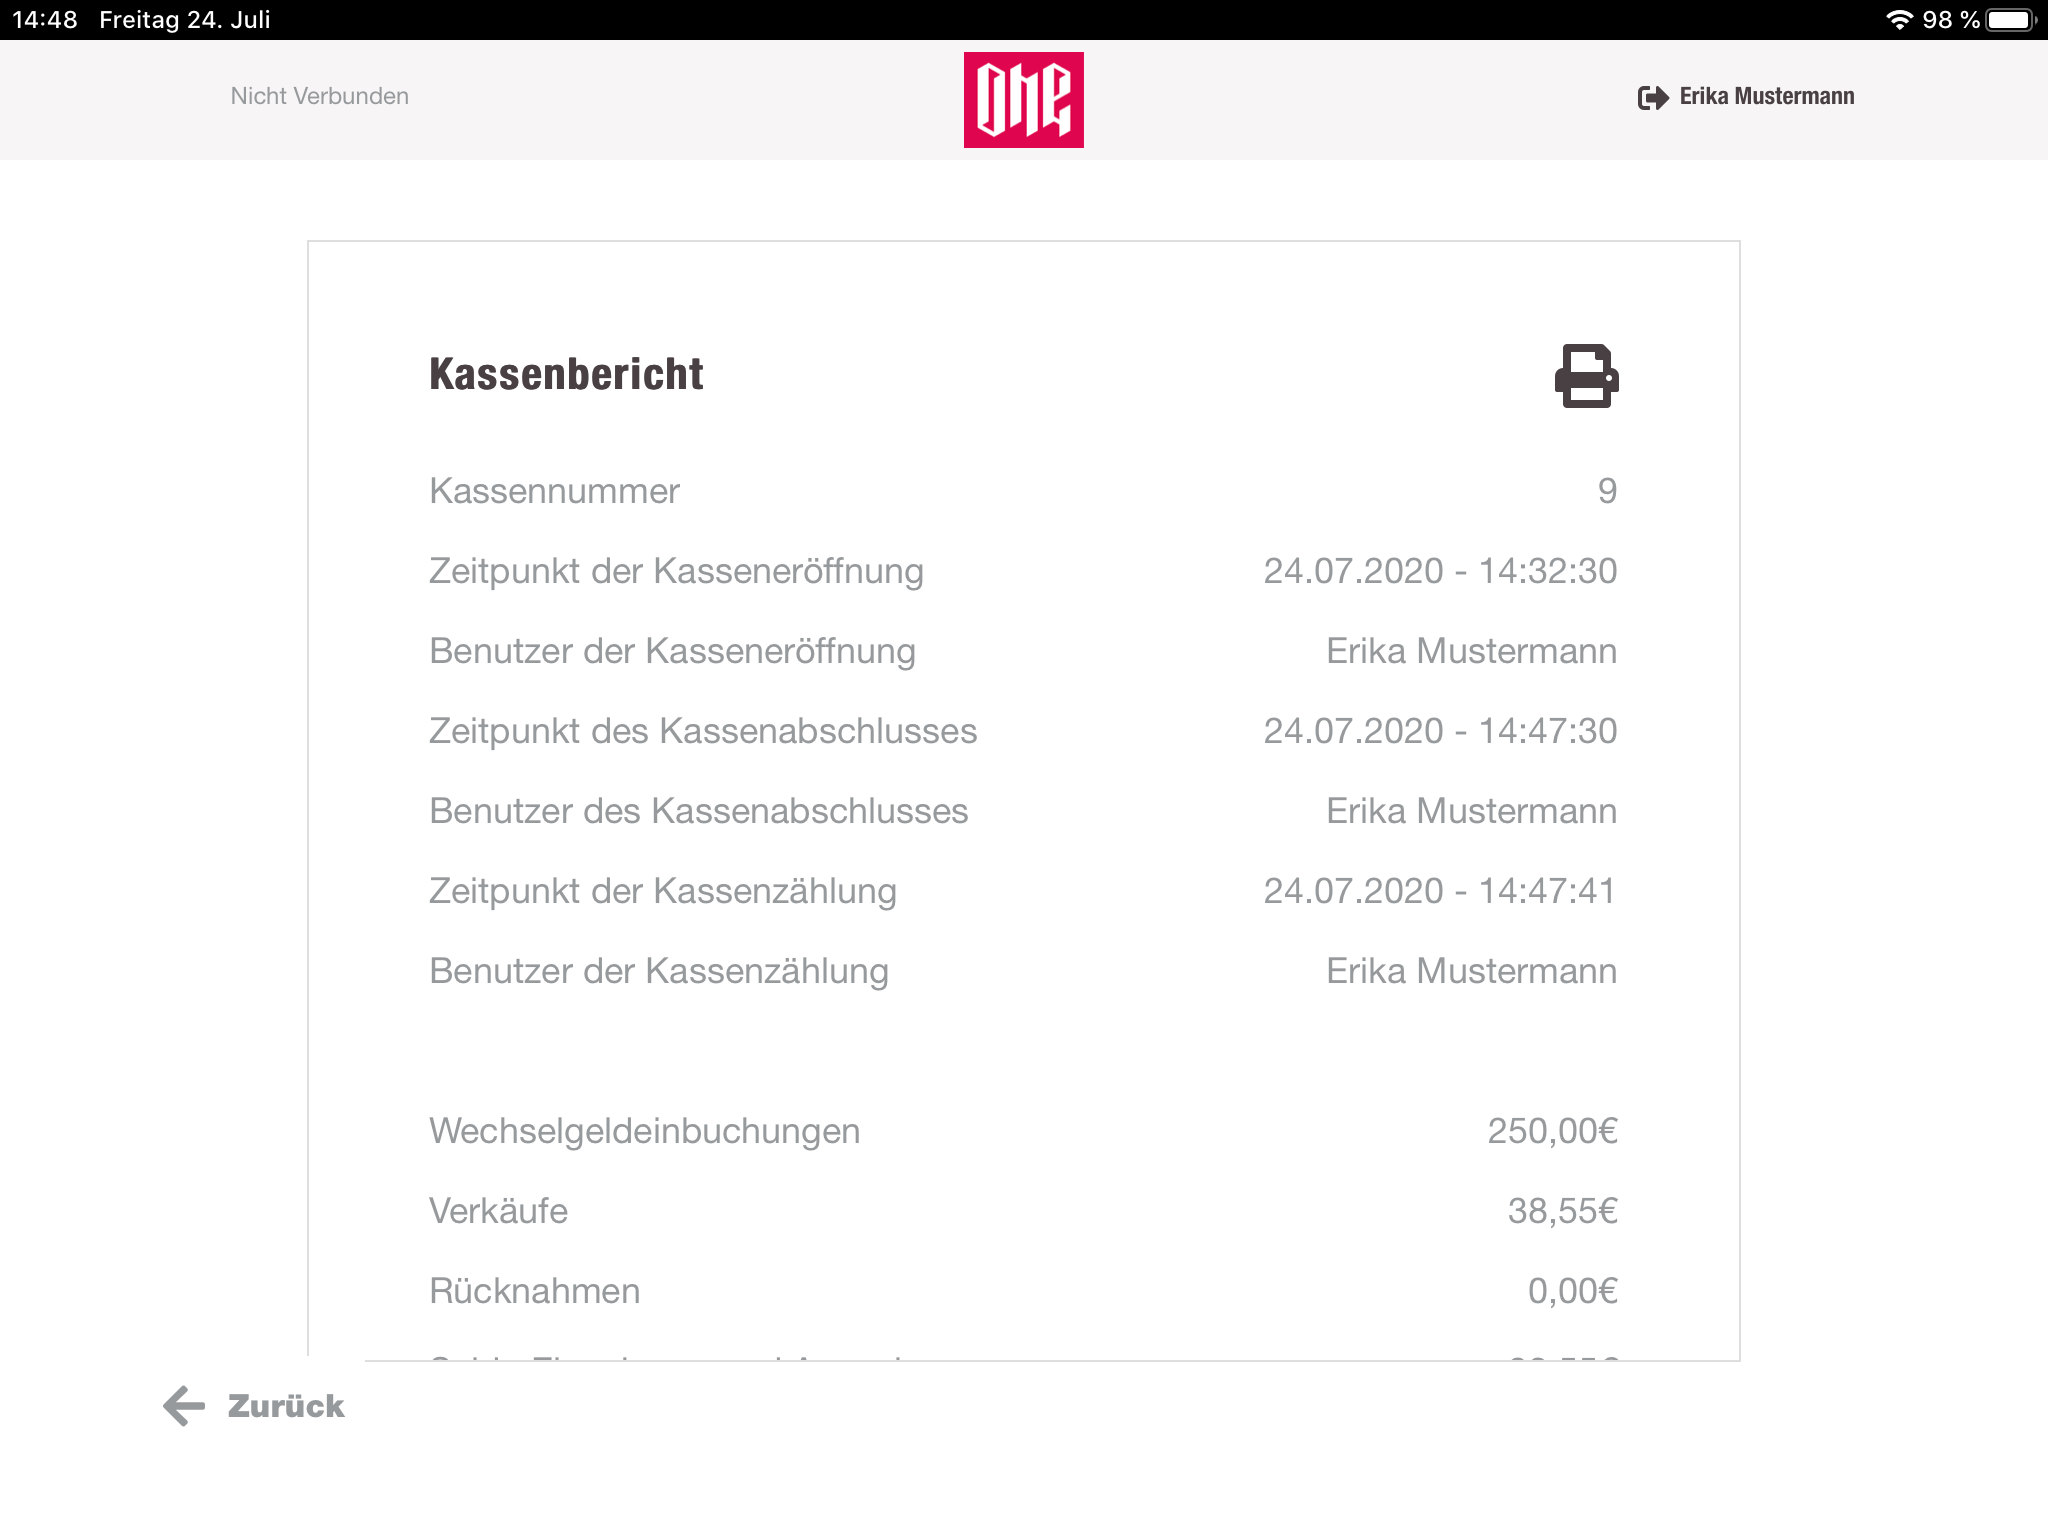
Besides that, the cashier has the possibility to print this report. Since iOS PWAs currently do not support the print API from the browser, a programmatic call to print this sheet is done after 5 sec. The cashier will be prompted by the default iOS print menu.
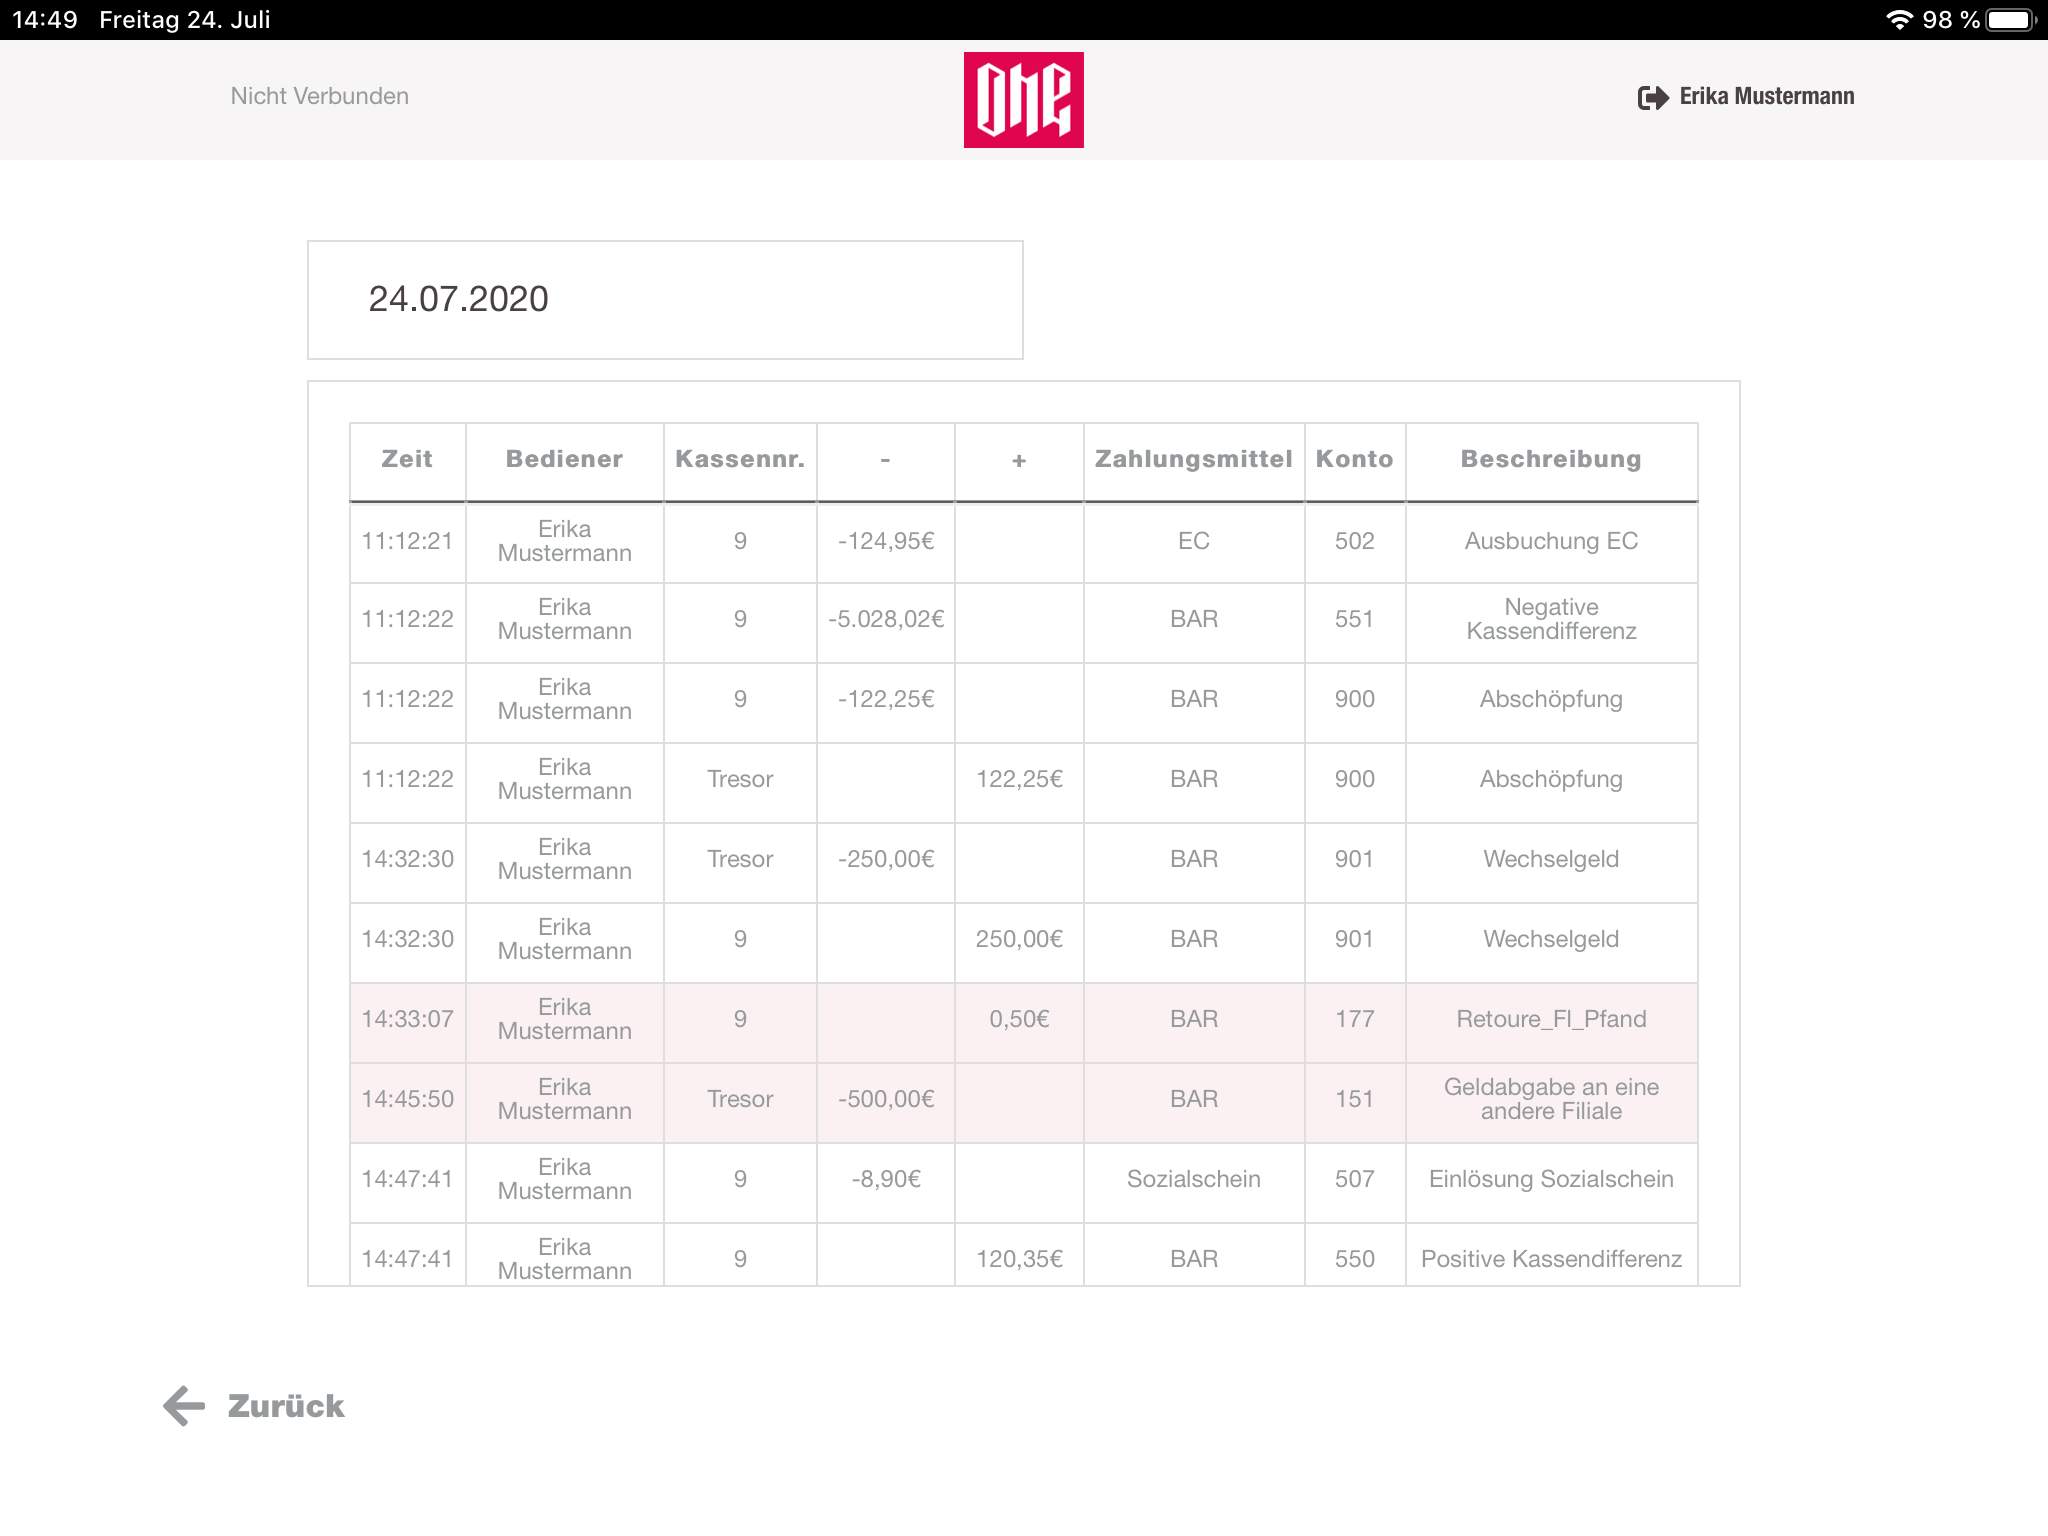
Financial bookings
The financial bookings are showing all money movements for a selected date. By default again the current day is selected. The rows of the table have a colored background, to identify specific money movement types. A legend of those colors is shown, when the cashier clicks on the info button.
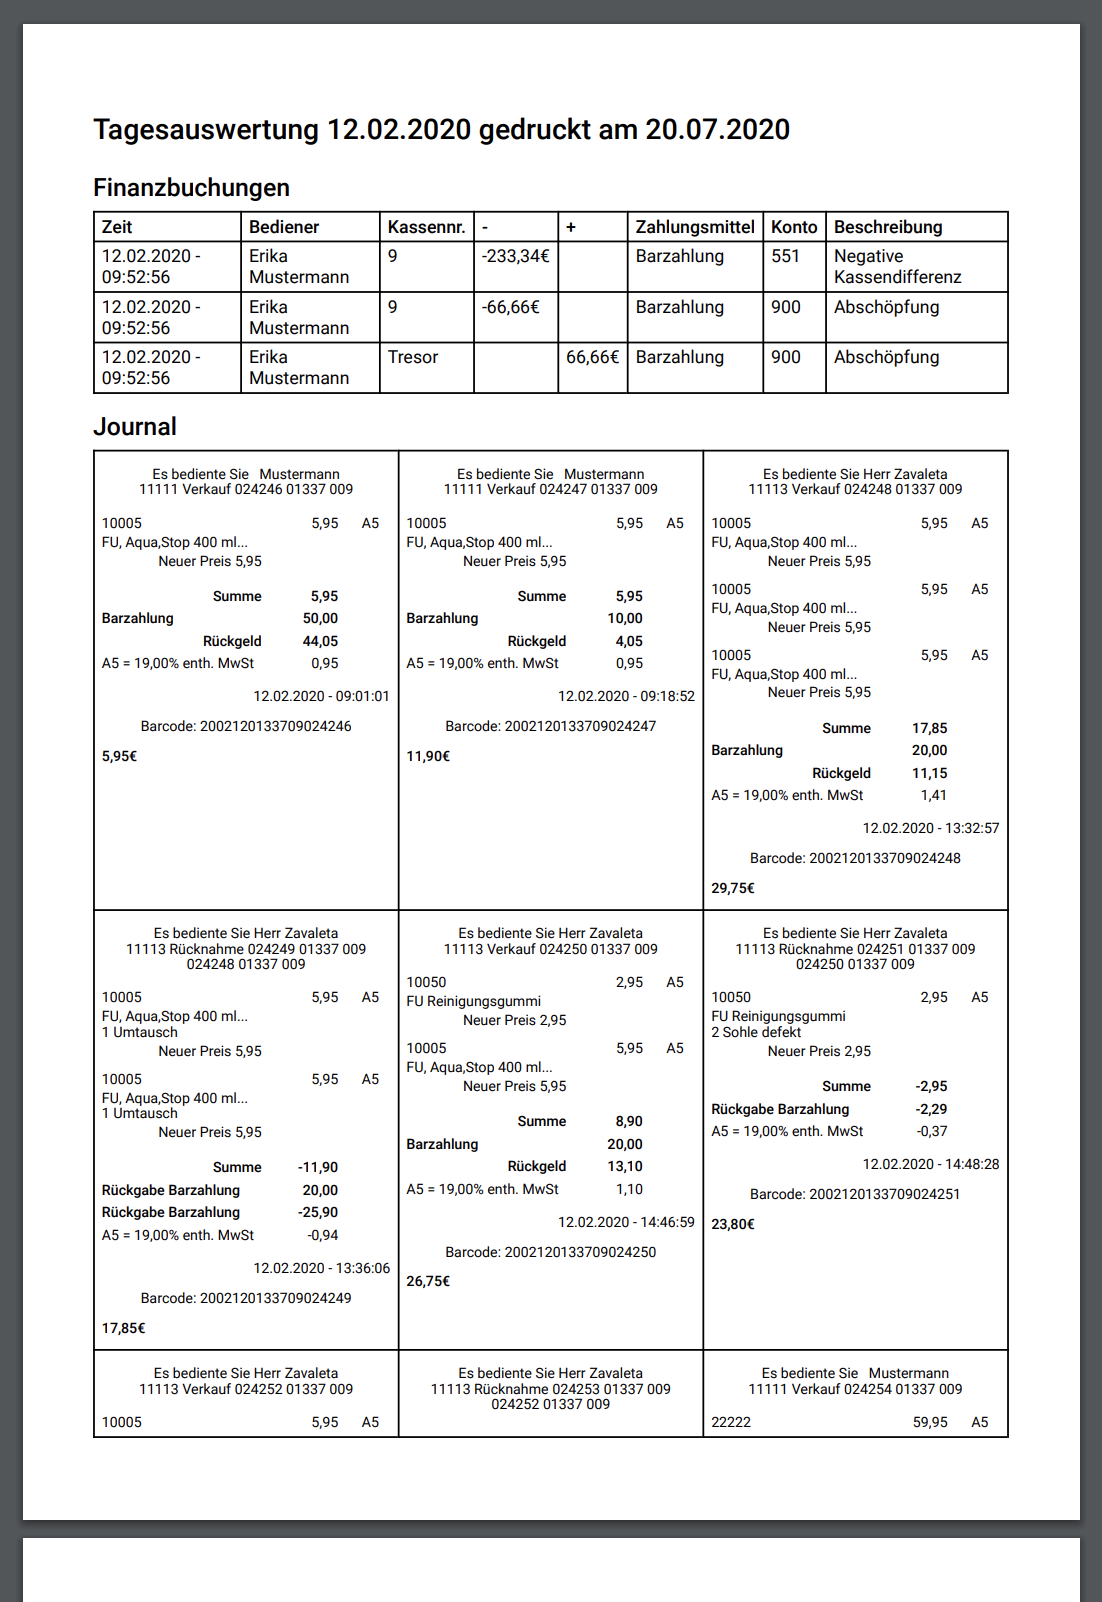
Daily report
Daily reports are a printed version of all money movements for a selected date. The report is build up with the financial bookings and all receipts of that day. This printing option behaves the same way like the cashregister report.
Use cashregister
With this selection the cashier starts his usual working process for selling / refunding items, applying discounts, selling giftcards etc.
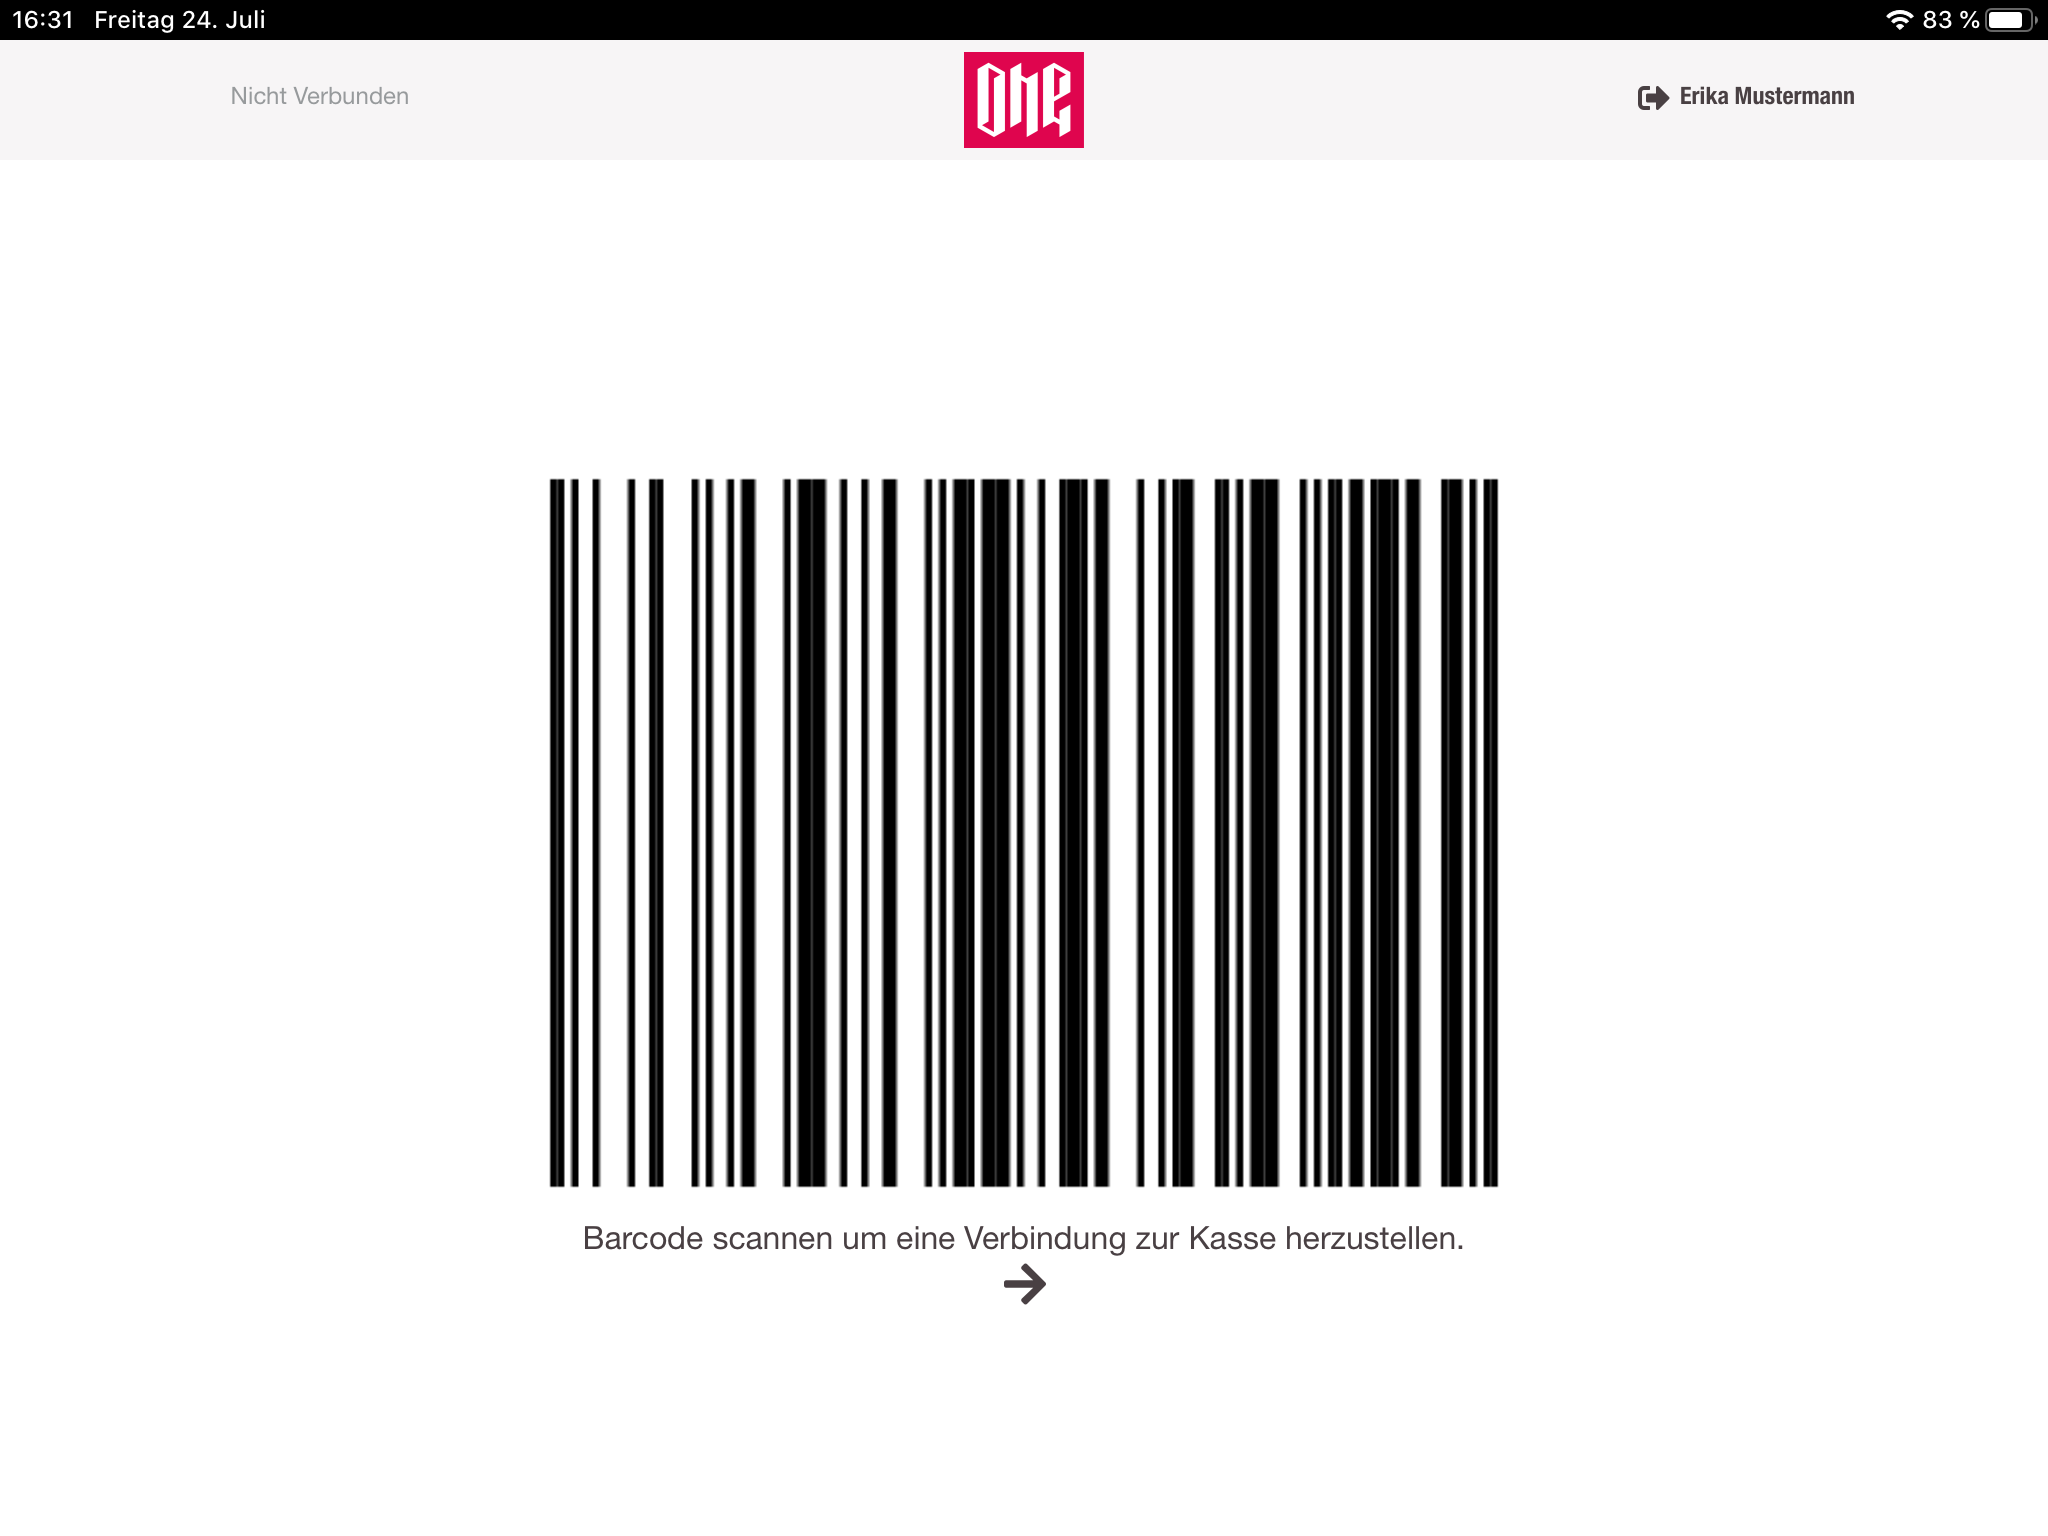
When clicking on "Use cashregister" the app initializes the pairing process between client application and devicehub. In this pairing process the cashregister app is sending a random hash to the hubregistry-service and will wait 30 secs for a pairing attempt. This hash is also displayed as a barcode on the cashregister application. To pair a devicehub with this application the cashier has to scan the barcode with the hand scanner from a devicehub. After the scan, the devicehub is also sending a request to the hubregistry-service with that scanned hashcode and his IP address. The hubregistry-service is now comparing that incoming hash with all hashes which are currently waiting for a pairing. On a match the hubregistry-service is responding to the client with the devicehub IP address. With this response the cashregister app can now build up a WebSocket connection to the devicehub and is able to communicate with the devicehub application.
Once the cashier is paired up to a device, the status in the navigation bar changes from "Not connected" to "Connected".
Sidebar
The sidebar can be used to navigate between different pages. Those pages are:
- Cart view
- Misc. incomes and expenses
- Manage cash register (as explained above)
- Close settlement
Cart view
After a successful pairing process the cashier can see the main working view. Here the cashier can work with the cart, add items, remove items, apply and remove discounts any pay the cart. This view is split in three parts. On the left side there is the cart, which displays the current items from the cart, informations about discounts, payments and sum of the cart. The right side is again split into two parts. On the bottom is a numpad, to enter number based input manually without the hand scanner. On top the cashier will find a button group with different kind of options, based on the current state of the cart.
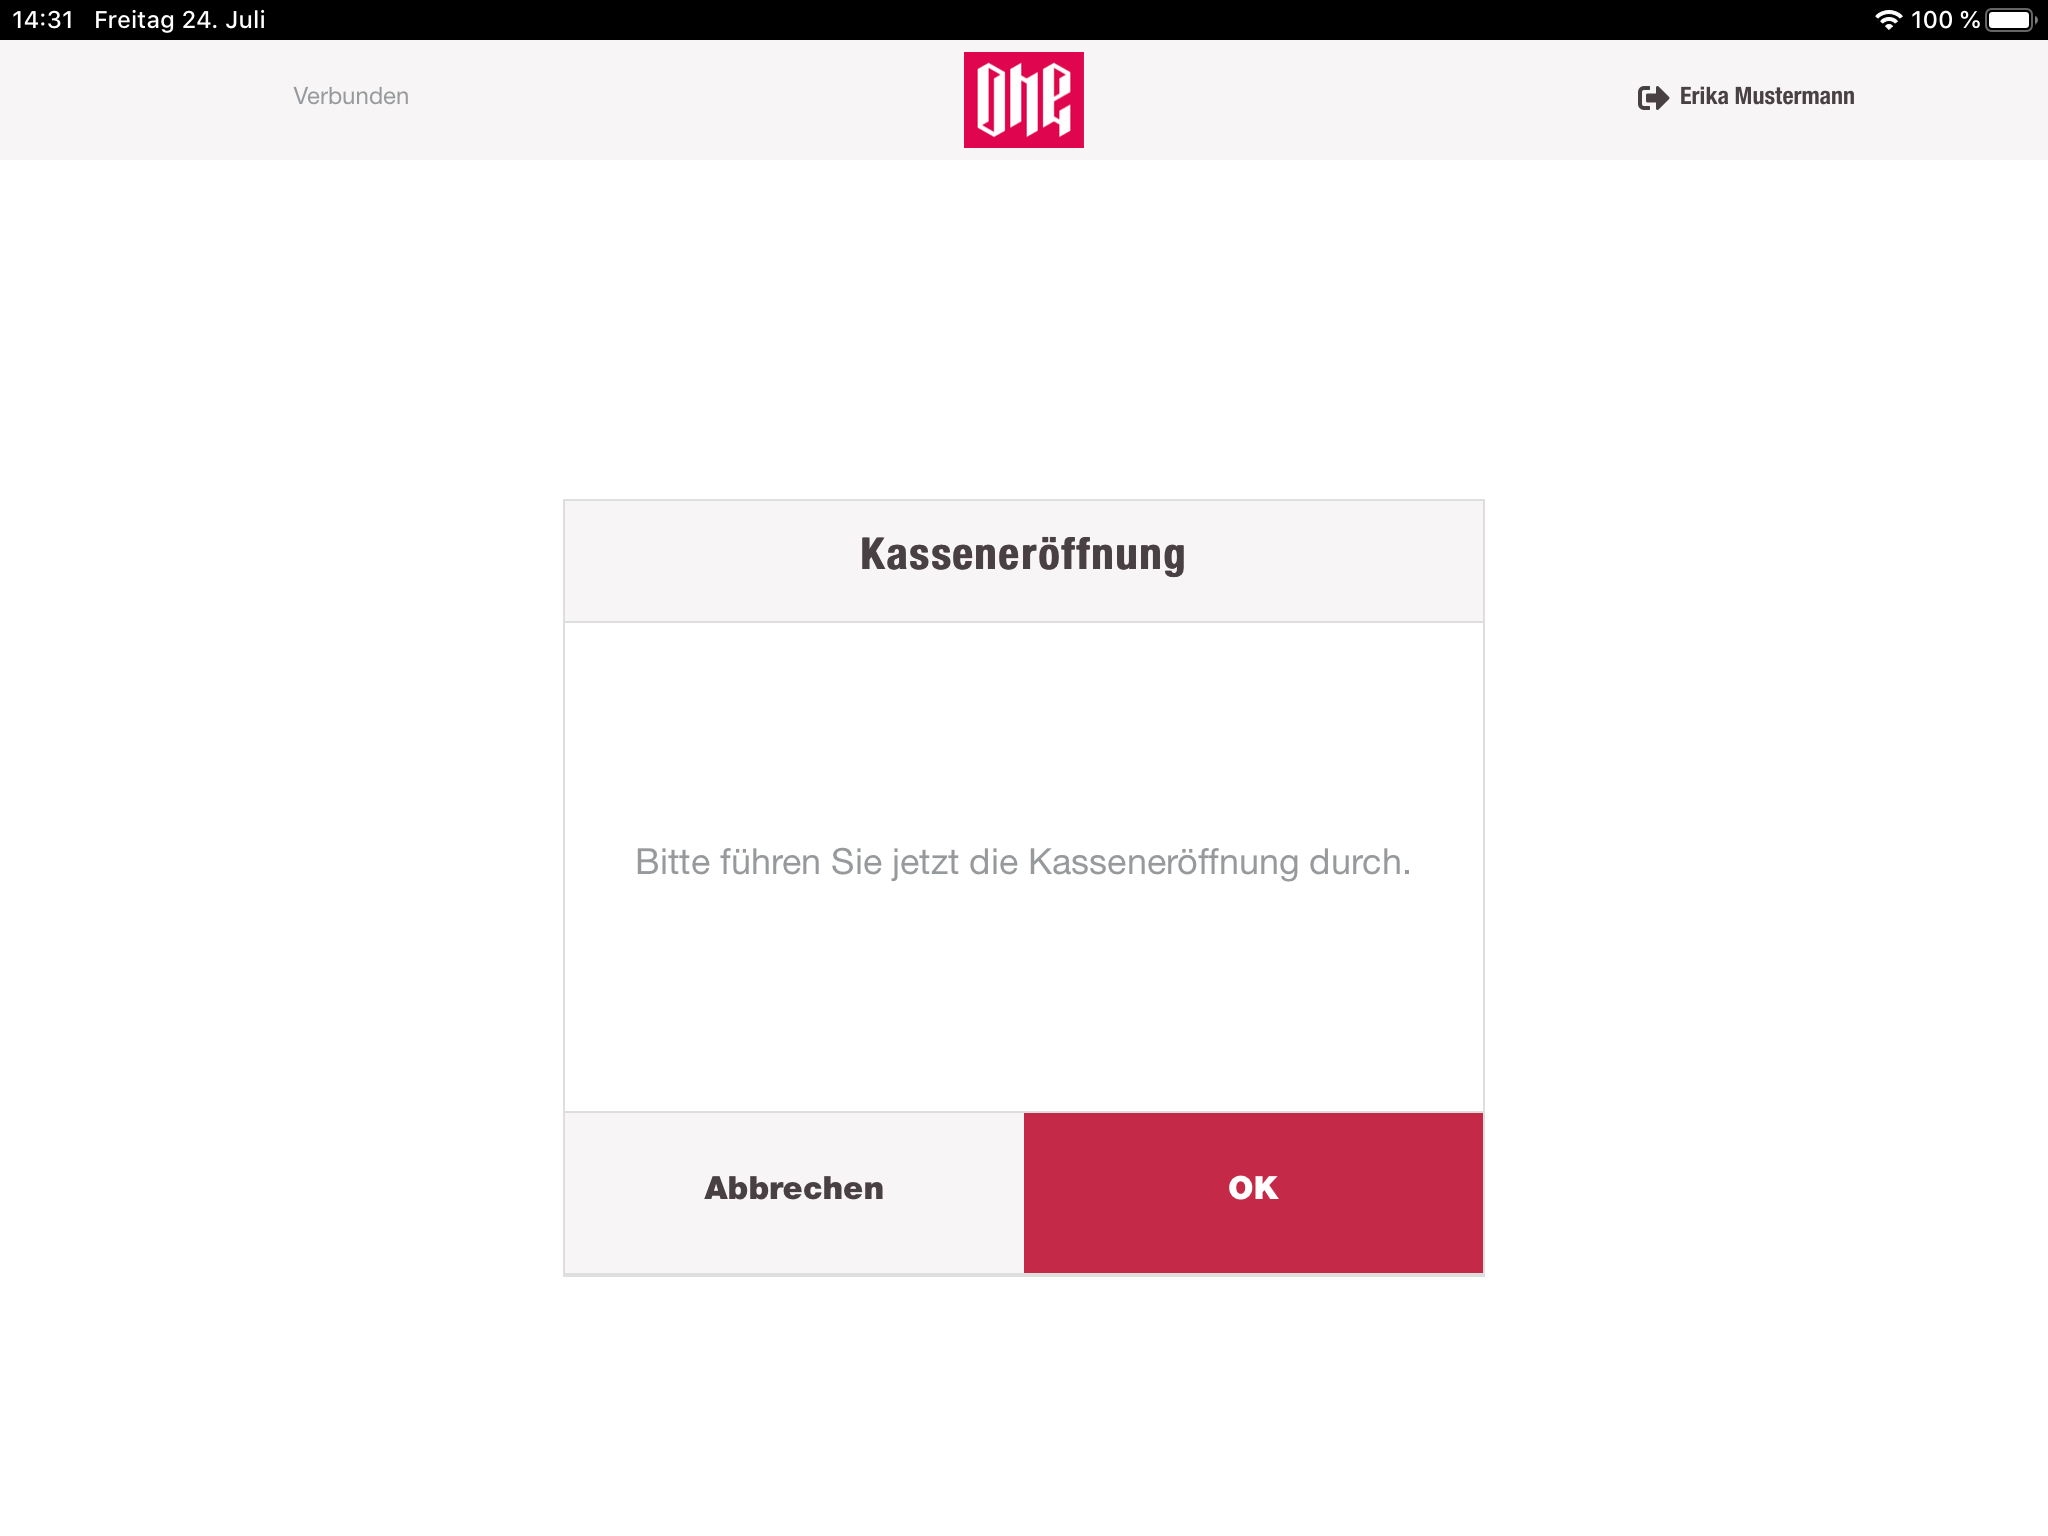
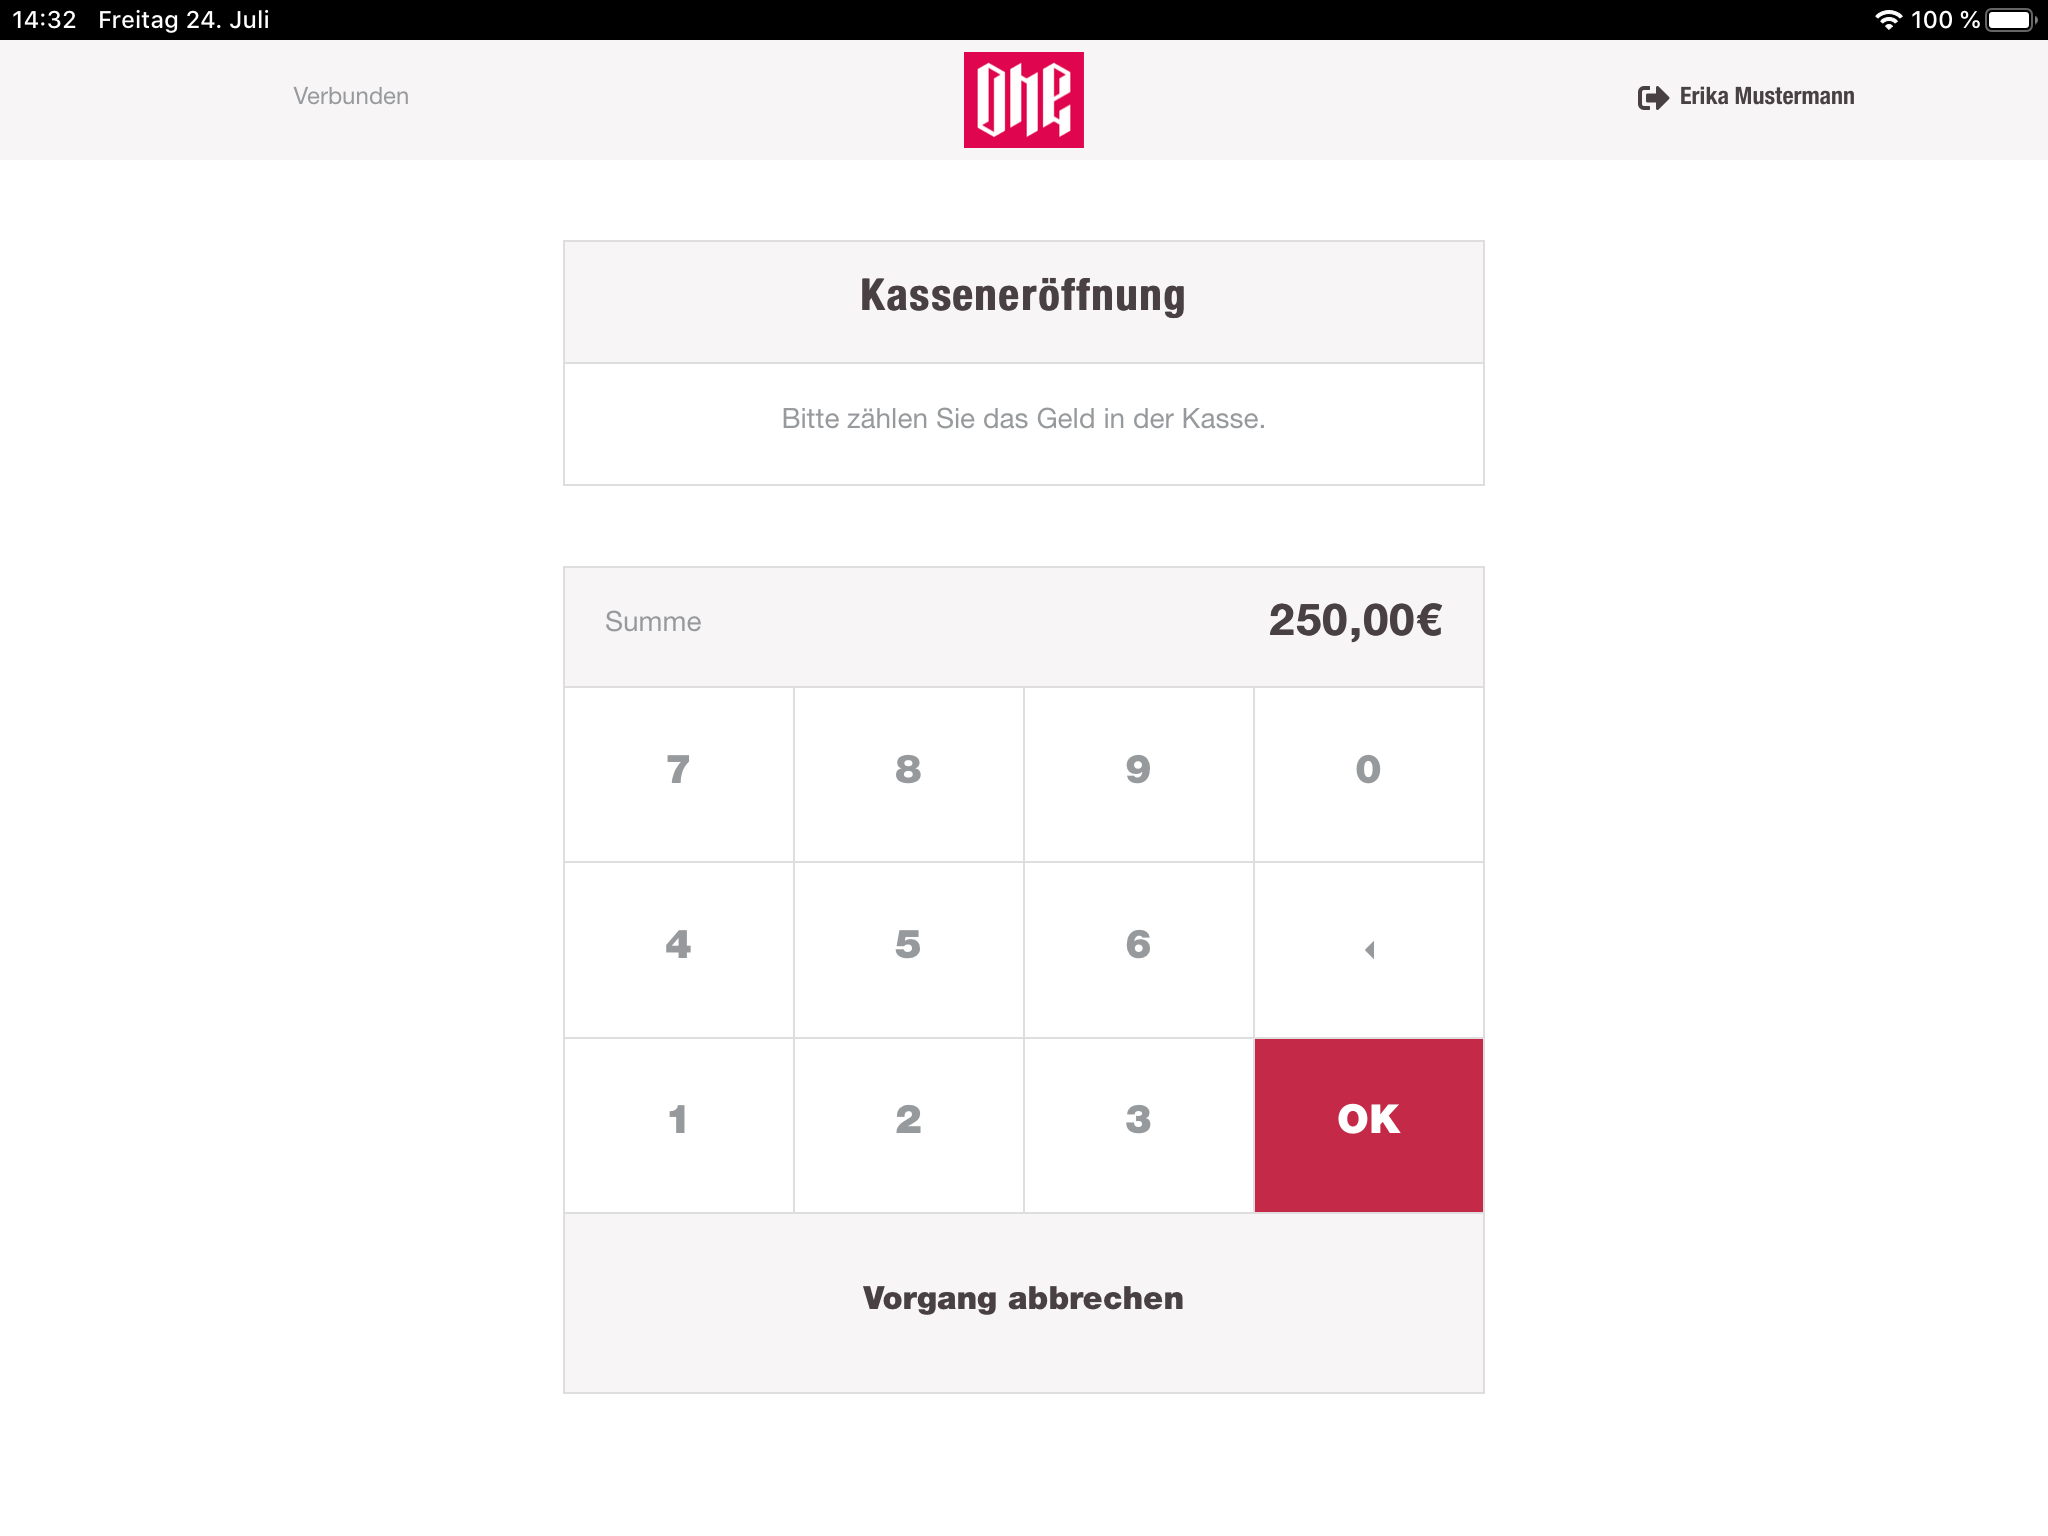
Open settlement
If there is no existing settlement for the current station, the cashier will be prompted by the app to open a new settlement. For that the drawer opens and the cashier has to include the money, which has to be counted before. After including the money, the cashier has to enter the initial amount of that settlement. Now the cashregister app will navigate to the cart view.
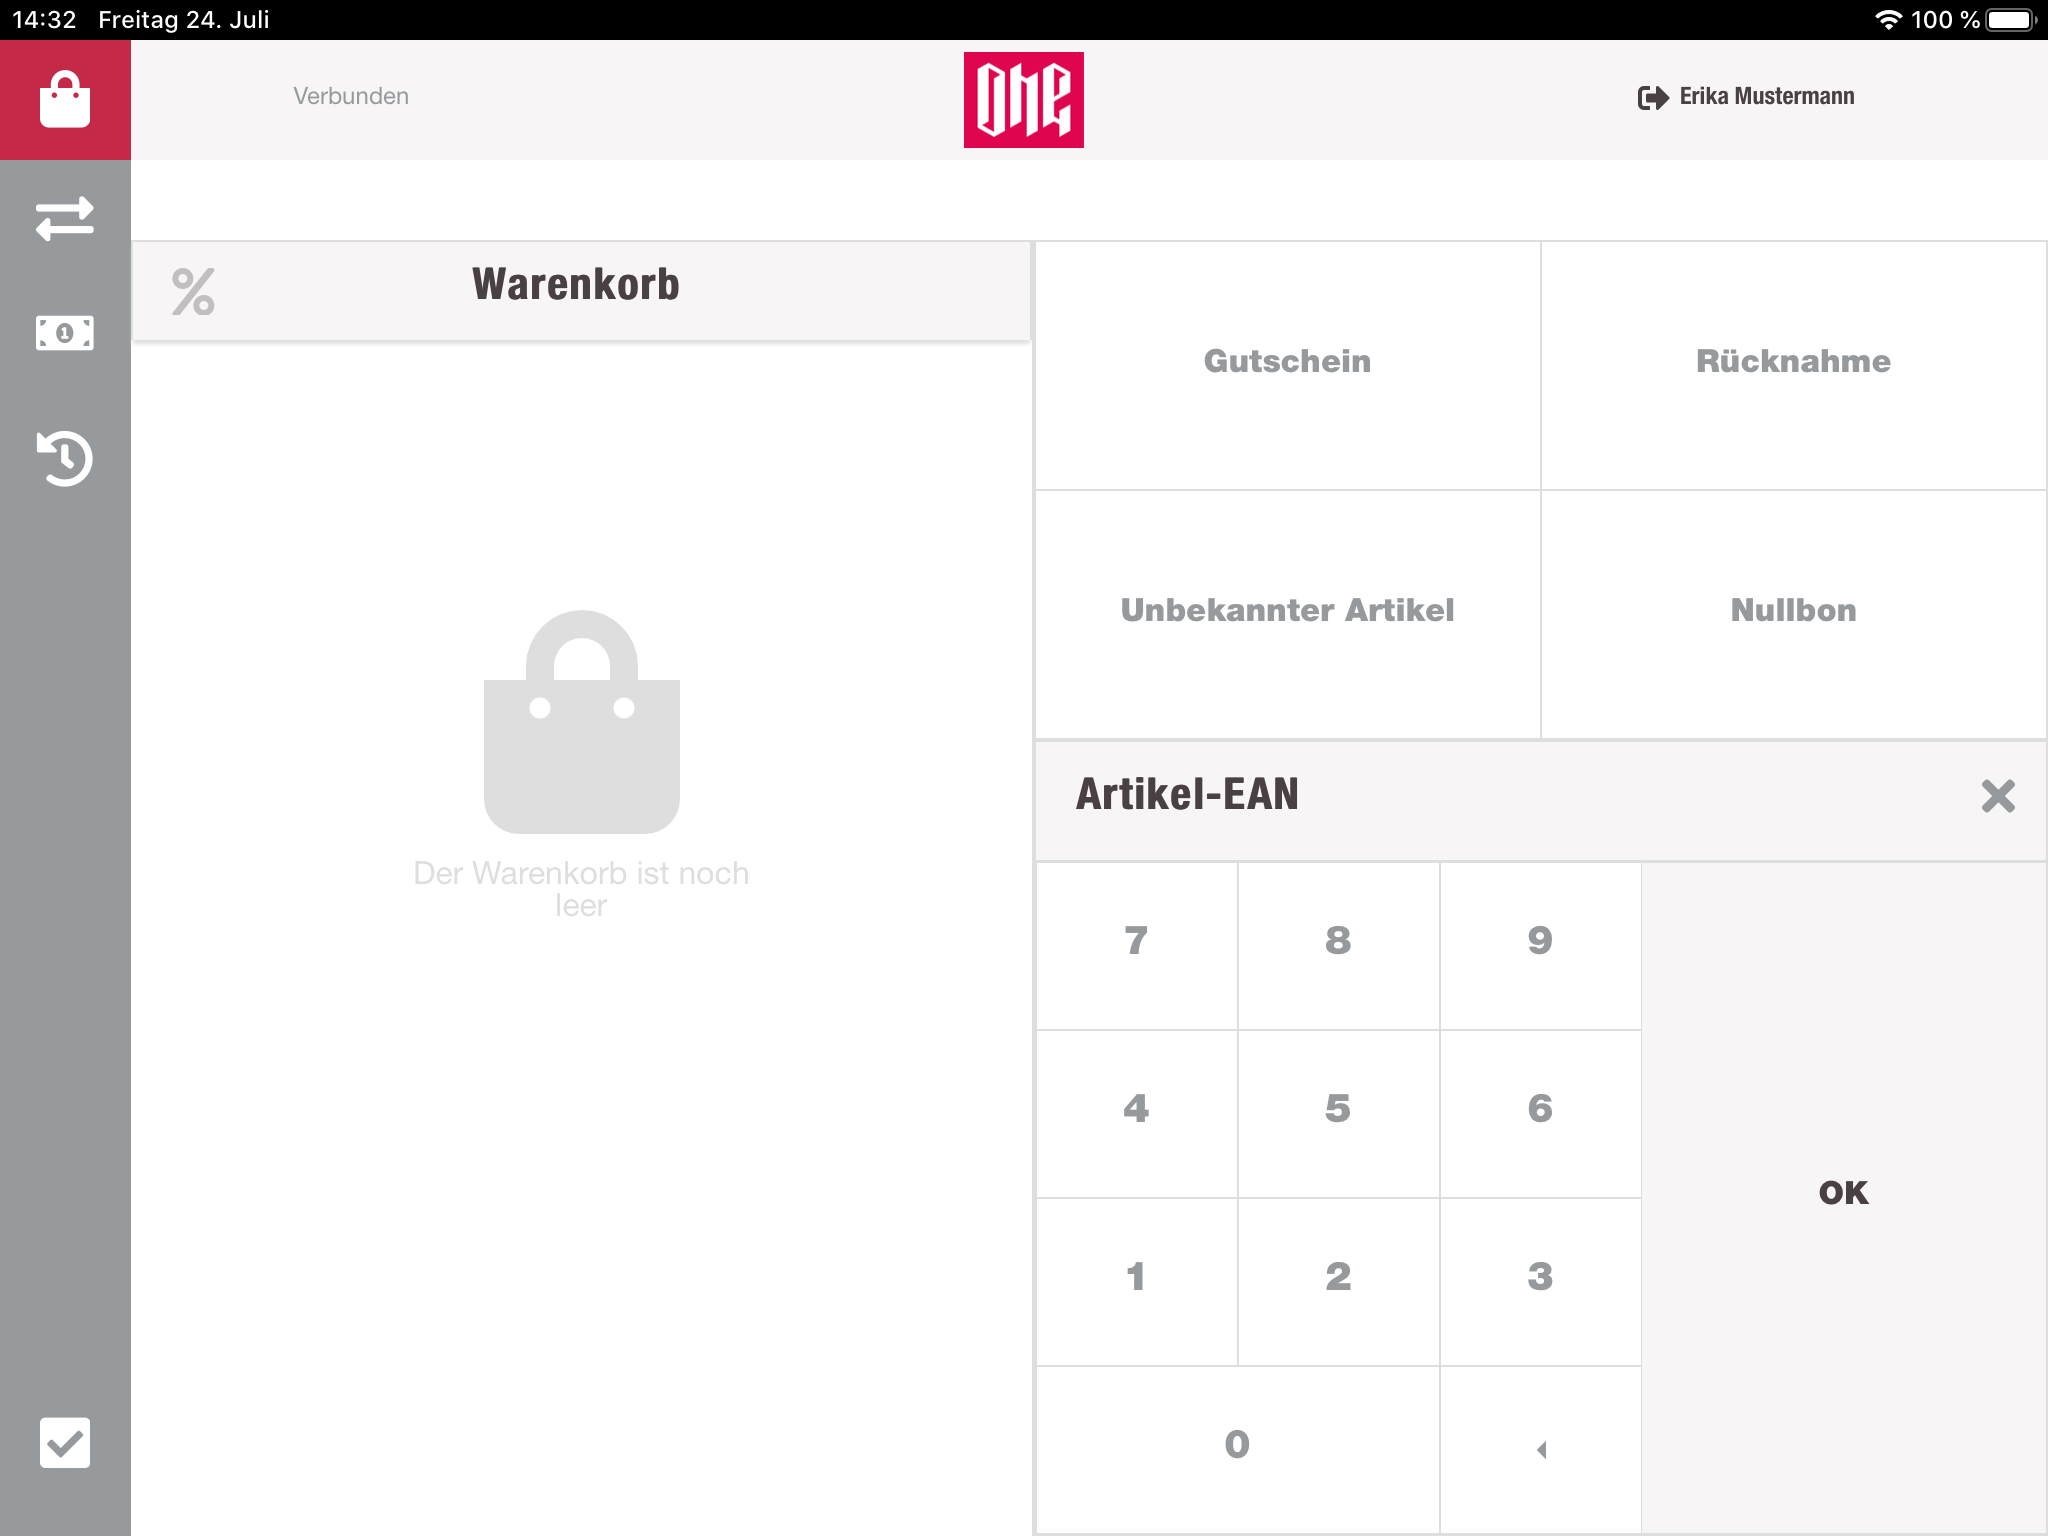
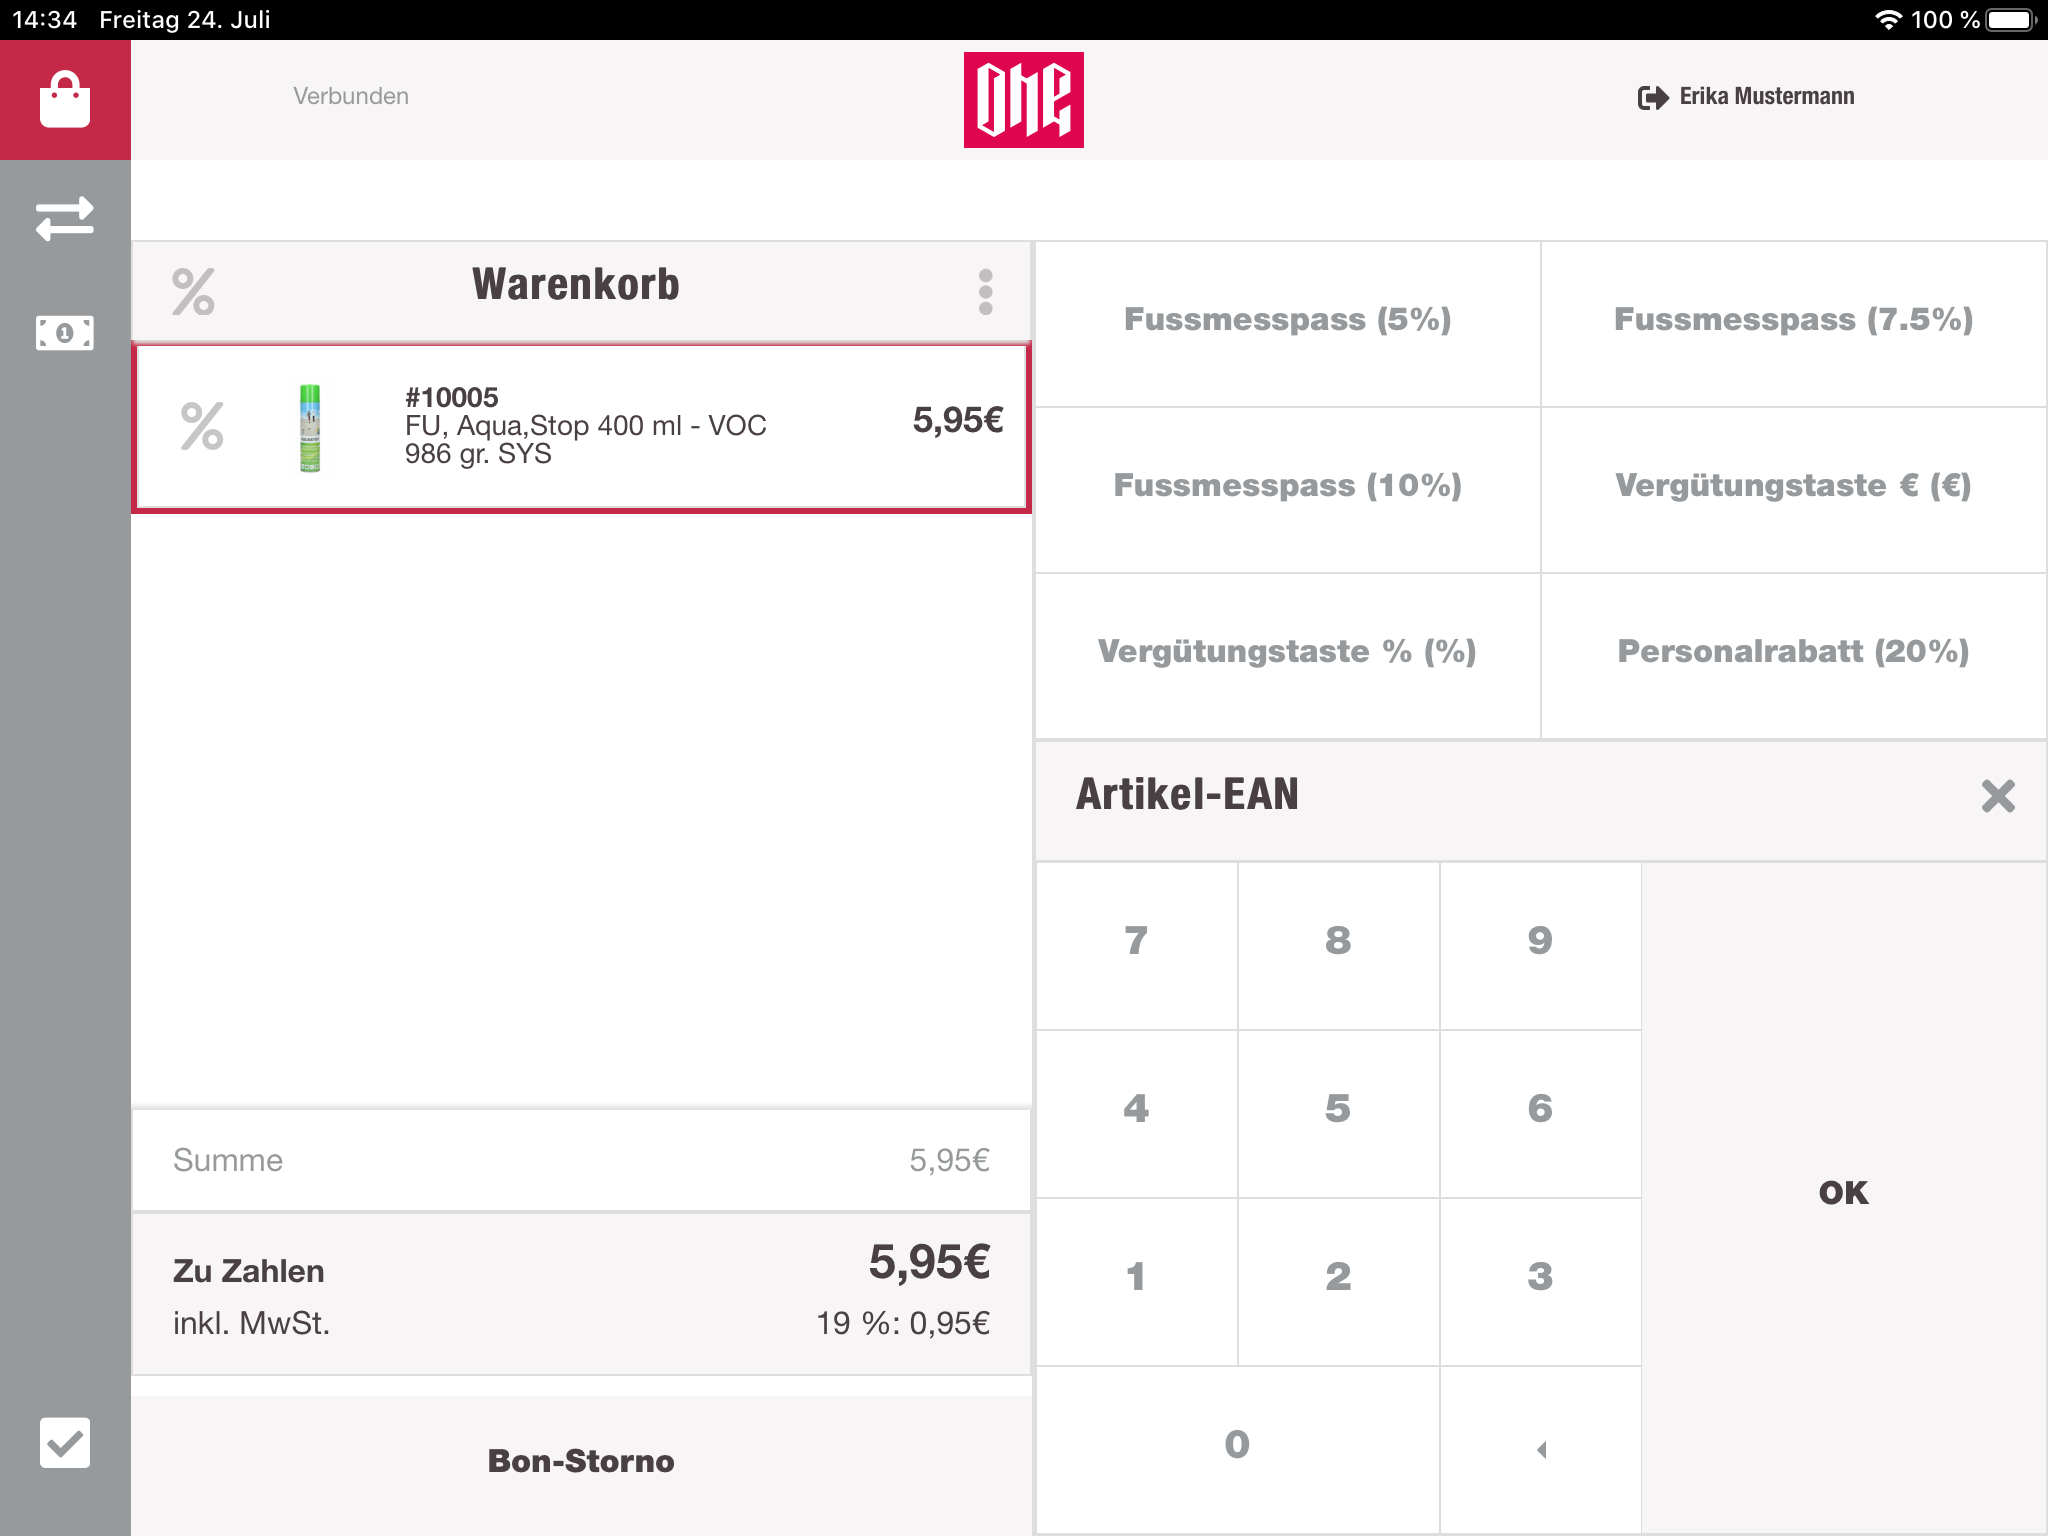
Cart
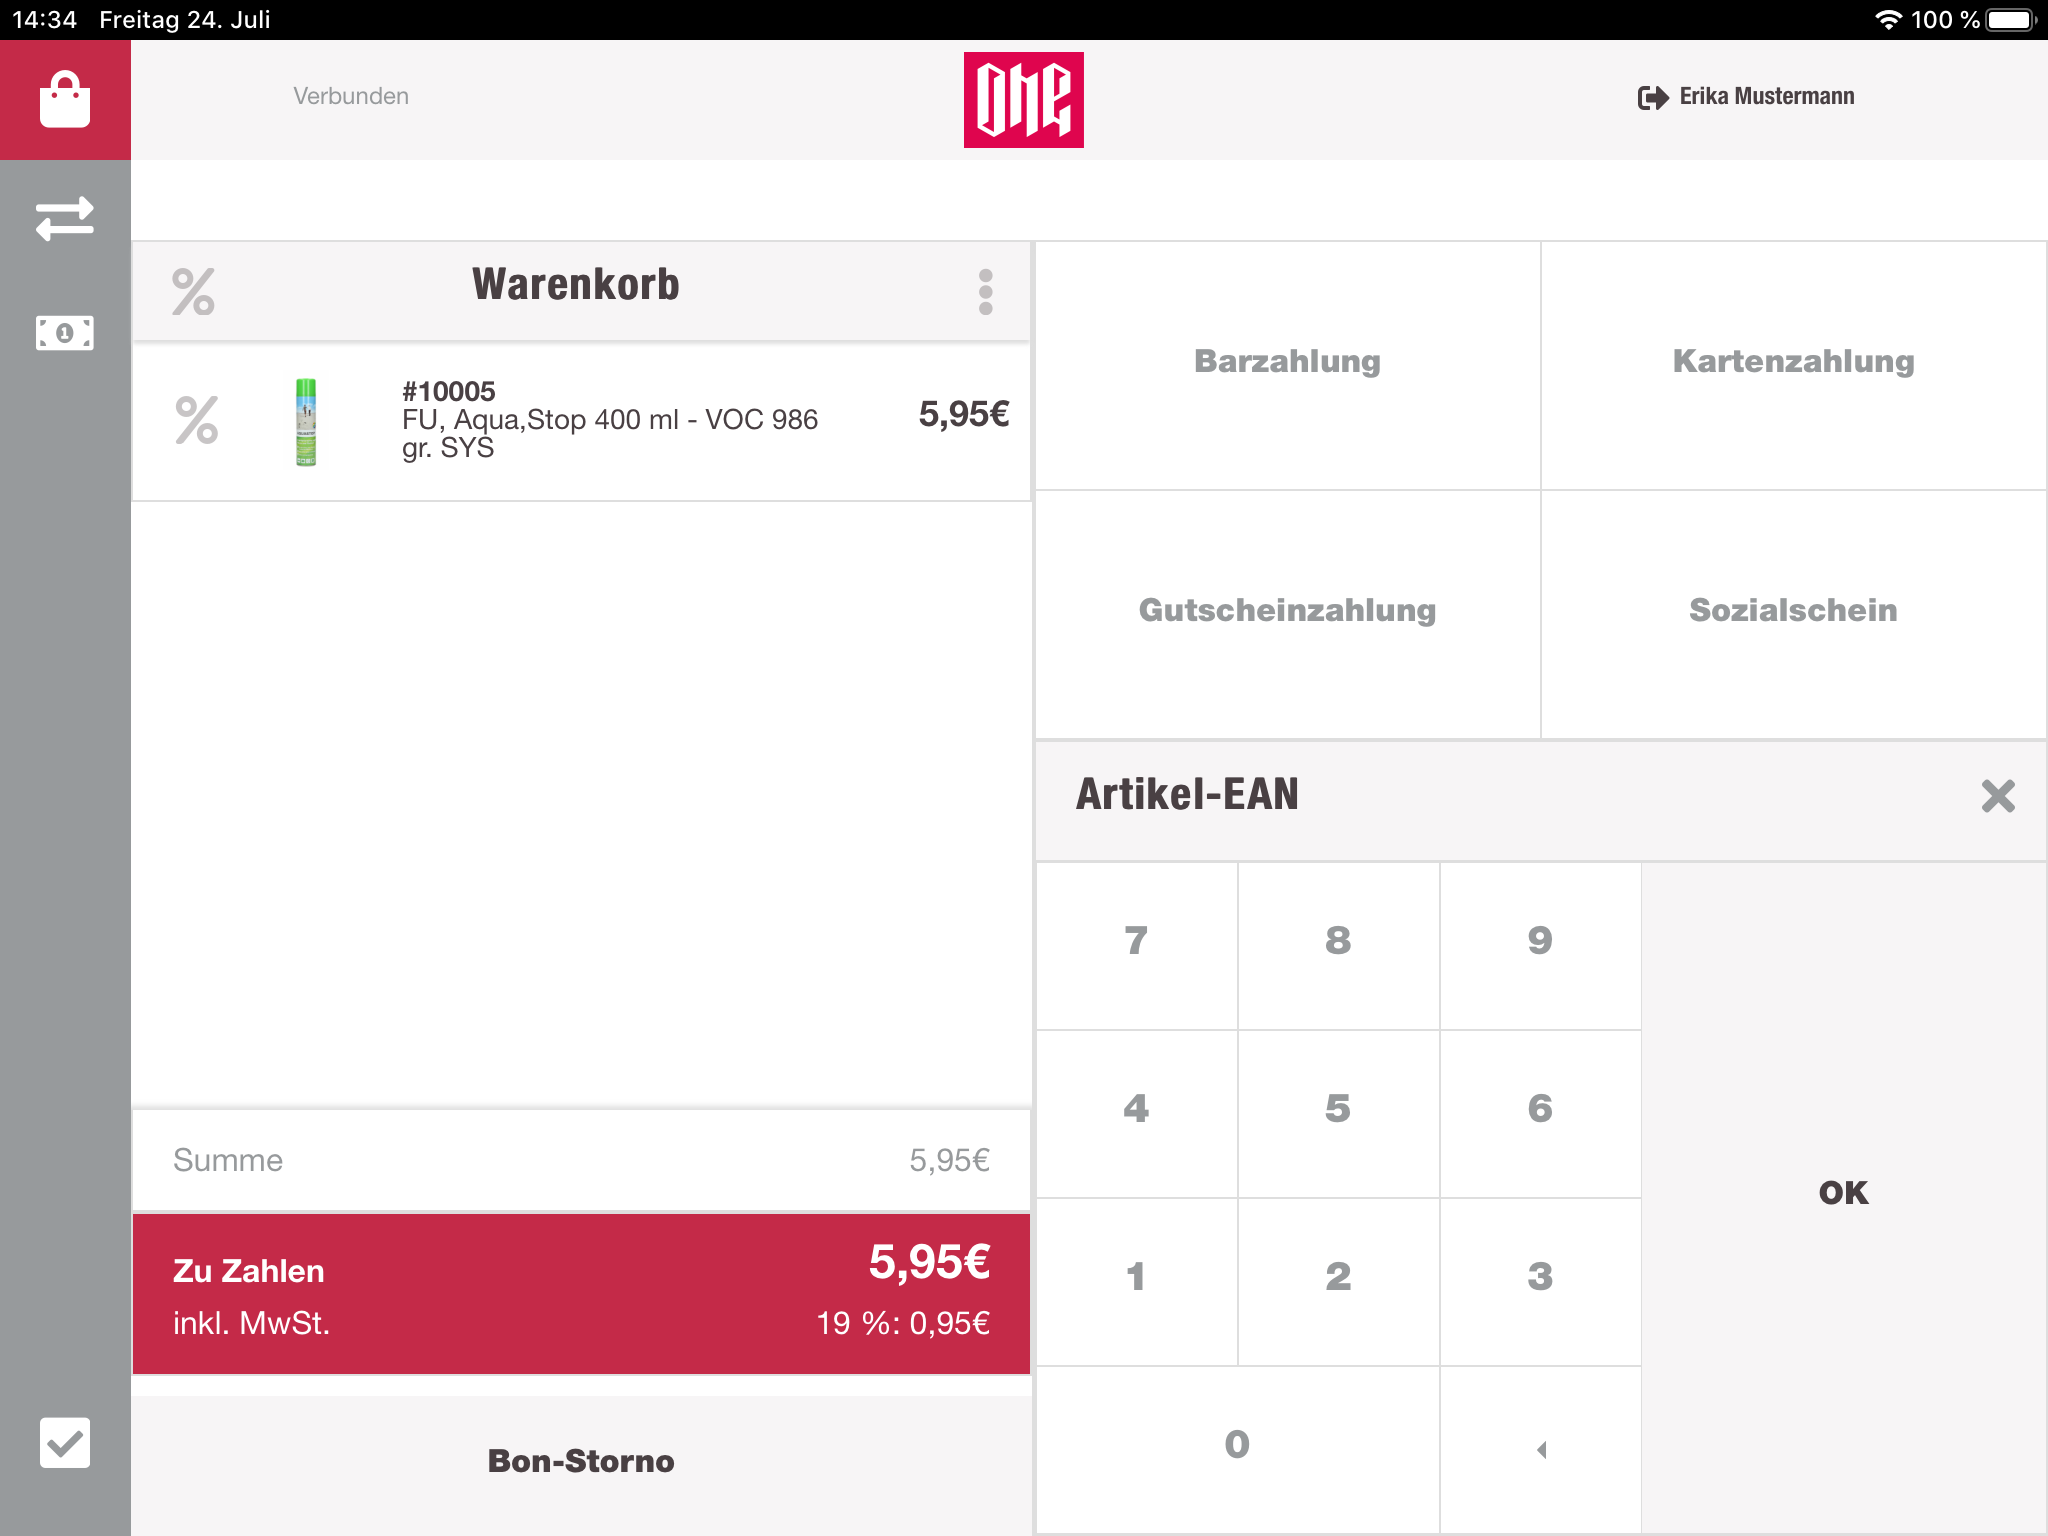
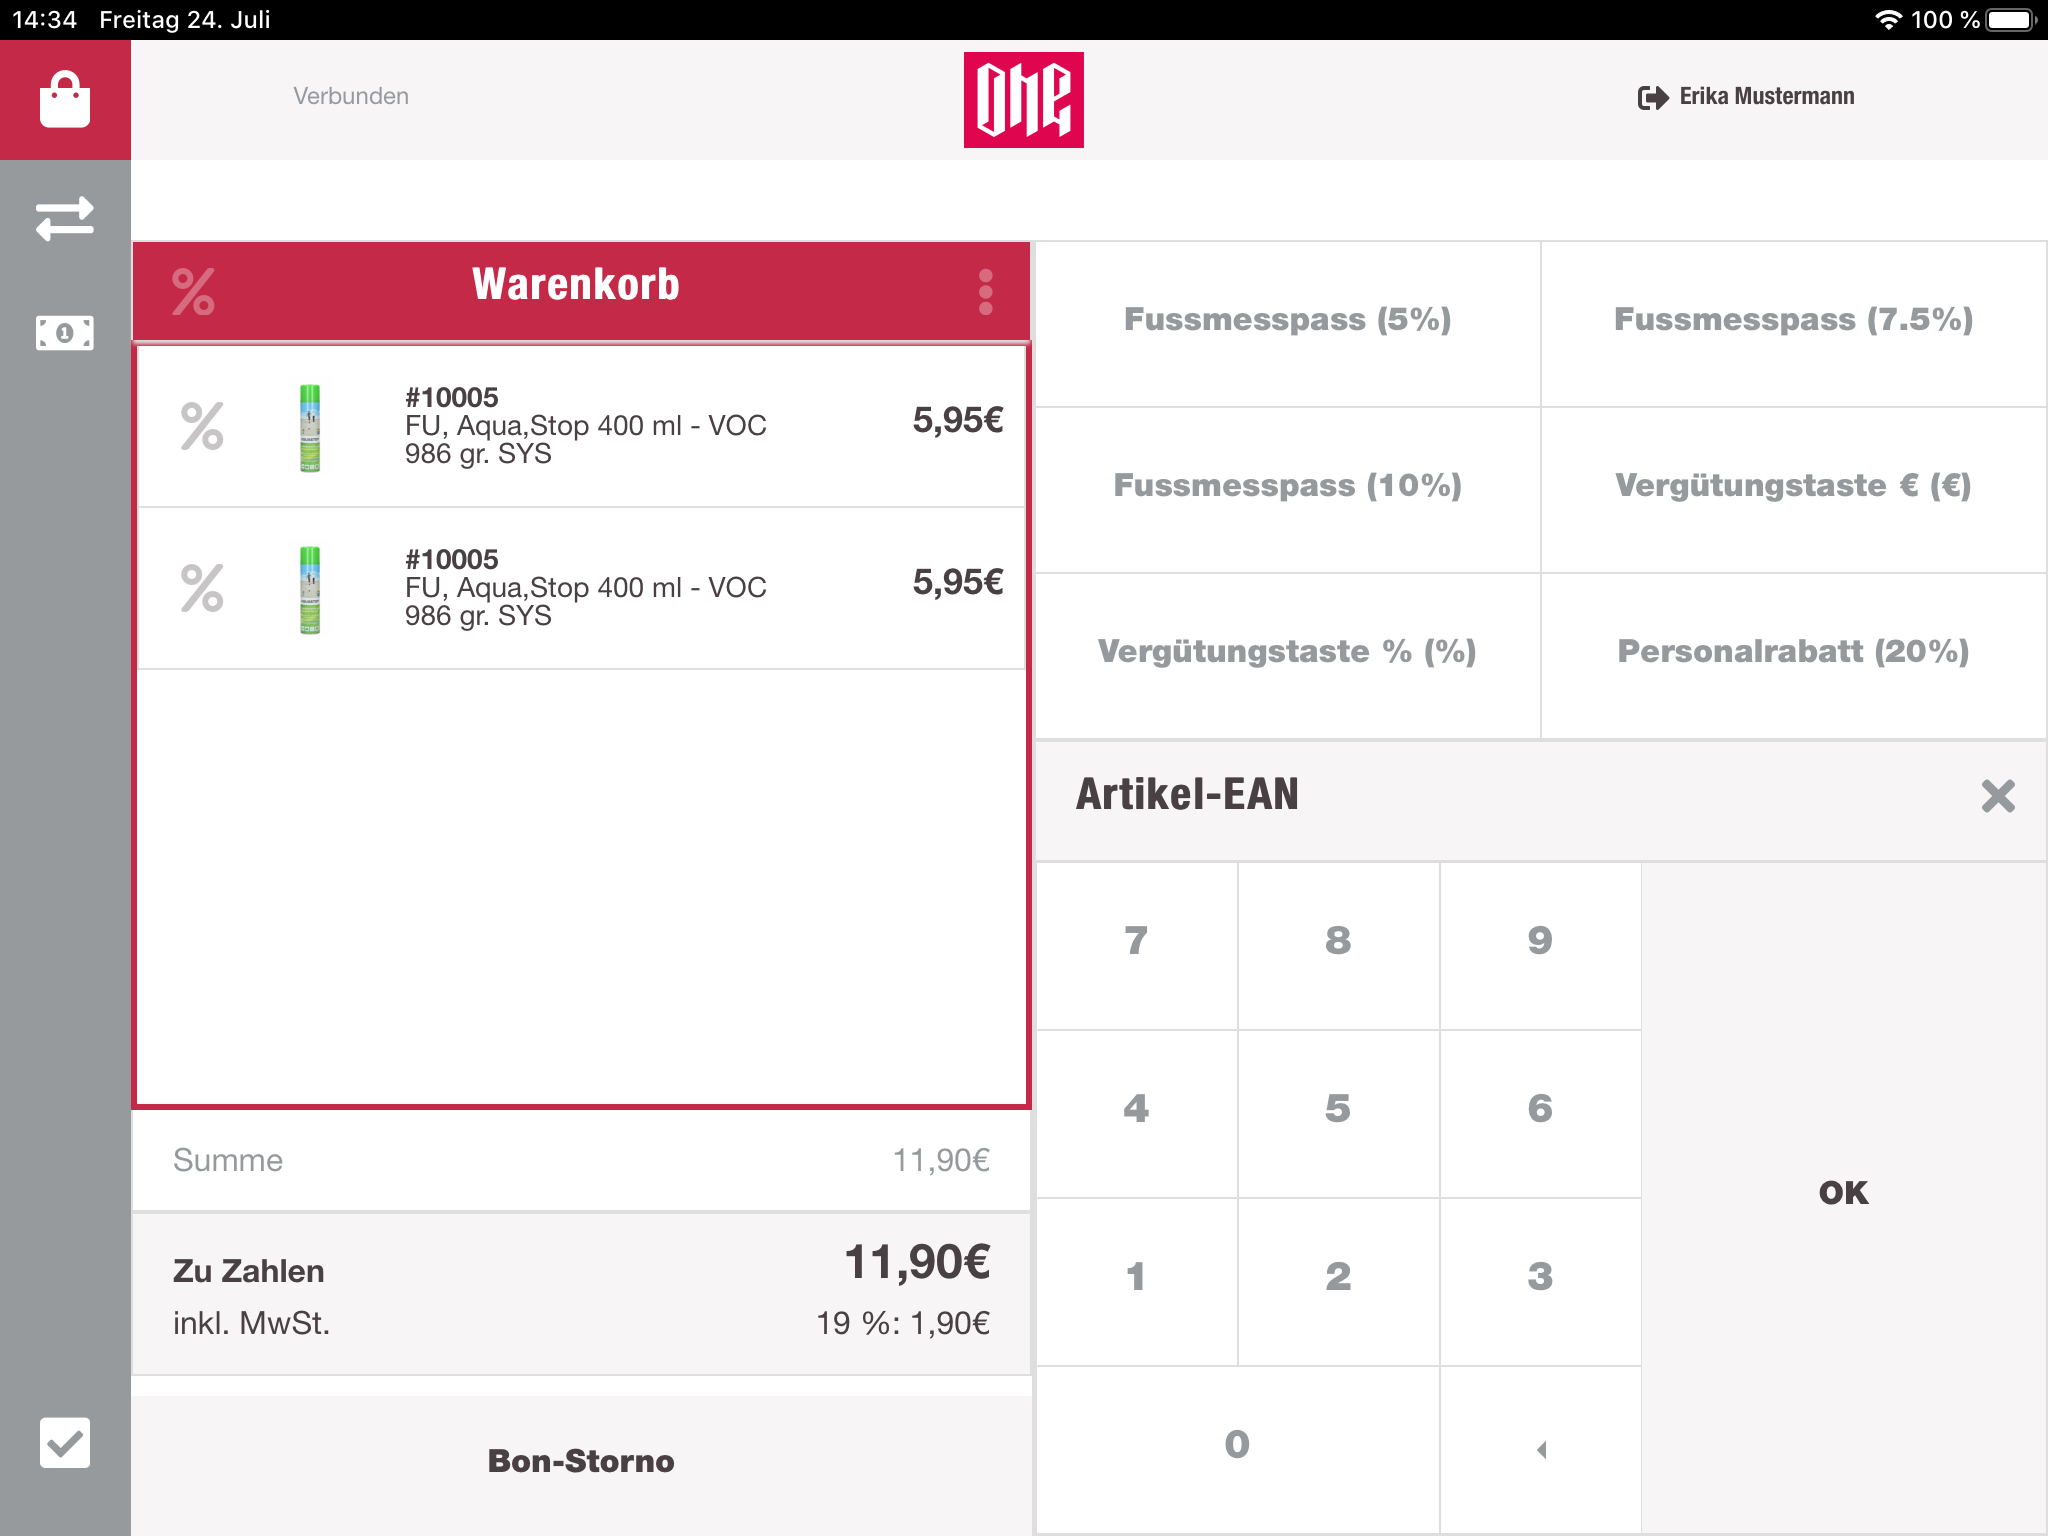
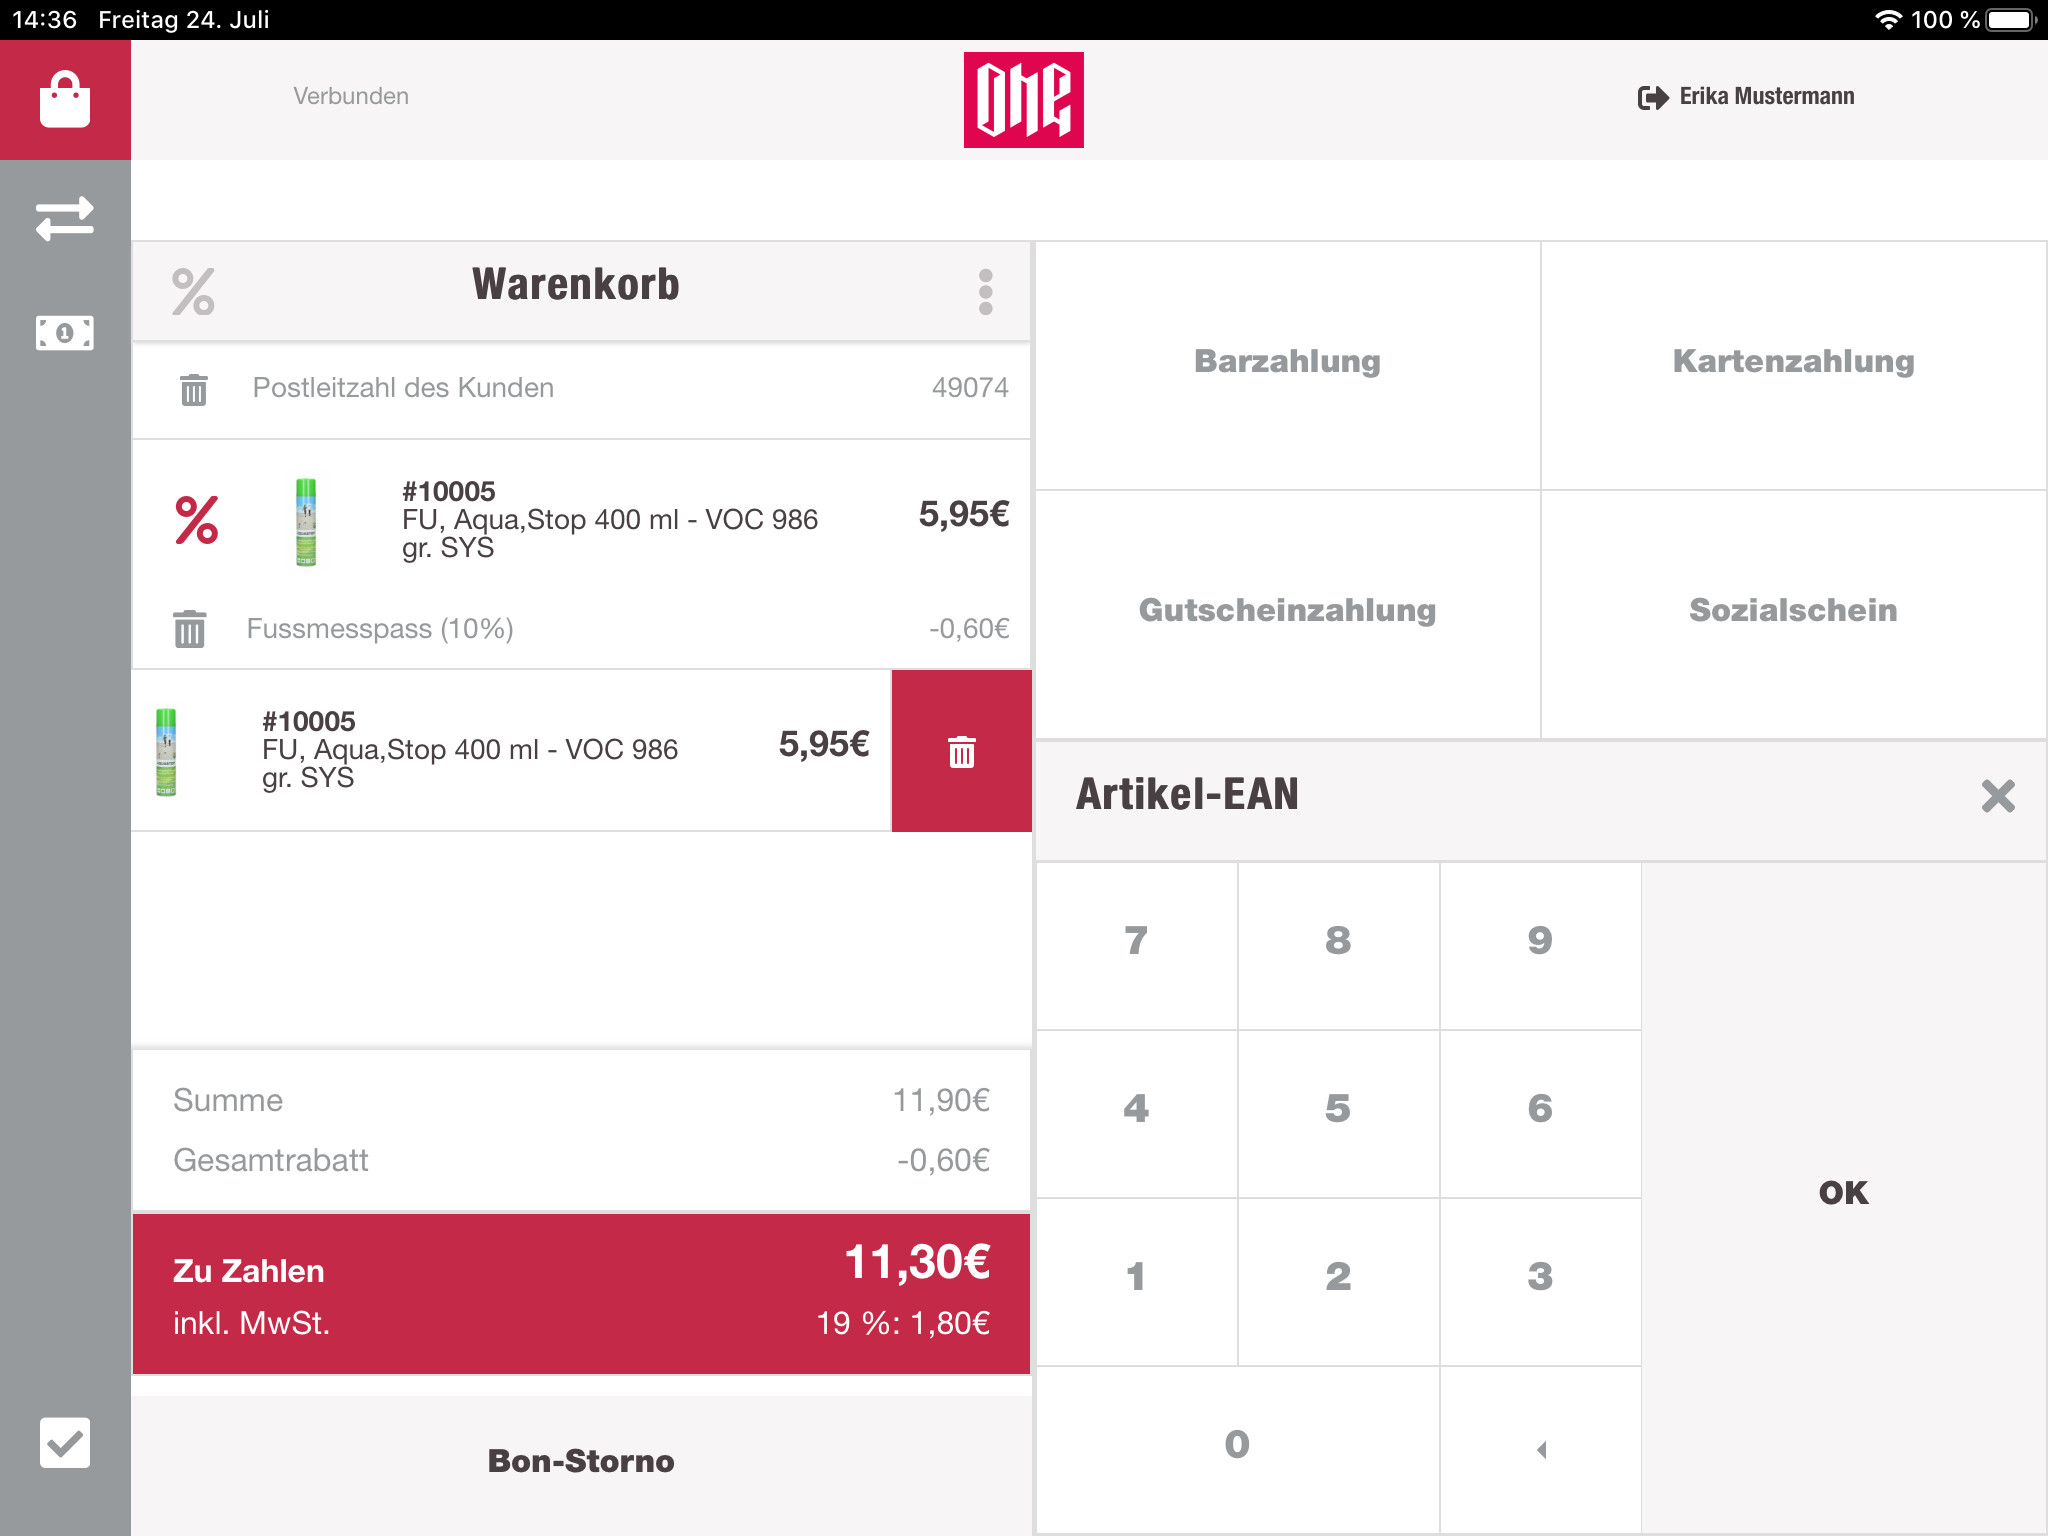
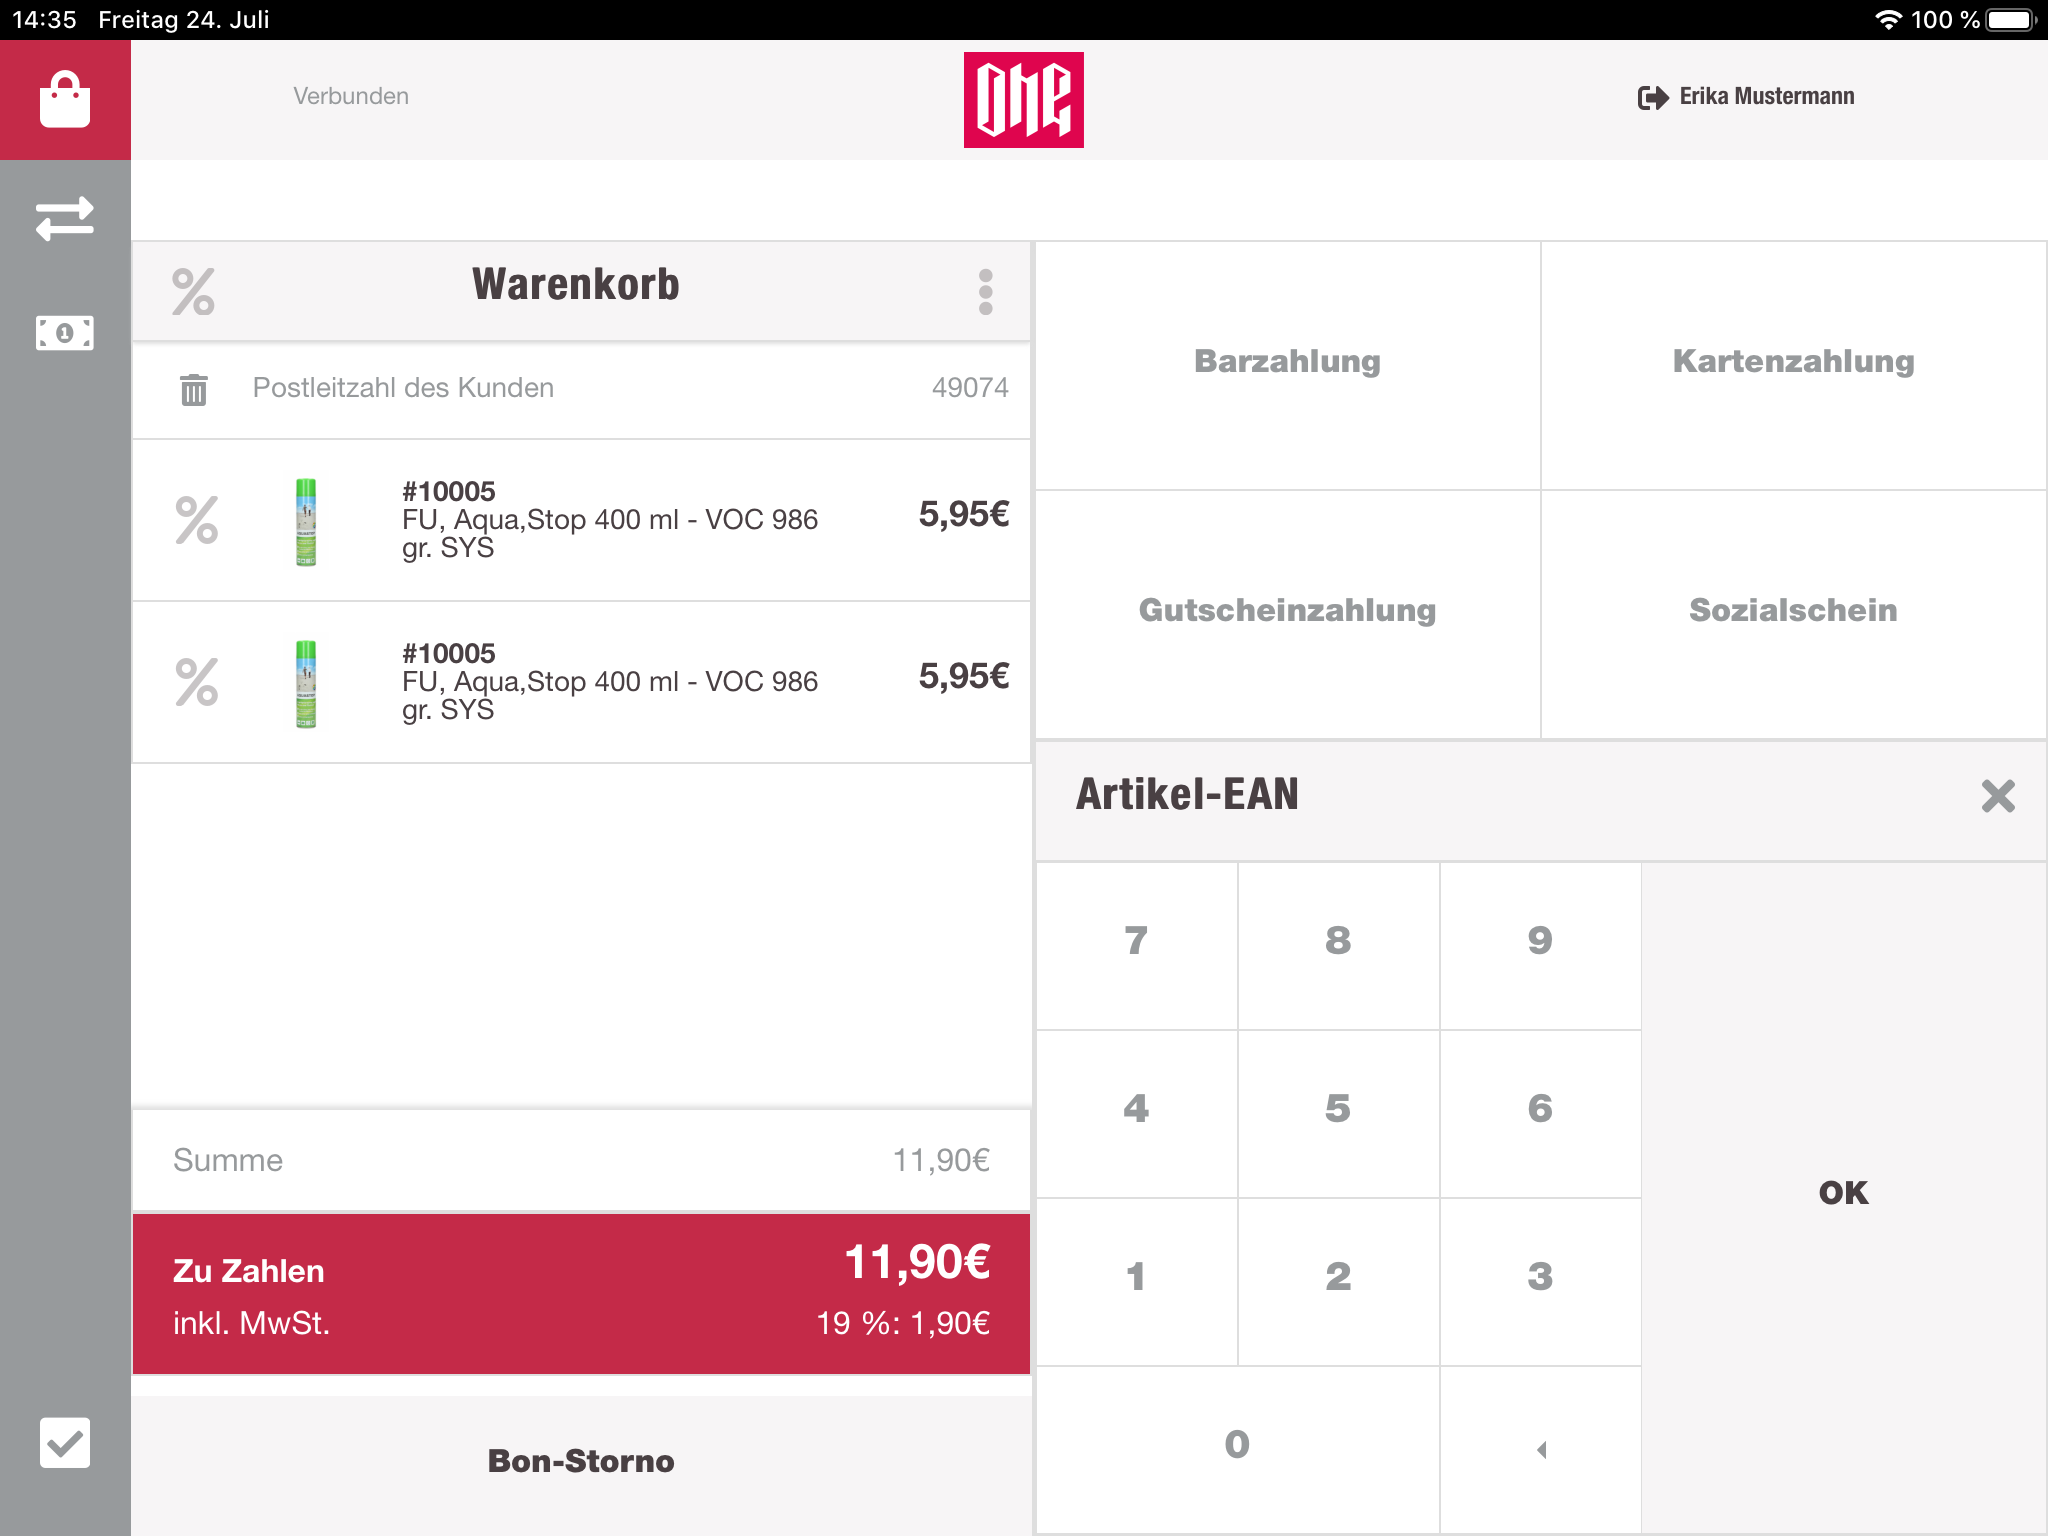
When empty, the cart is only showing a message, informing the user that the cart is empty. Once the cashier scans a valid product EAN or enters it manually with the numpad, the cart view is including a new row for this item. After the item is included, the cart is also displaying the cart sum, the amount, the customer has to pay, information about the VAT and a button to discard the whole cart. Each item gets his own row in the cart list, even if the item is already in the cart. The quantity is not increasing. For each new or removed item, the payment and sum information are updated. To apply a discount on the whole cart, the cashier can just tap on the header of the list, which will switch the button group on the right side to all available discounts of the current store. Discounts for the whole cart will be displayed per item, after it was applied.
Item
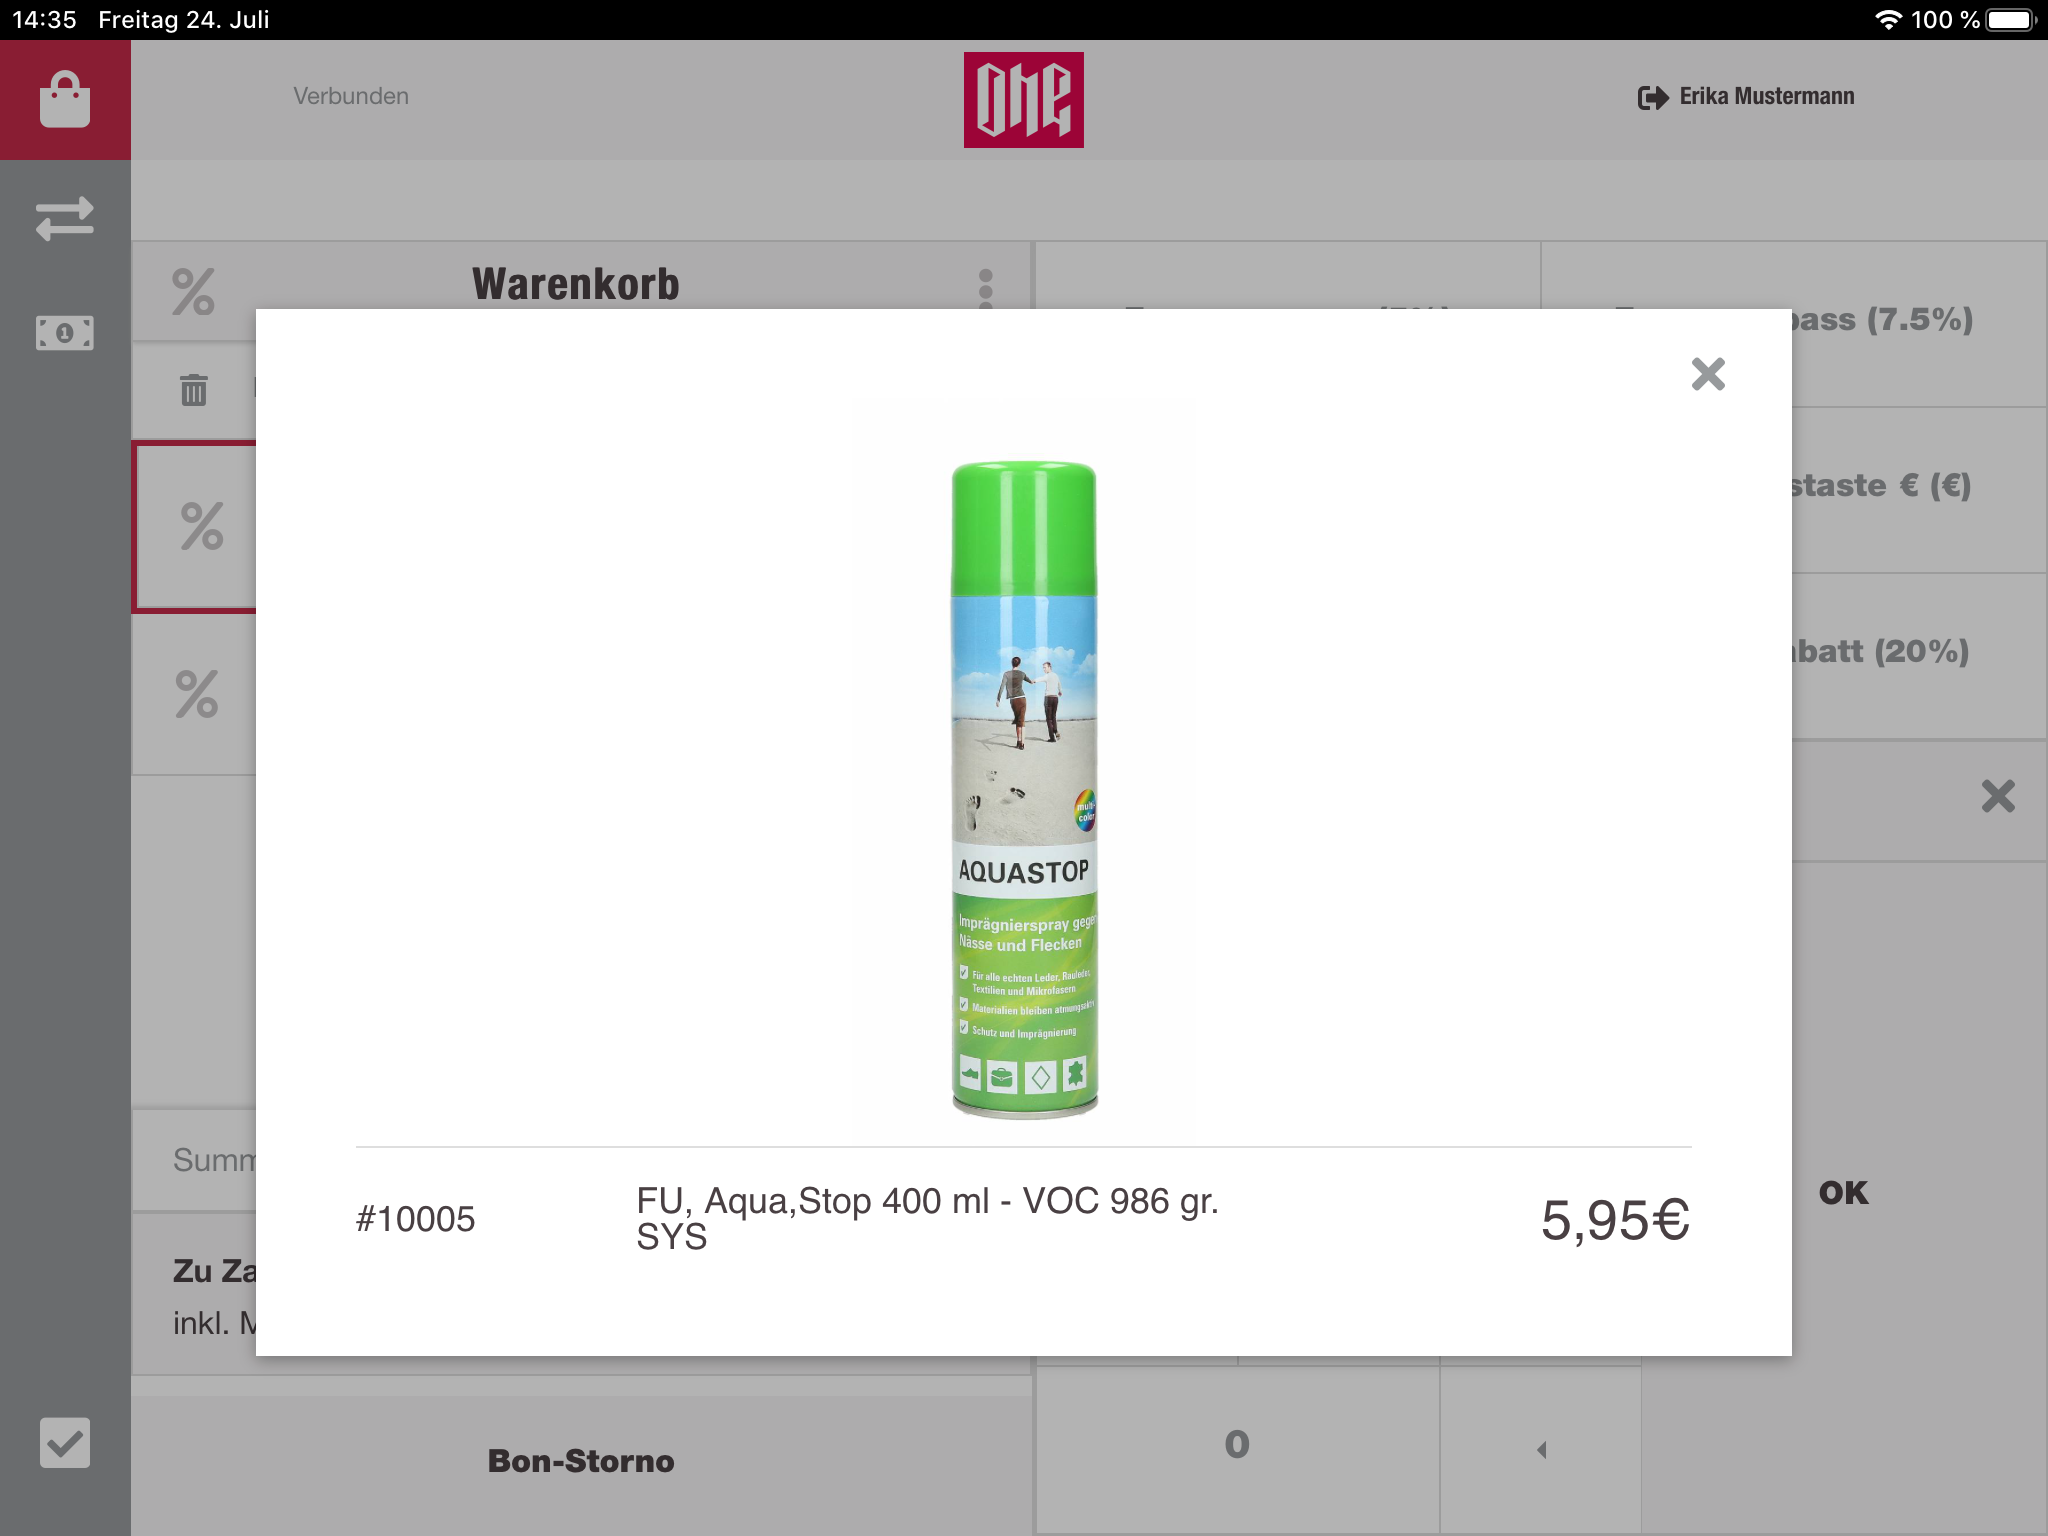
Every item is represented in a row of the cart list. Each row has an indicator for discounts (active or not active), a picture of the item, item SKU, item description and the item price.
Clicking on the row updates the button group on the right side with all available discounts for the current store.
When the cashier is selecting a discount, it will be applied on the selected item. Selected items are identified with a border.
After applying a discount on an item, it is also displayed in this row. This information contains the discount name, rate, value and an option to remove this discount.

To remove an item, the cashier has to swipe from right to left on the item row. There the cashier will have to possibility to delete this item.
If the cashier needs a larger picture of the selected item, it is possible to get it via clicking on the picture itself. A modal pops up, with a larger image.
Payment details
On the bottom of the cart list, informations about the cart sum and VAT are displayed. Also different payment methods (partial payment) or the total discount value are displayed here. All those values are summed up and shown for the cashier to know how much the customer has to pay.
Receipt cancelation
To cancel the whole current cart, the cashier can do this by pressing the "Bon-Storno"-Button. The current cart will be replaced by a new, empty cart.
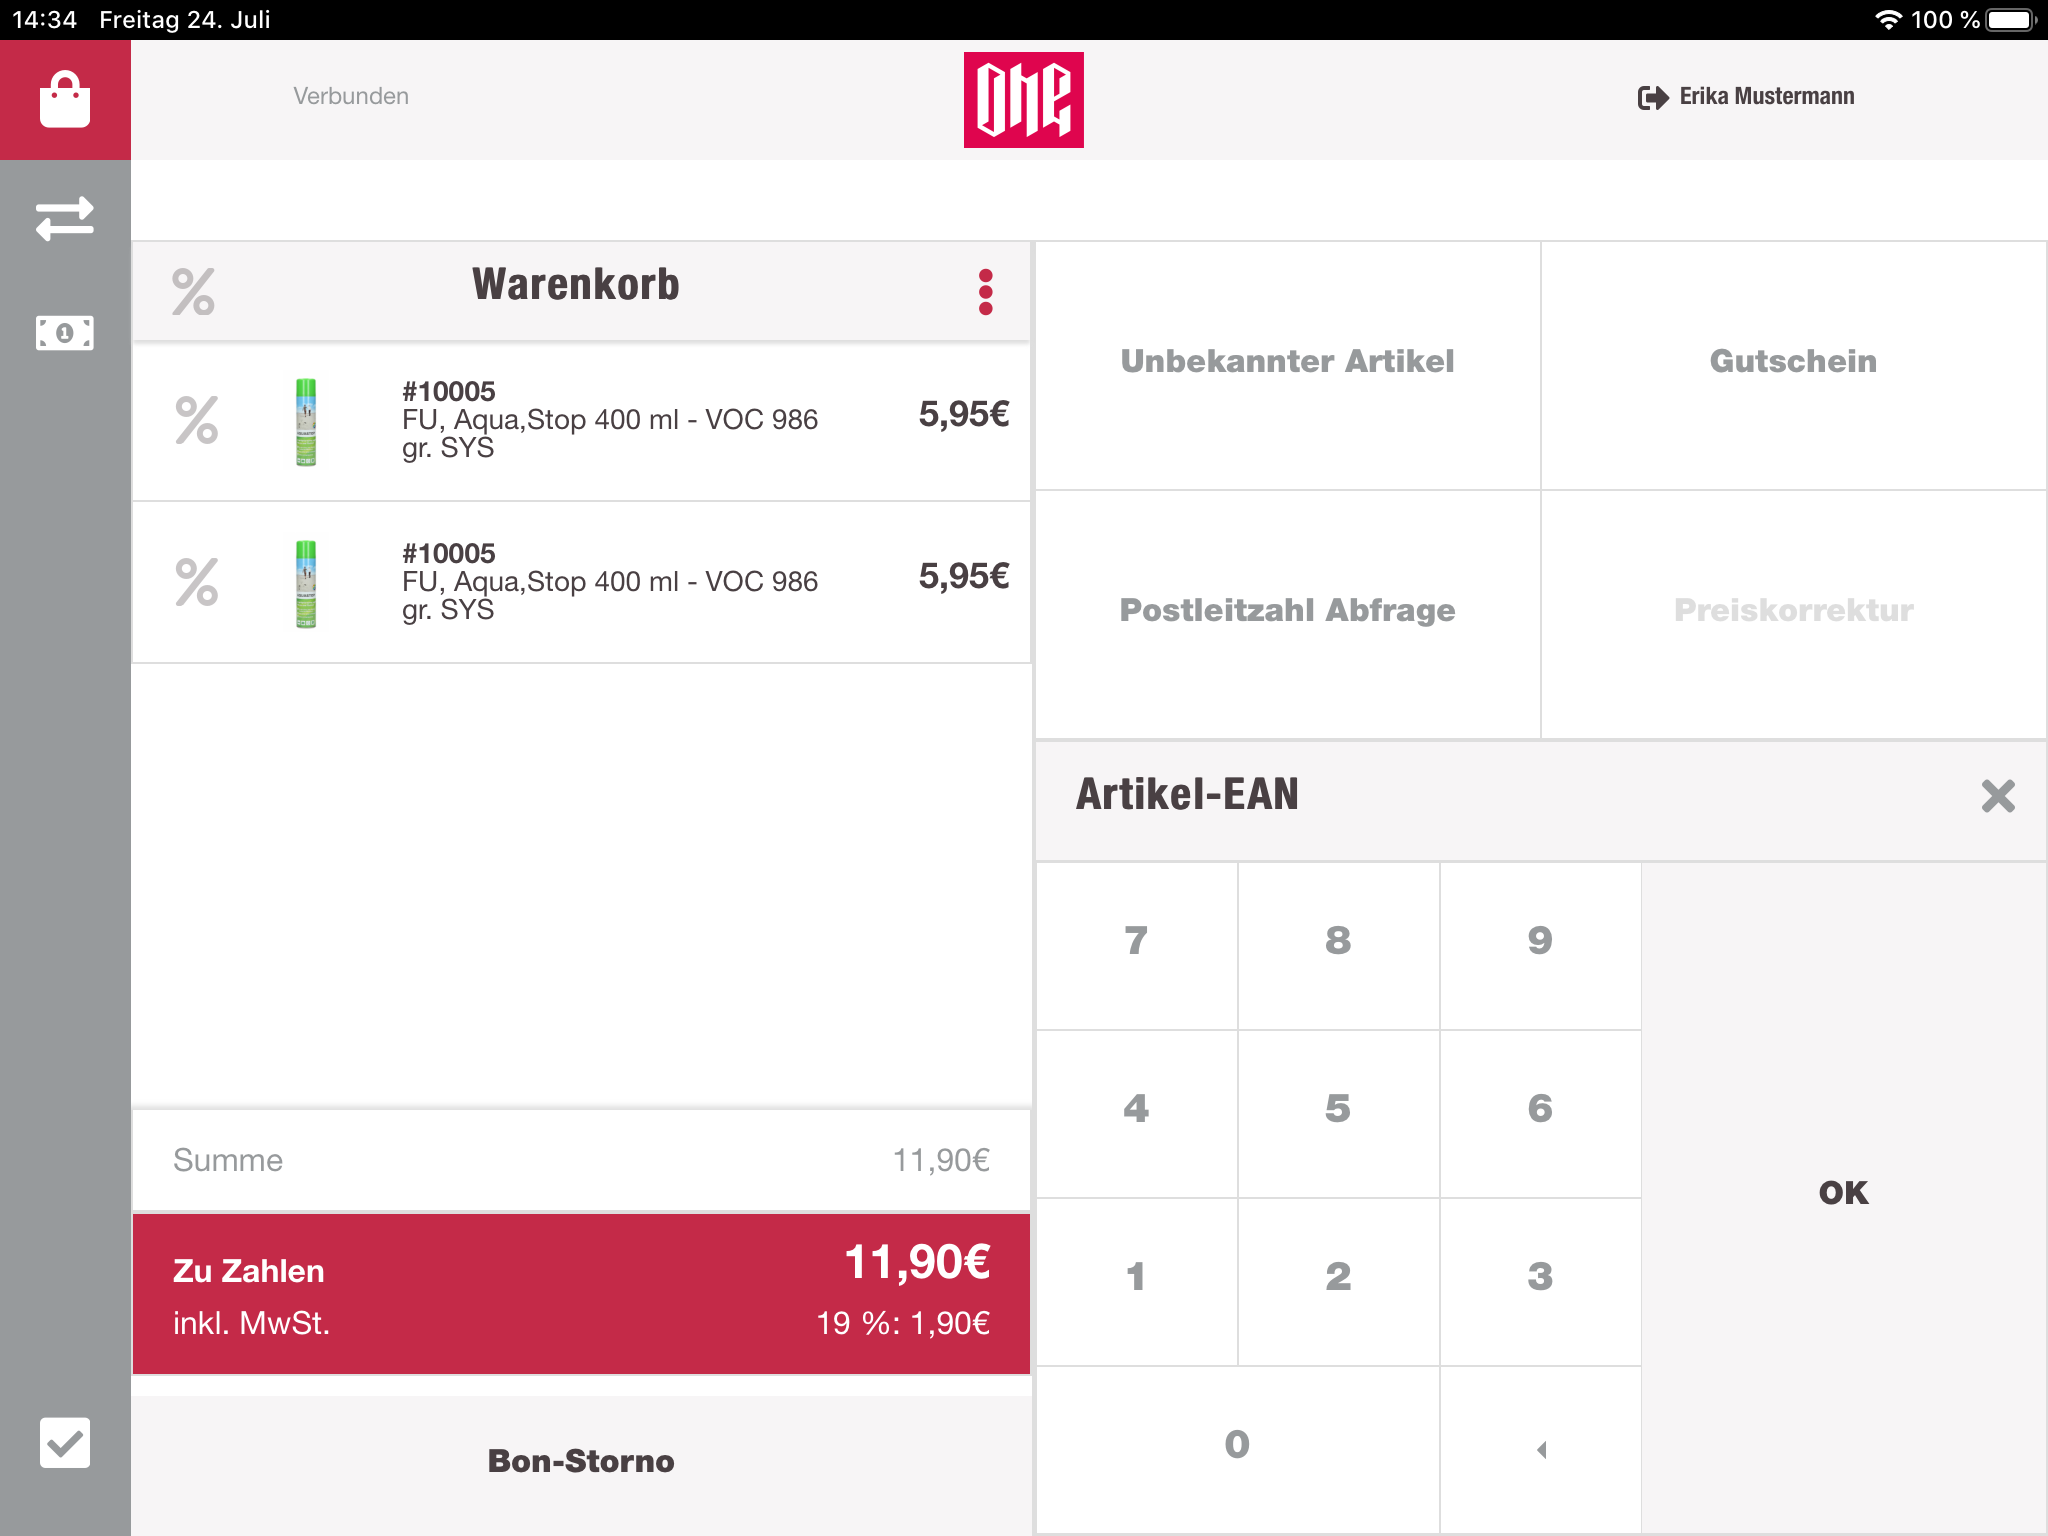
Numpad
To avoid the iOS software keyboard, the cashier have the possibility to enter number input with the numpad. Based on the current state of the cashregister the output source can change. Initially it will be used for EAN/SKU input.
Dynamic button group
Here the cashier can initialize different type of actions except selling items. When the cart is empty, following options are shown:
- Gift card
- Refund
- Unknown Product
- Zero Receipt
If at least one item is inside the cart, the button group will switch to payment methods. The cashier can select those payment methods and continue with the payment of the whole cart.
When the cashier has selected one item or the header of the cart, the discounts will be displayed in the buttton group.
Next to the cart header is button (three dots) with more options. Here the cashier has access to other actions while some items are in the cart. Here we have the two known options:
- Unknown Product
- Gift card
Besides those two options, there are two new options, only visible if there are items in the cart:
- Postal code survey
- Price correction
Giftcard
Selecting the gift card action, will switch the cart view to an input field for the gift card number. Here the cashier can enter it manually with the numpad or via scanning the barcode of the card. This action can also be initialized, by directly scanning the card from the cart view.
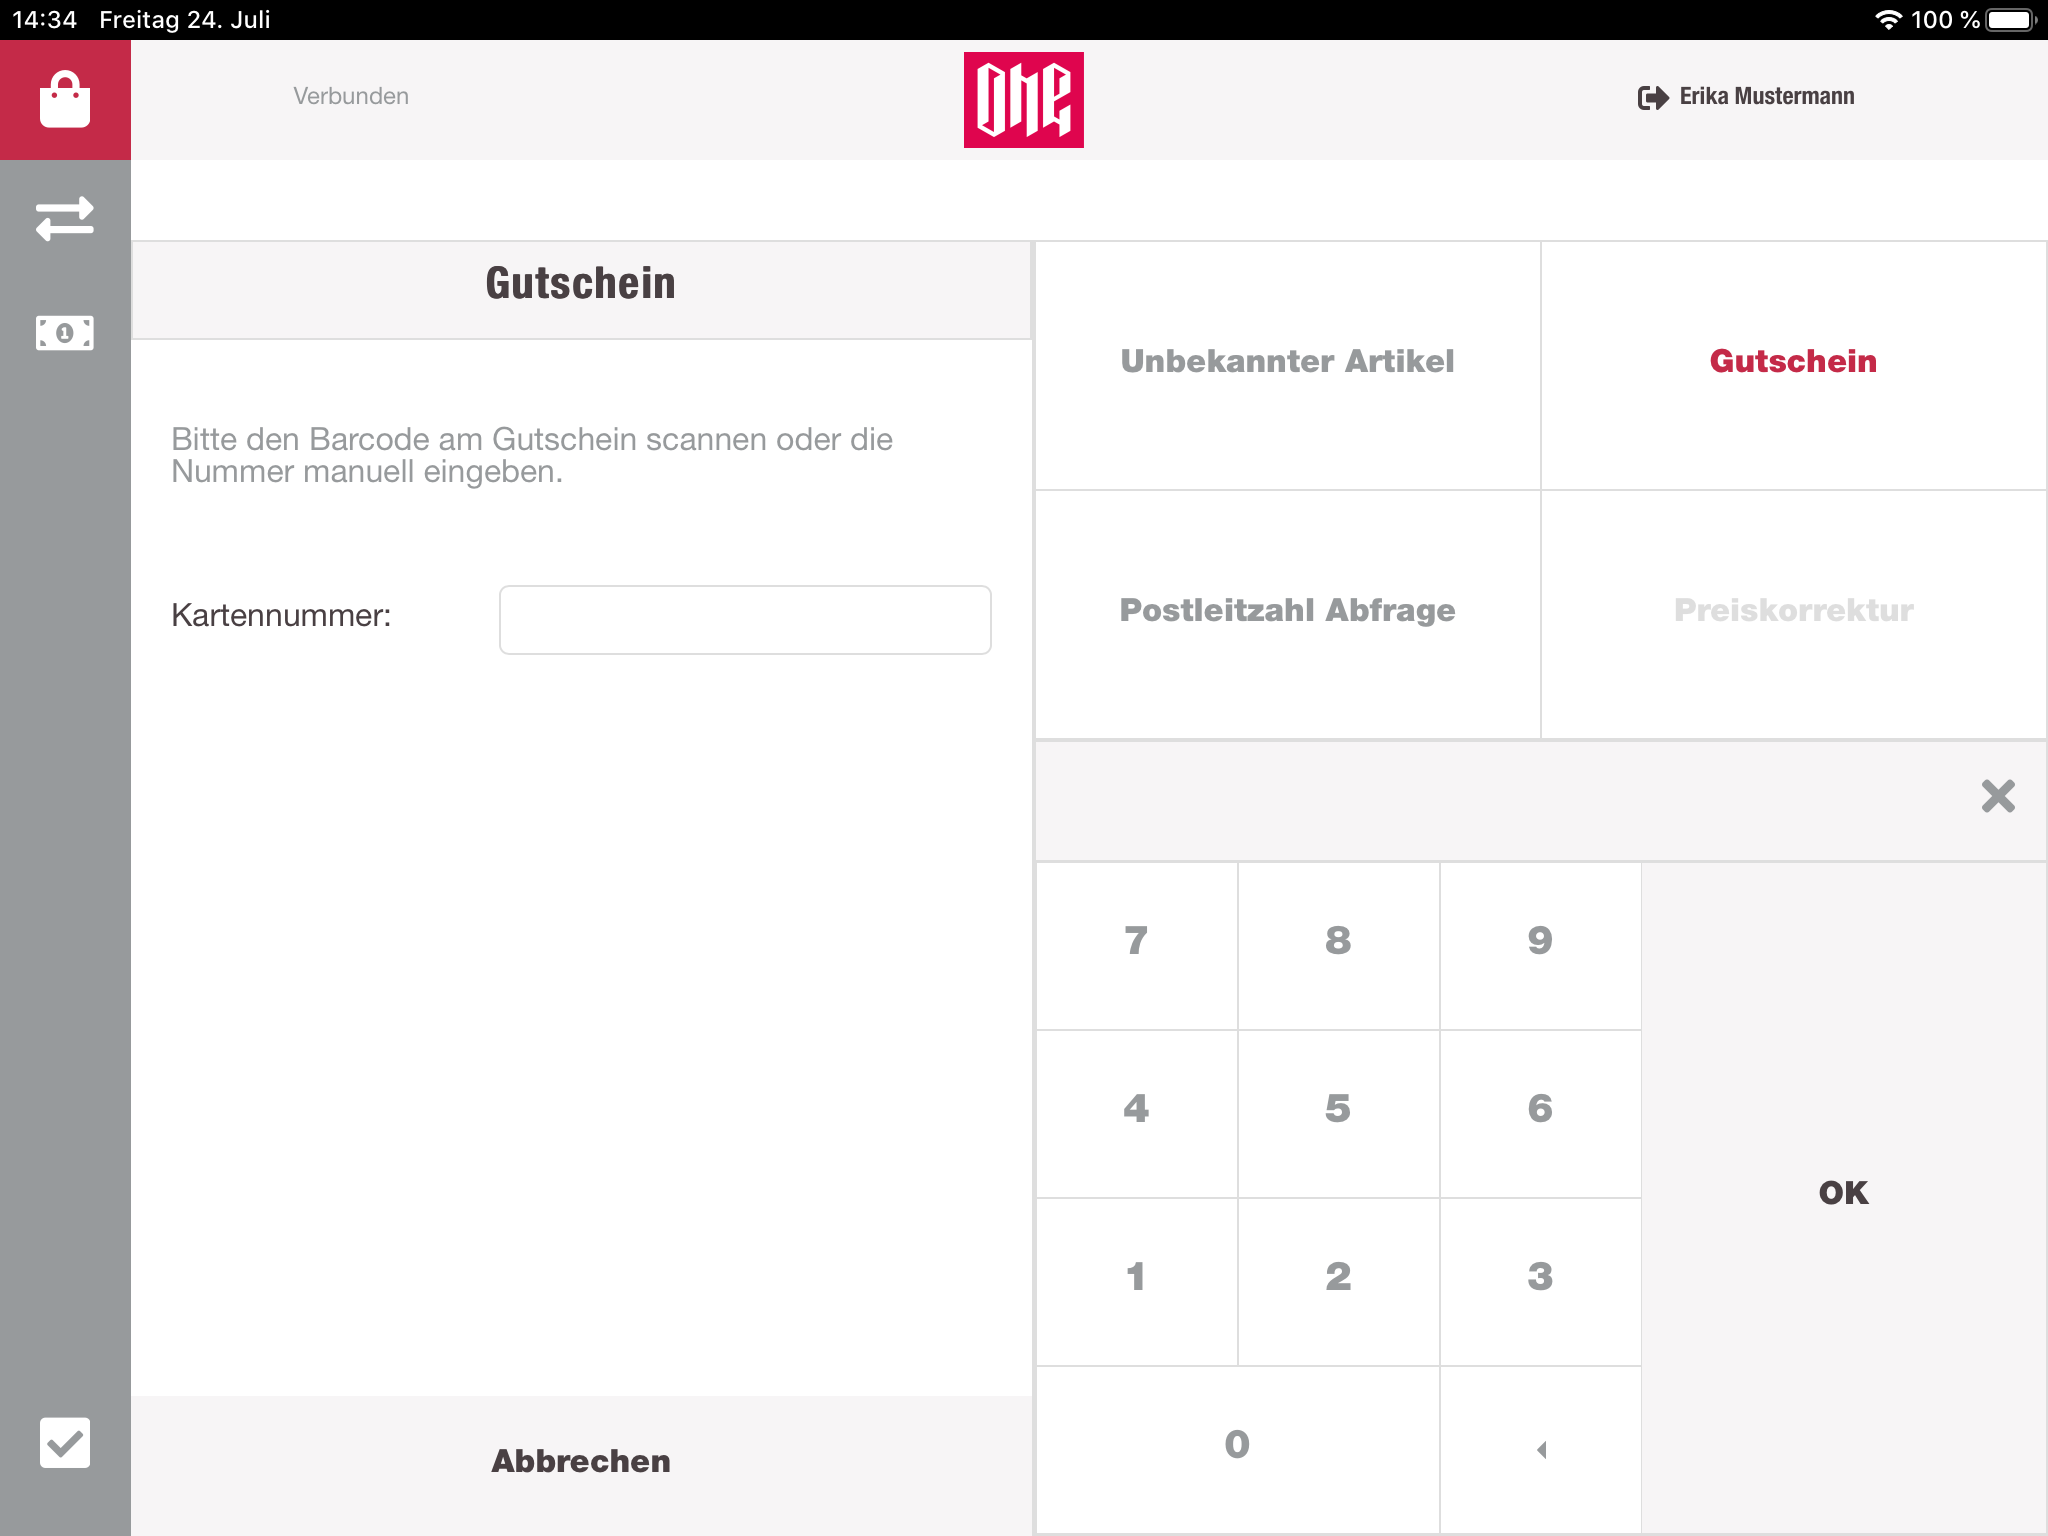
After providing the card number, the card will be validated. If it is an existing card, the cashier has the possibility to enter the amount, which the customer wants to load on his giftcard. If there was already some money on the card, the current balance will also be displayed here. Besides that the cashier can also see the min. and max. amount of this gift card.
If the entered amount is between min. and max. the cashier can submit his entry and the gift card will be placed in the cart. There it will have his own row in the cart list. It can be removed like any other item from the cart.
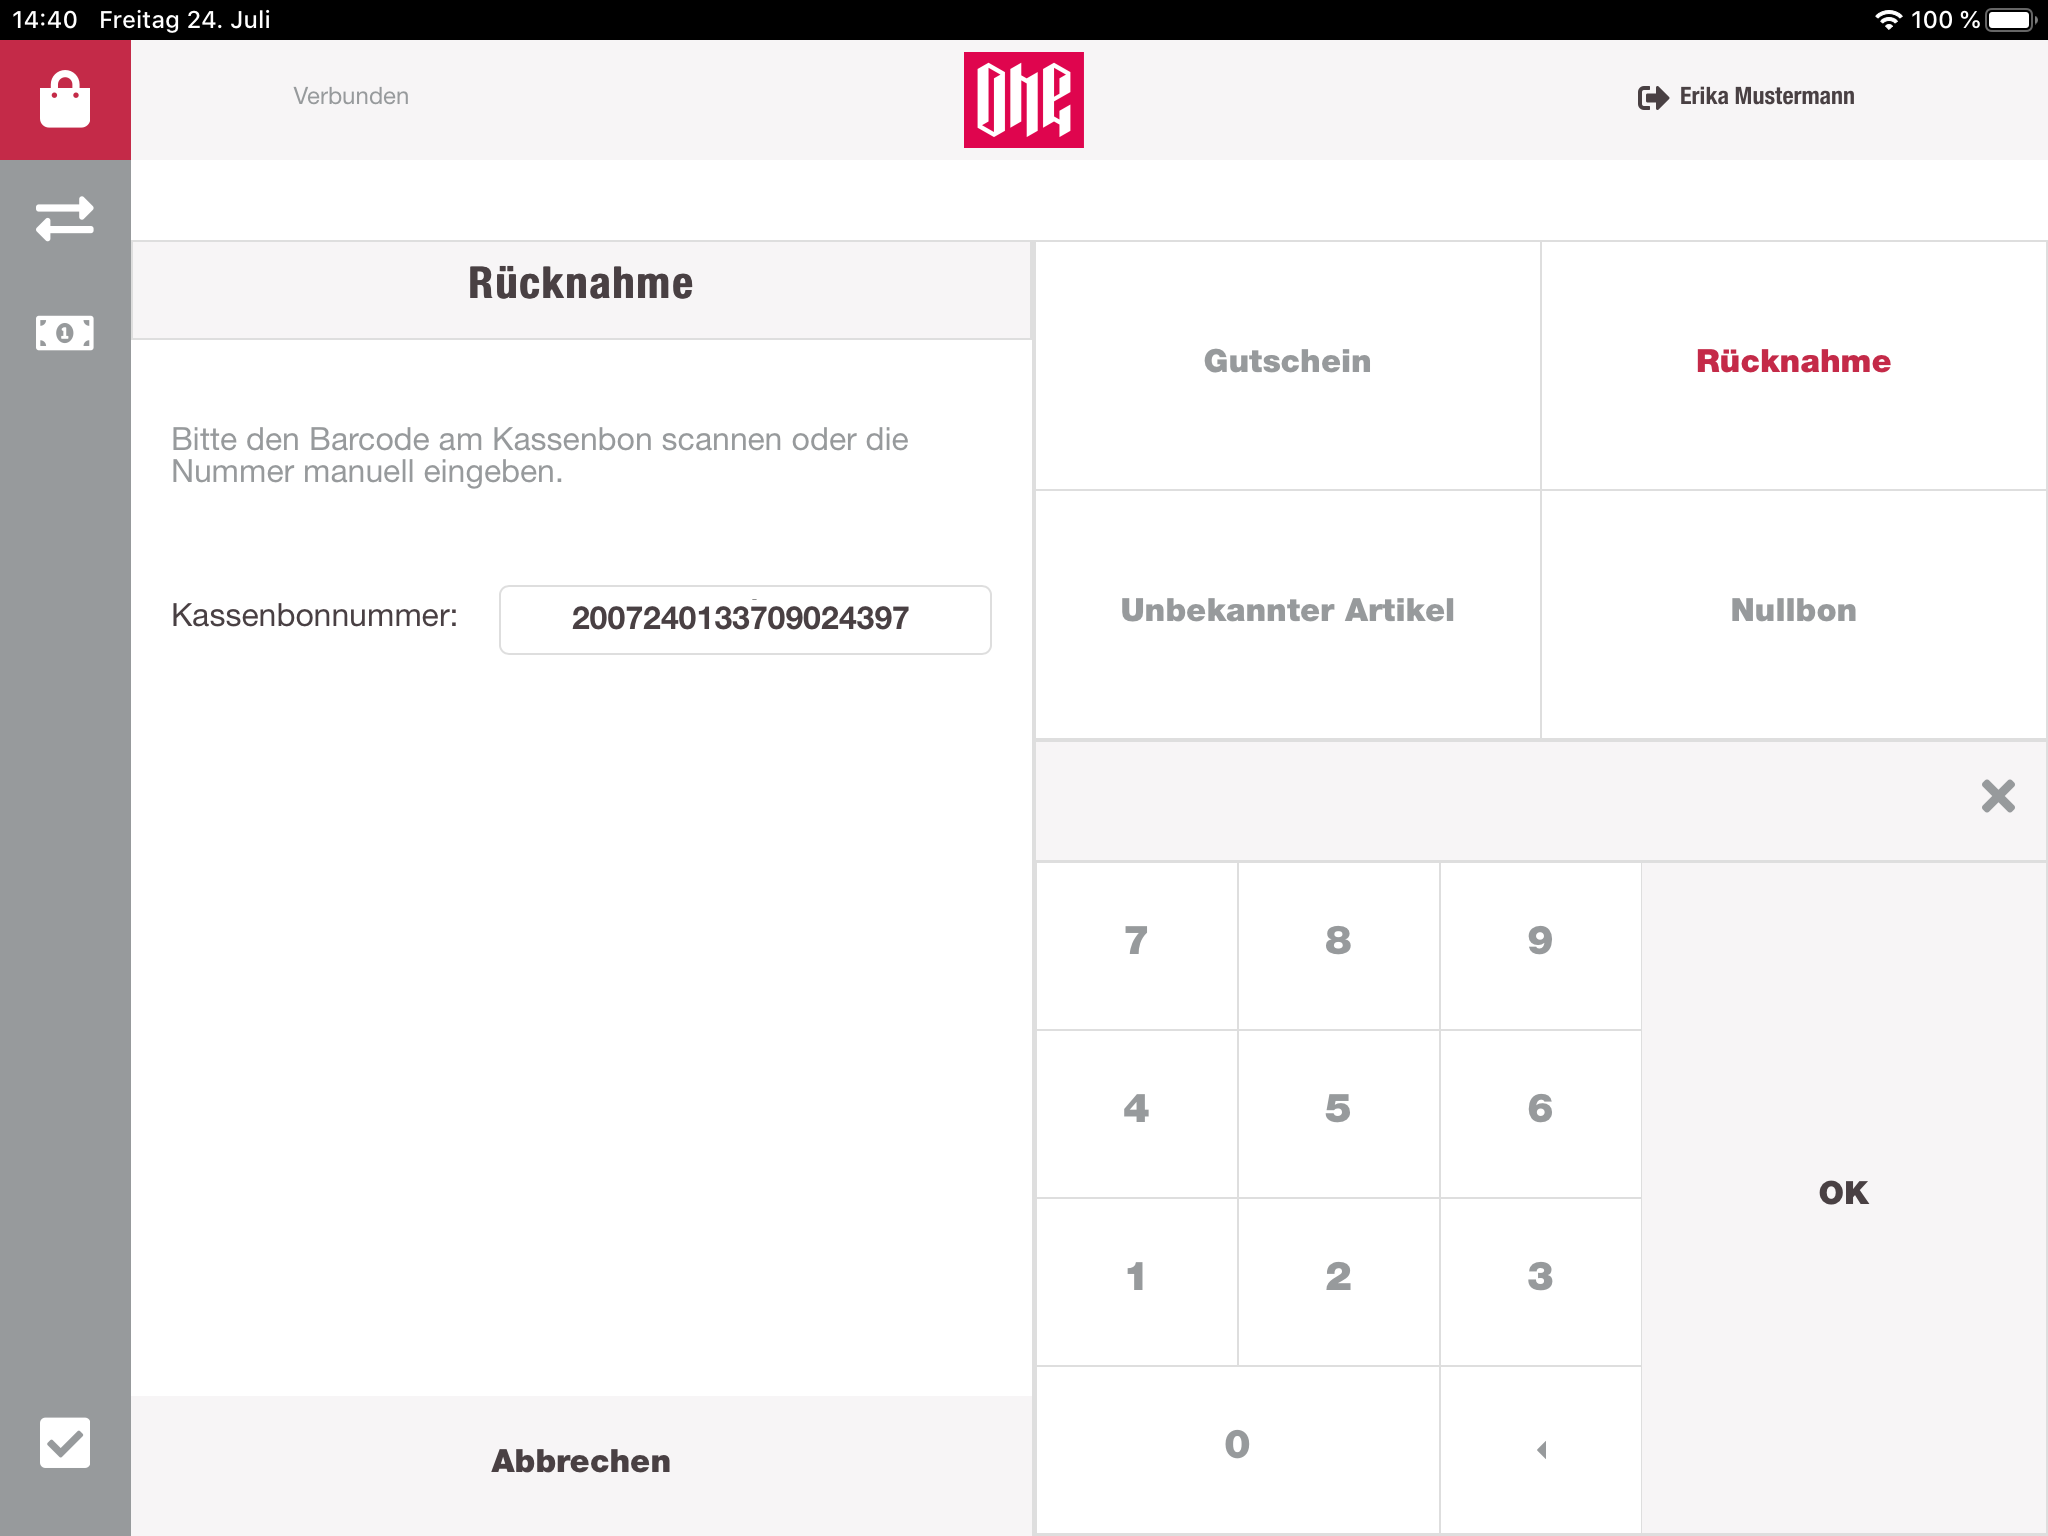
Refund
When refund is selected, the cashier has to provide a valid barcode of a receipt, again manually with the numpad or by scanning a barcode from a receipt. Directly scanning the barcode navigates to the same result.
Here the cashier has an overview of the original cart with all of his items and discounts. Not refunded items can be selected. When selected, the cashier has to provide the reason for the refund. After applying the selection, the selected items will be taken, and a new cart will be created with those items. This creates a refund cart with a negative sum. The total sum can be refunded to the customer by cash, pinpad or gift card.
SCREENSHOT
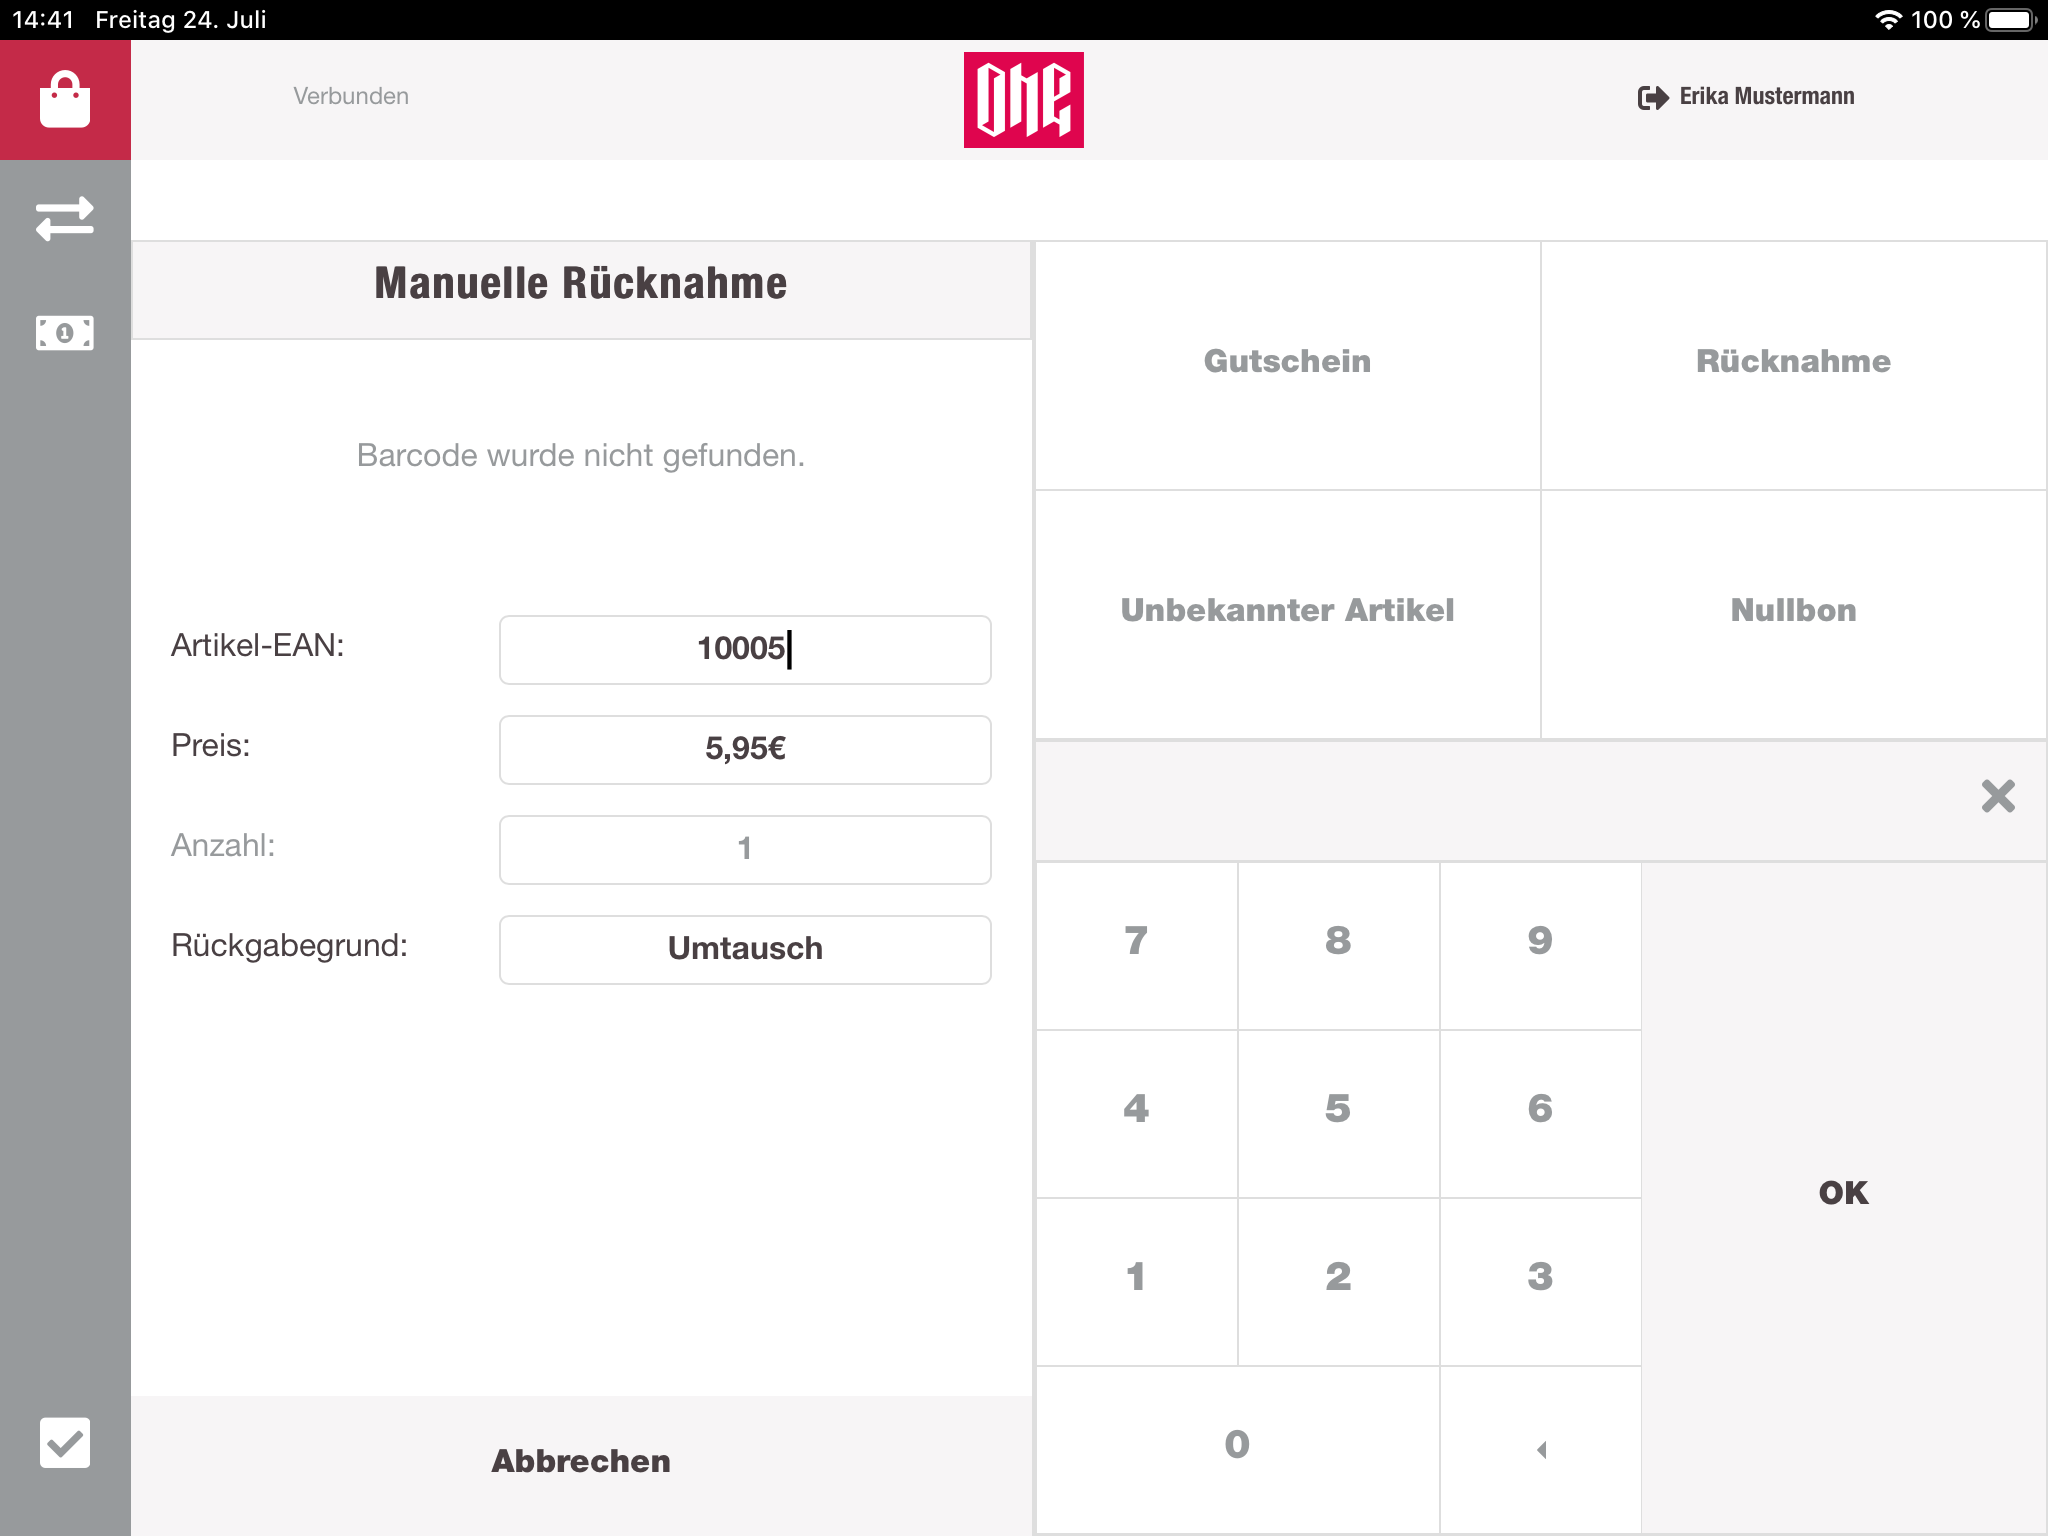
If the customer does not have a valid receipt, for example if he has a legacy receipt, then the cashier can initialize a manual refund. For the manual refund he has to provide the legacy barcode or leave the input field empty. After submitting the entry the cashier has to provide informations about the product/s to return. The SKU/EAN, price and refund reason are necessary.
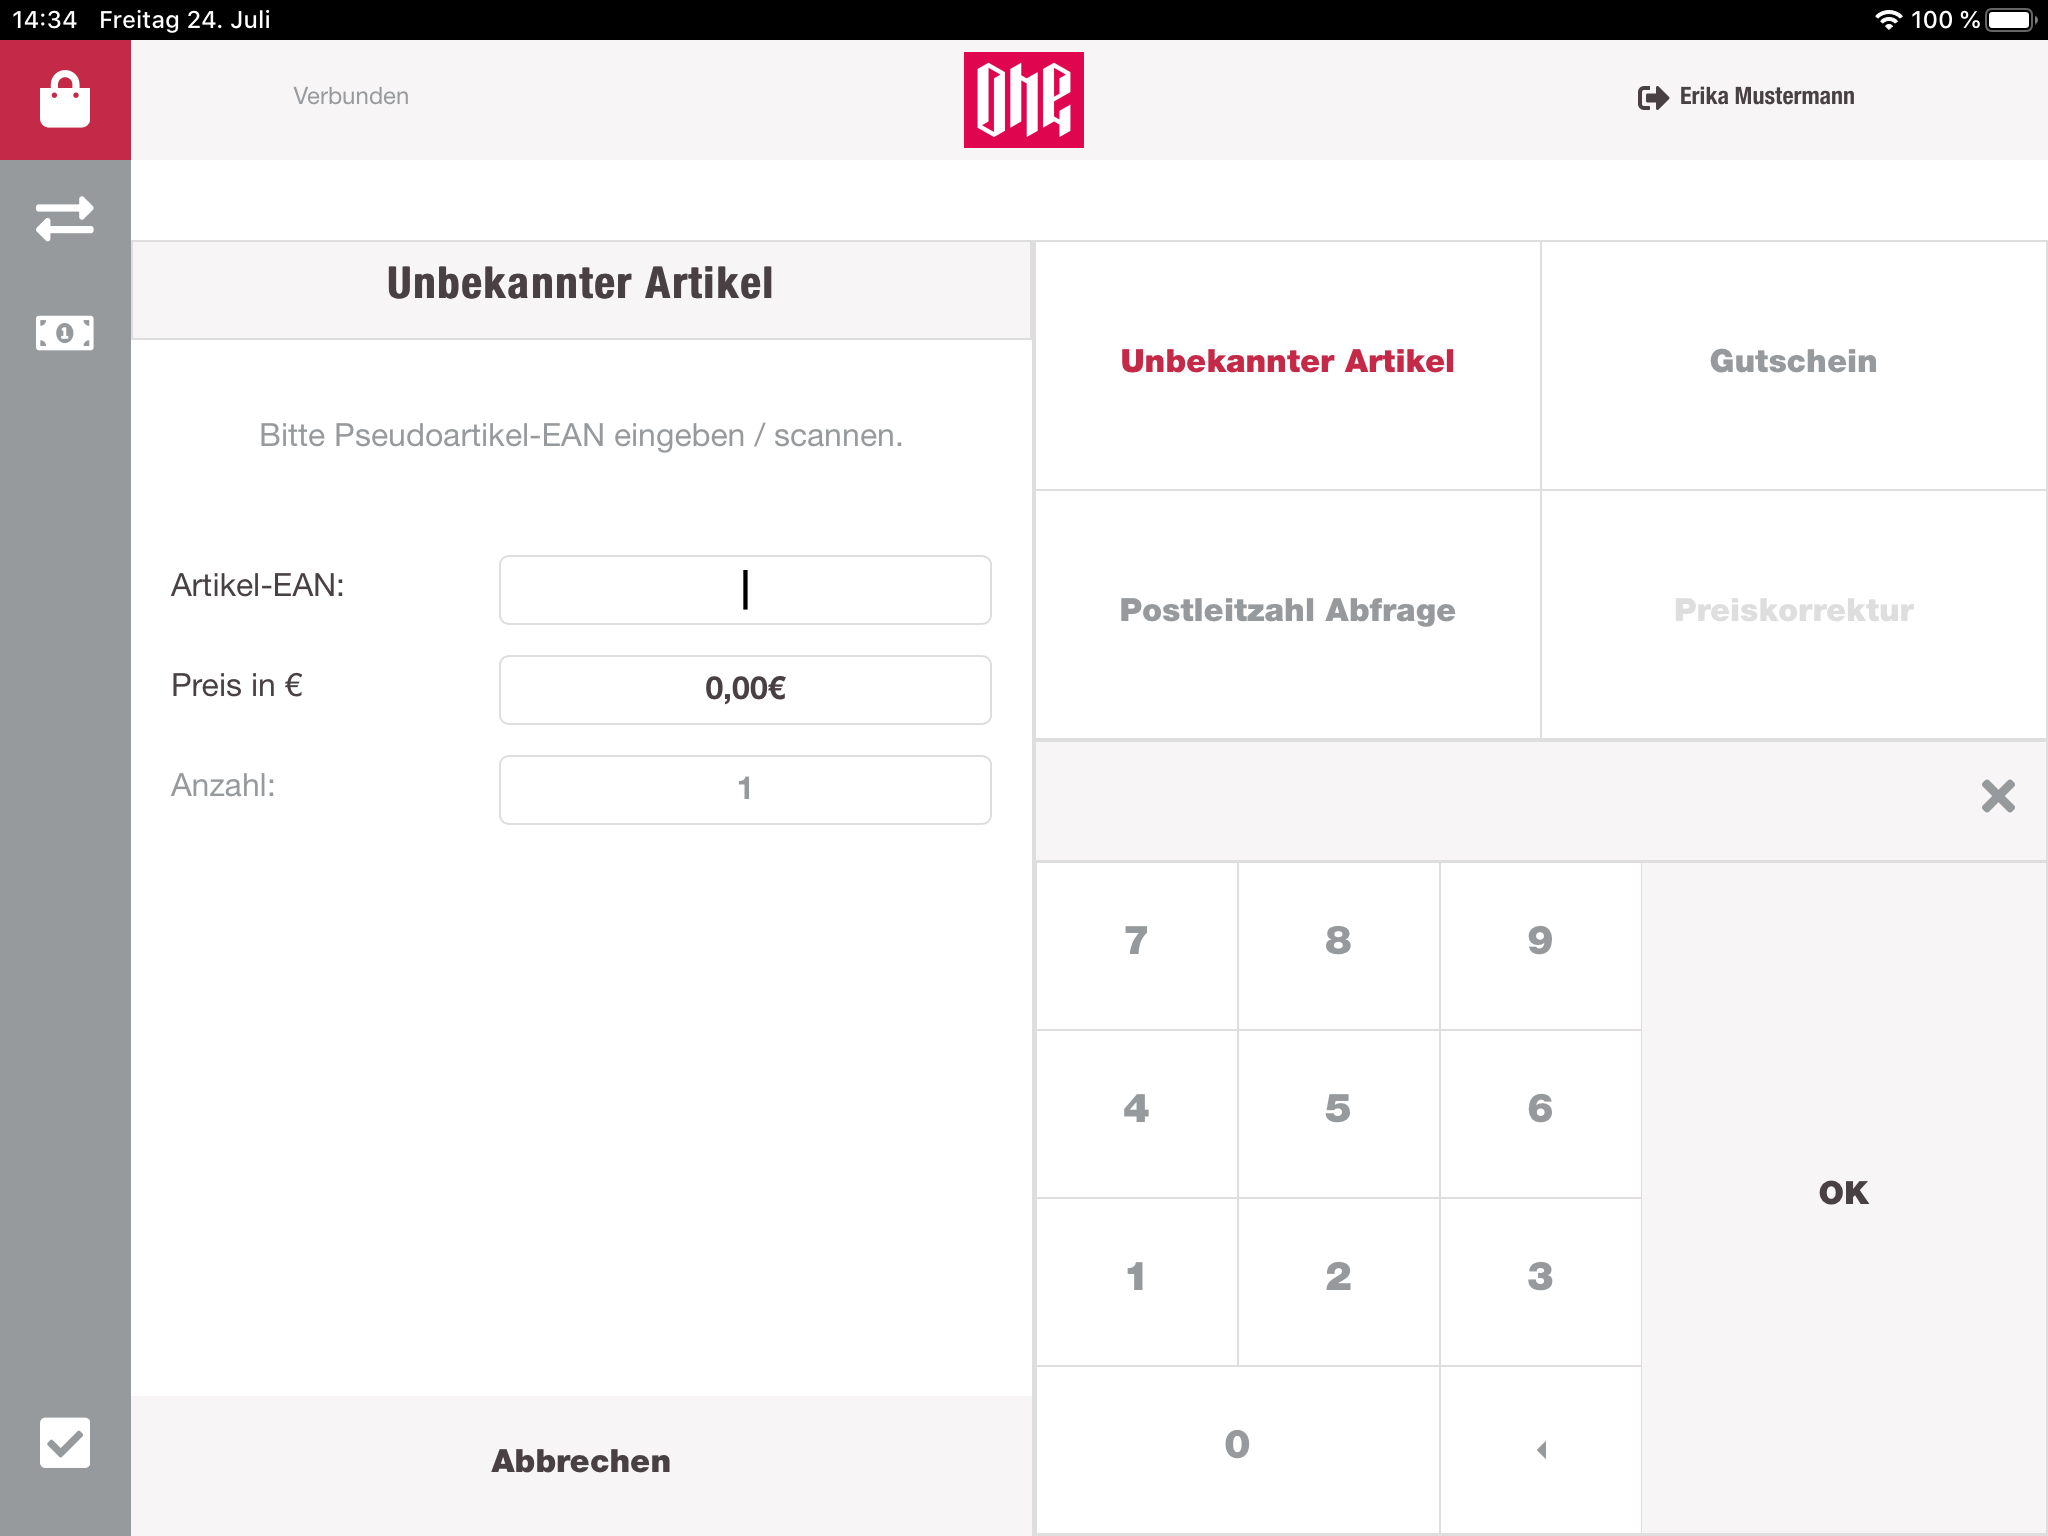
Unknown product
The unknown product can be used to add items to the cart, which can not be identified, for example when the packaging is lost and the barcode of the shoe is accessible. For this case there are existing default SKUs for different kind of product categories. So far that case the cashier has to provide one of those SKUs and the price for the given item. After submitting the form, a pseudo item will be included into the cart and is treated the same way.
Zero receipt
If the cashier has to open the cash drawer, without any sellings or refunds, the process has to be protocolized. For this purpose cashregister uses zero receipts. The cashregister is requesting a zero receipt from the receipt-service which contains information about the store, station, cashier, date, etc. Very similar to a usual receipt. This zero receipt is now included in the cashbook and is proof, that the cash drawer was opened. The zero receipt gets printed, and the cashier has to note down the reason for the opening on the receipt.
Postal code survey
For market analysis, the cashier sometimes have to provide the postal code of the current customer. This option switches the cart view to a form with an input field for the postalcode. With the numpad the cashier can enter the postal code and submit it.
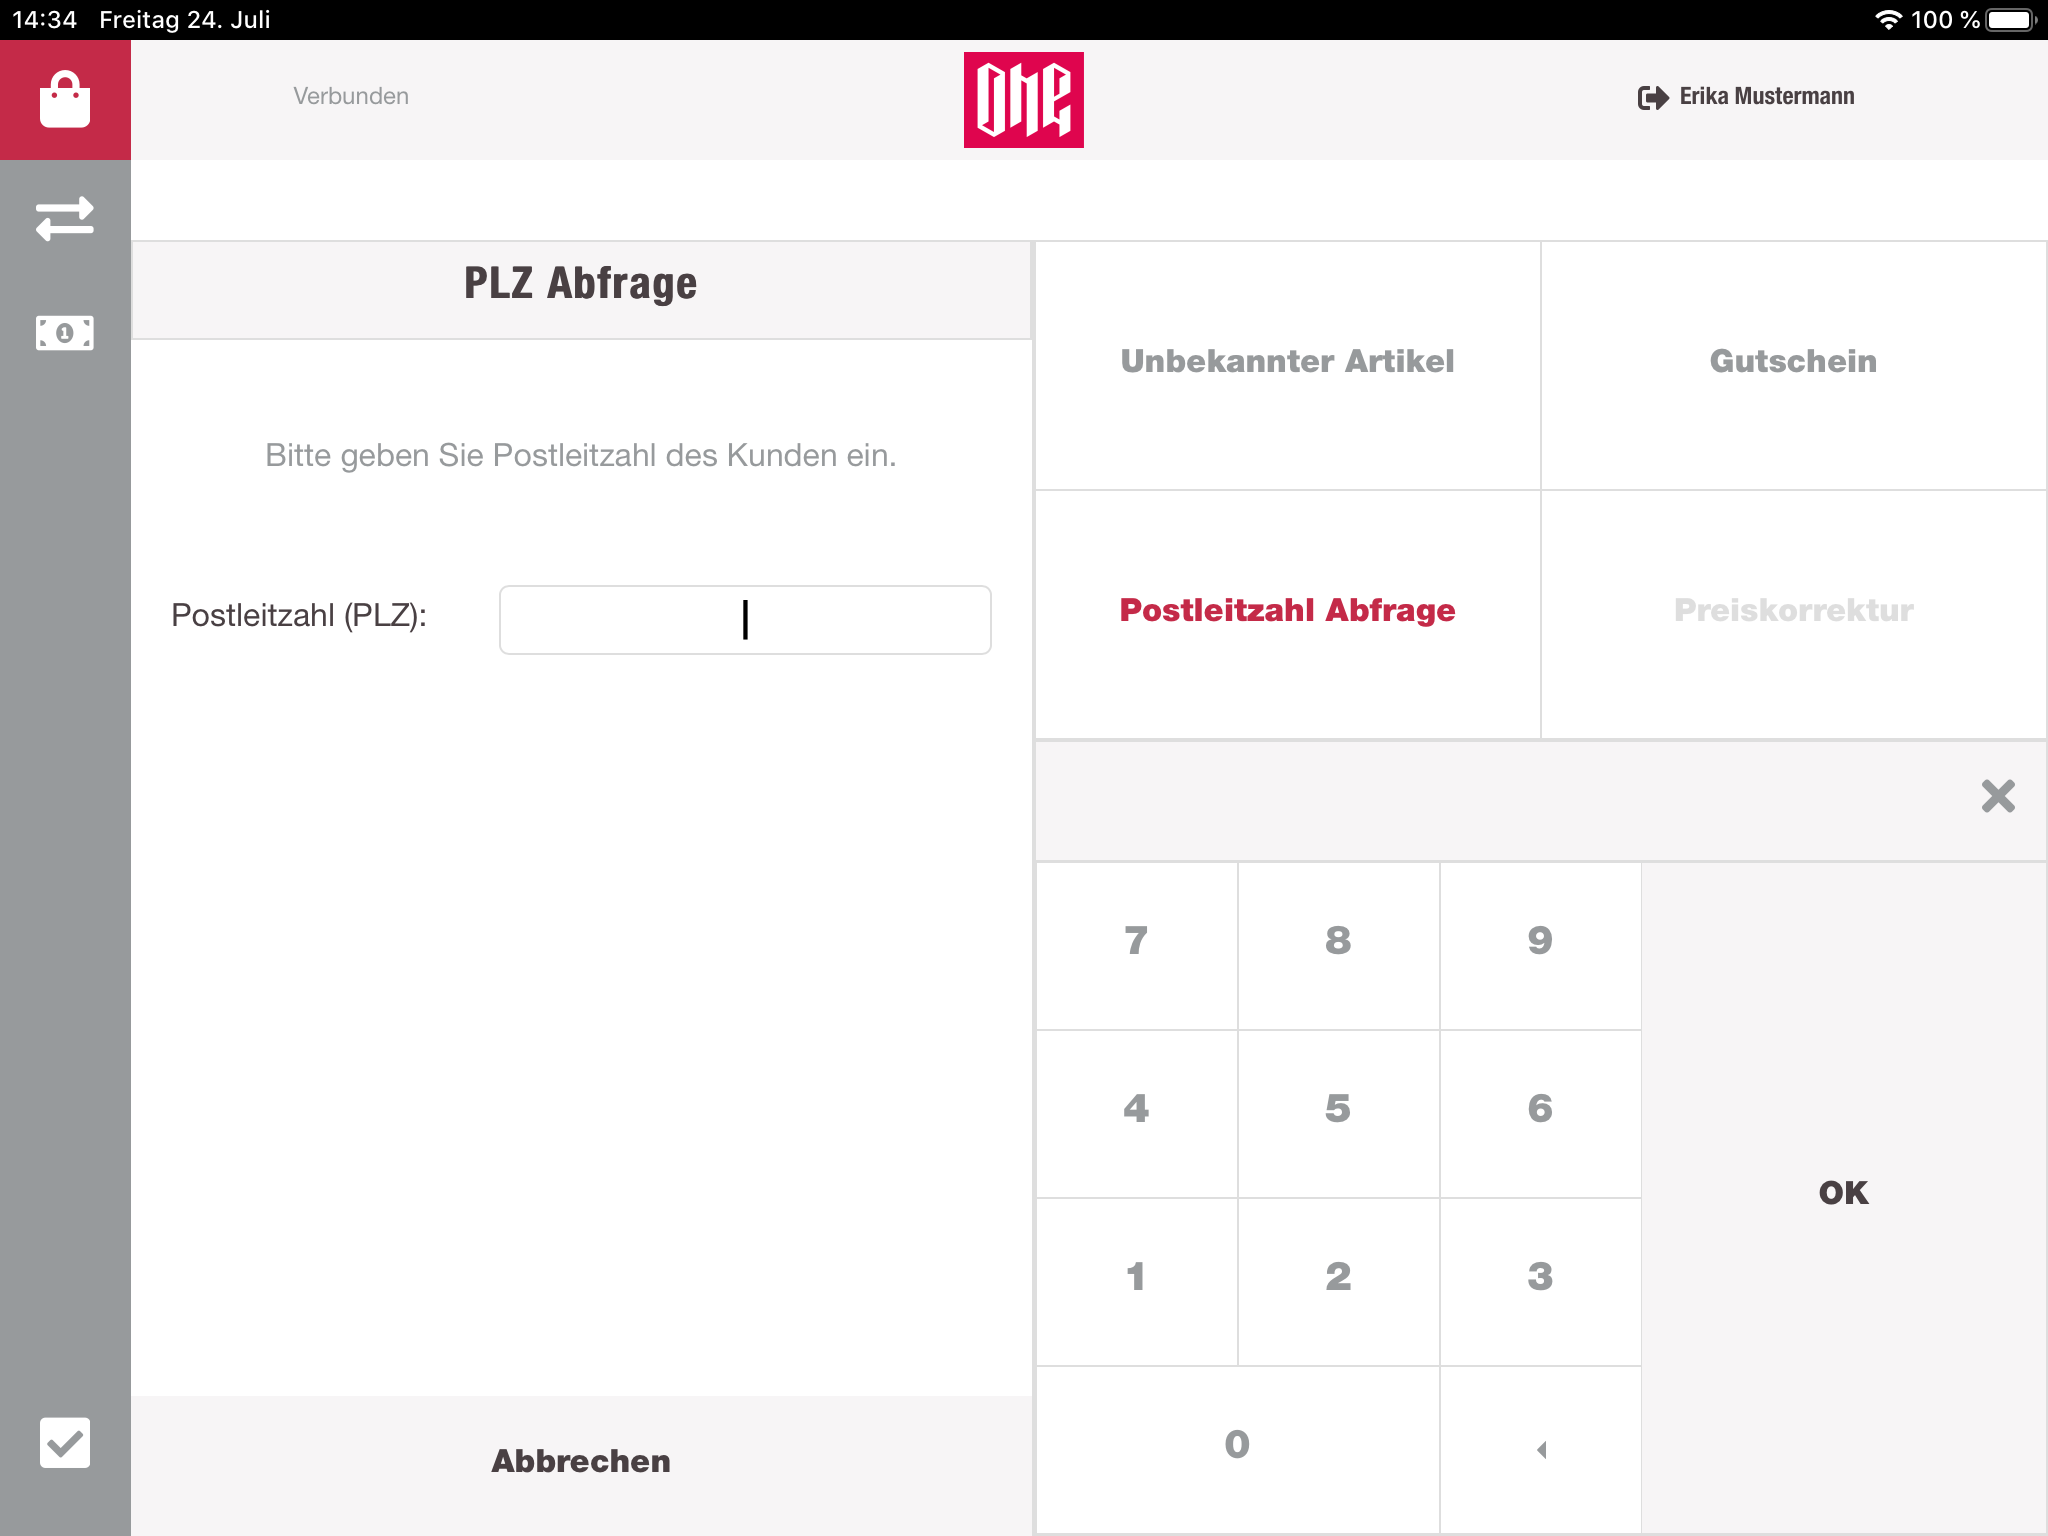
Once the postal code was submitted, it will be displayed below the cart header, with the possibility to remove it.
The postal code survey can only be reached when at least 1 item is inside the cart.
Price correction
For the price correction the cashier has to select the wished item and then click on the "more-options"-button in the cart header. From here the cashier can select the price correction. The view will change again, and the cashier can enter the new price. After submitting the new price, the view will be navigated back to the cart, and the item will have the new price.
SCREENSHOT
Payment methods
If the cart is not empty the dynamic button group will display different payment methods. Those payment methods can be configured individually per store via the backoffice application by the customers admins. After selecting a payment method, the cashier will be navigated to the payment view.
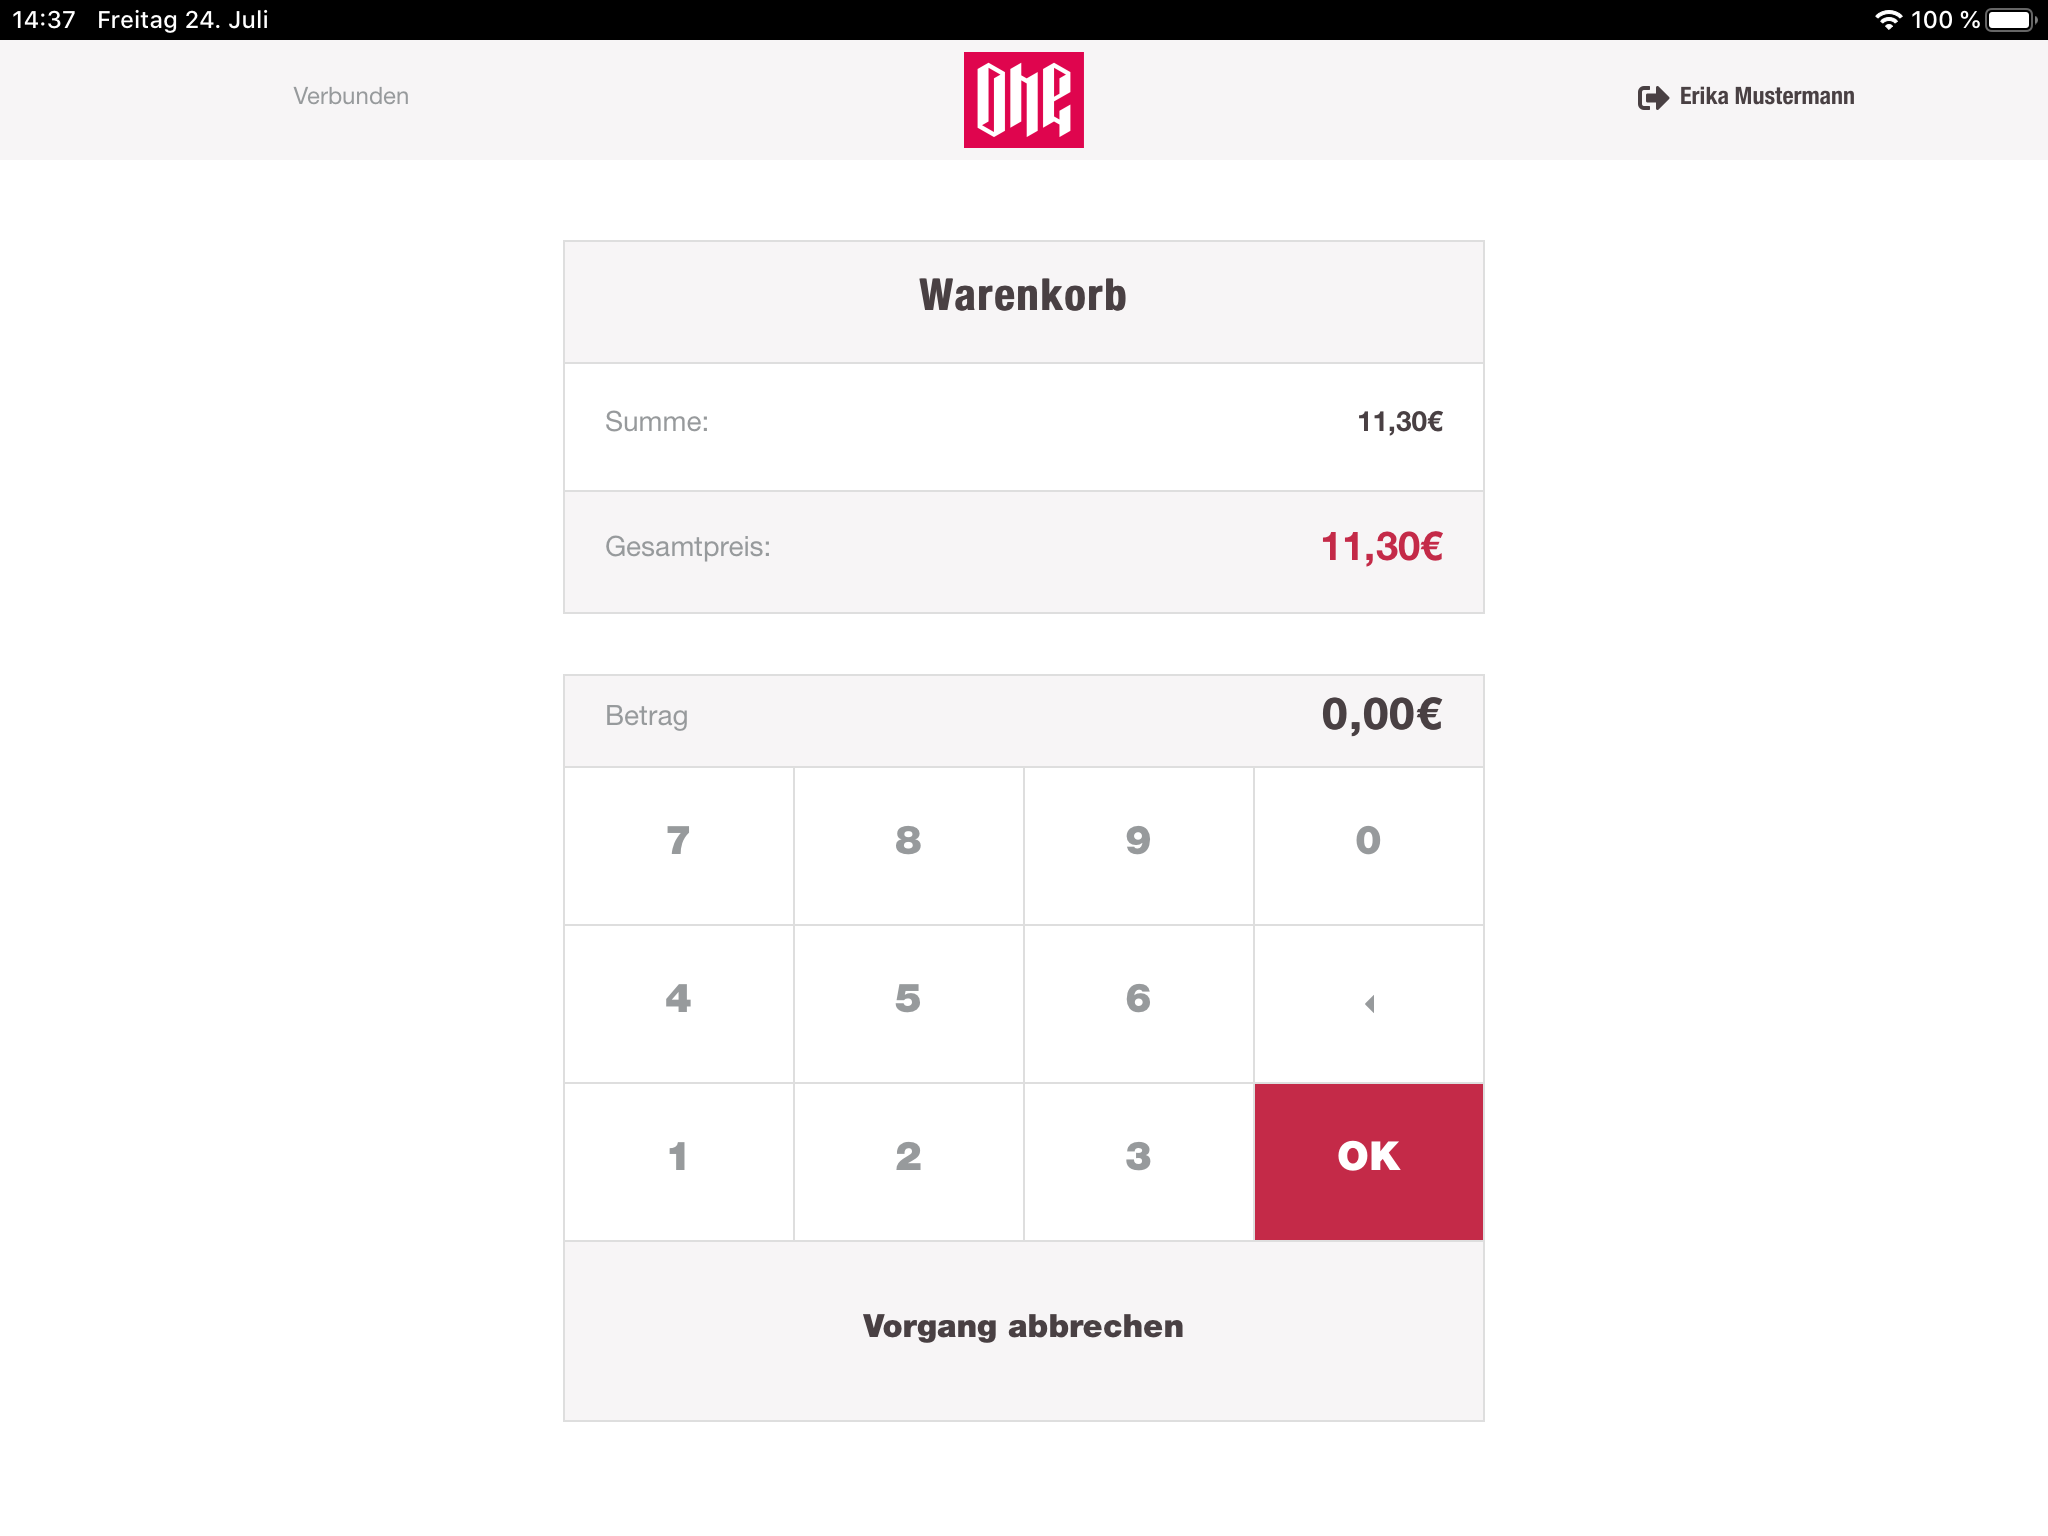
Cash
On the new screen the cashier will see the amount which the customer has to pay. Below that there is a numpad to enter the amount the customer is providing. The numpad for cash payment is split into two parts. The left side allows an entry of numbers which are concatenated with the current number. The right side shows whole euro bills. Each selection of a euro bill will sum up with the current sum. The cashier can only use one method per entry.
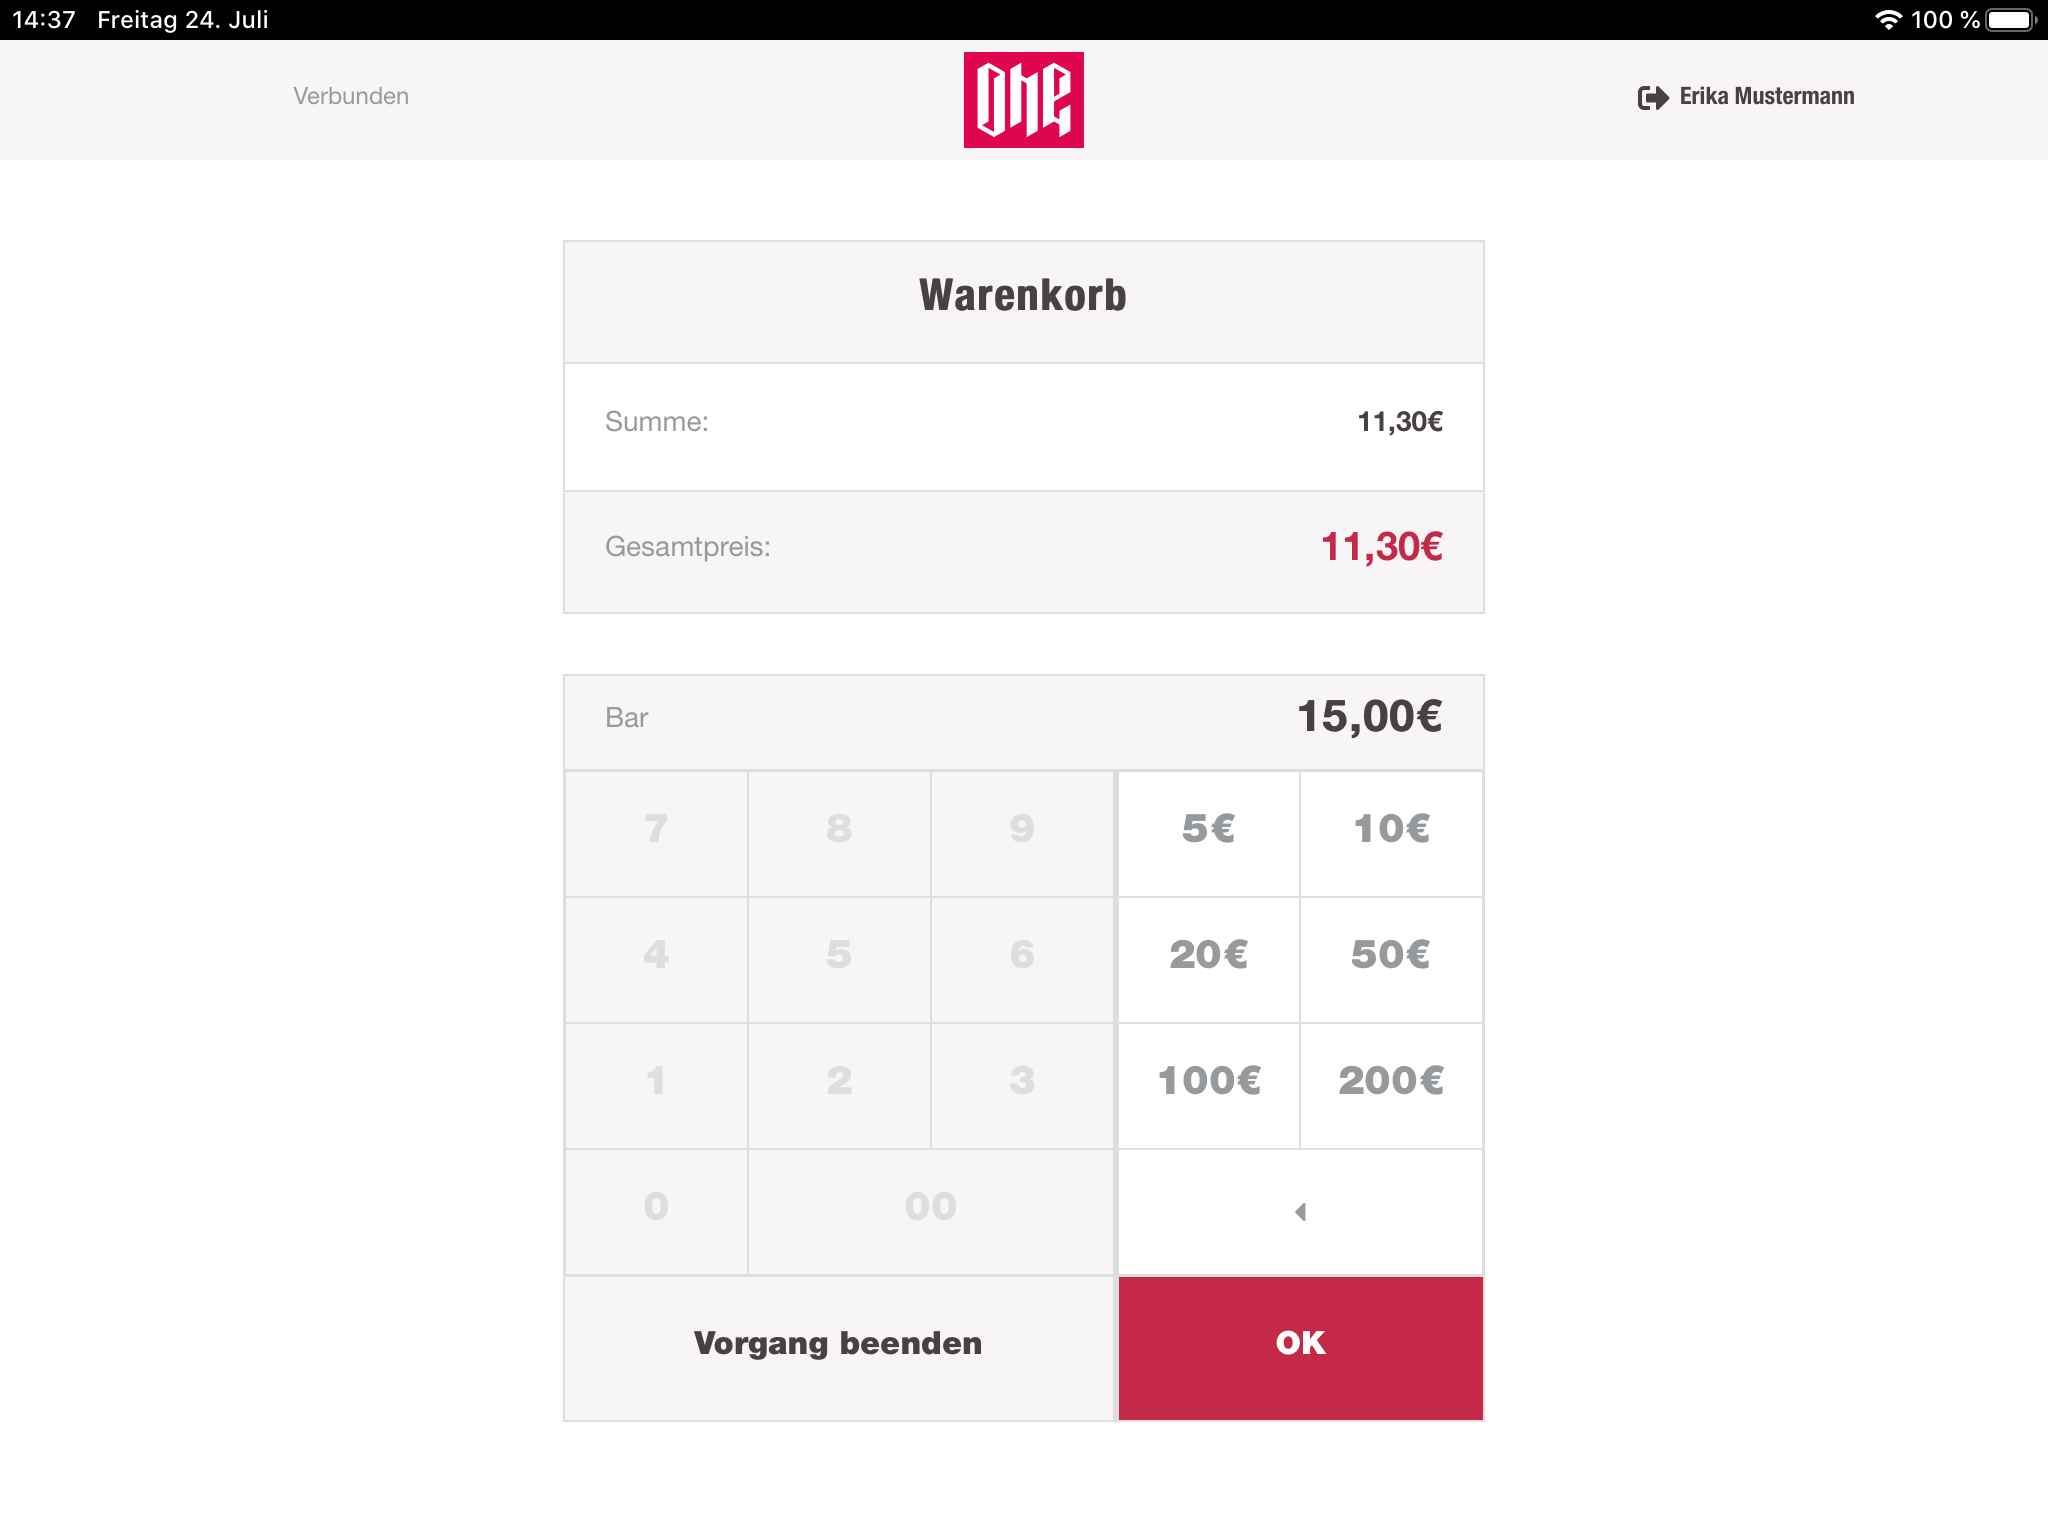
Once the entry is done, the cashier can submit the provided amount. If the amount is equal to the cart sum, the cash drawer opens so the cashier can include the money into the drawer. A receipt for the customer will be printed, and the cashier is navigated back to the cart view with an empty cart.
If the amount from the customer is higher than the cart sum, the cashregister will behave the same way, but will display the return money. The cashier has to take it out of the drawer and give it to the customer.
Another possibility is that the customer provides less money than the value of the cart sum. For that case the cashregister is not opening the drawer and is just navigating back to the cart view. Here the cashier can now see the partial payment listed down in the payment details. Once the payment is completed with another payment method, the drawer will be opened so that the cashier can include the cash money.
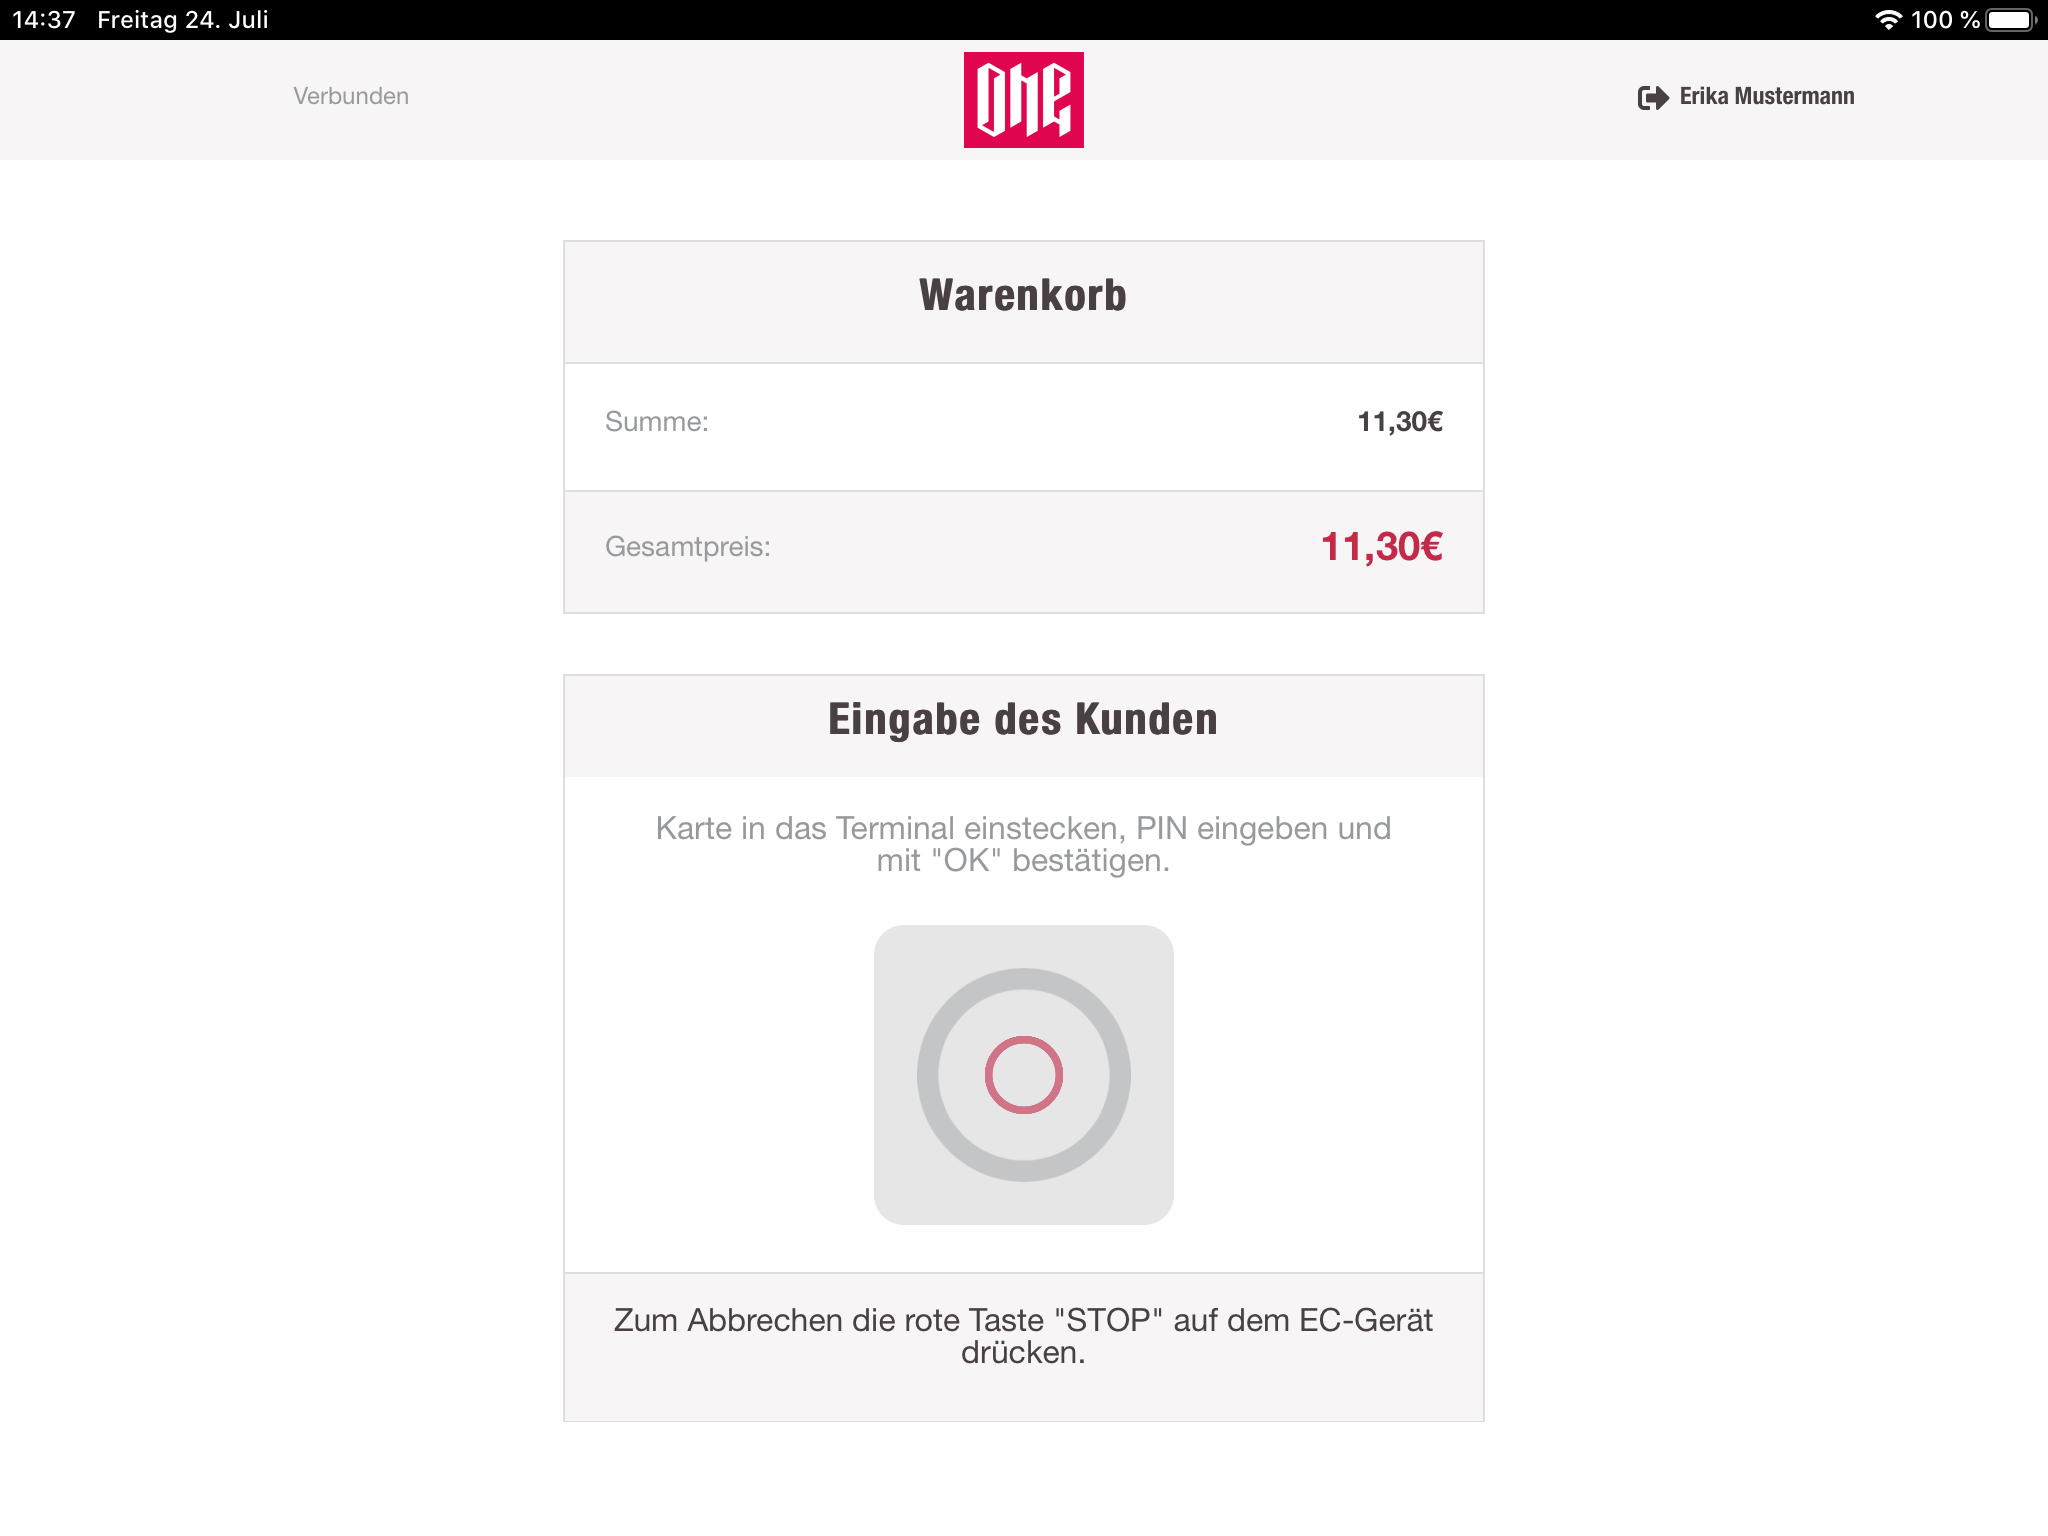
Pinpad/Card Payment
Here the cashier will also see the amount which the customer has to pay. The amount will be sent to the devicehub and from there to the card pinpad, which will display the amount. From there on the cashregister will just wait for a feedback from the devicehub. Once the card payment is done, the cashregister will receive a response and will display the successful payment on the screen. The receipt will be printed and the cashregister navigates back to the cart view with an empty cart. If the devicehub receives and error from the pinpad it will forward the message to the cashregister. The error will be also displayed to the cashier. It is not possible to initialize a partial payment with the pinpad payment method. Pinpad is only receiving the remaining amount of the cart and is always the last possible payment method.
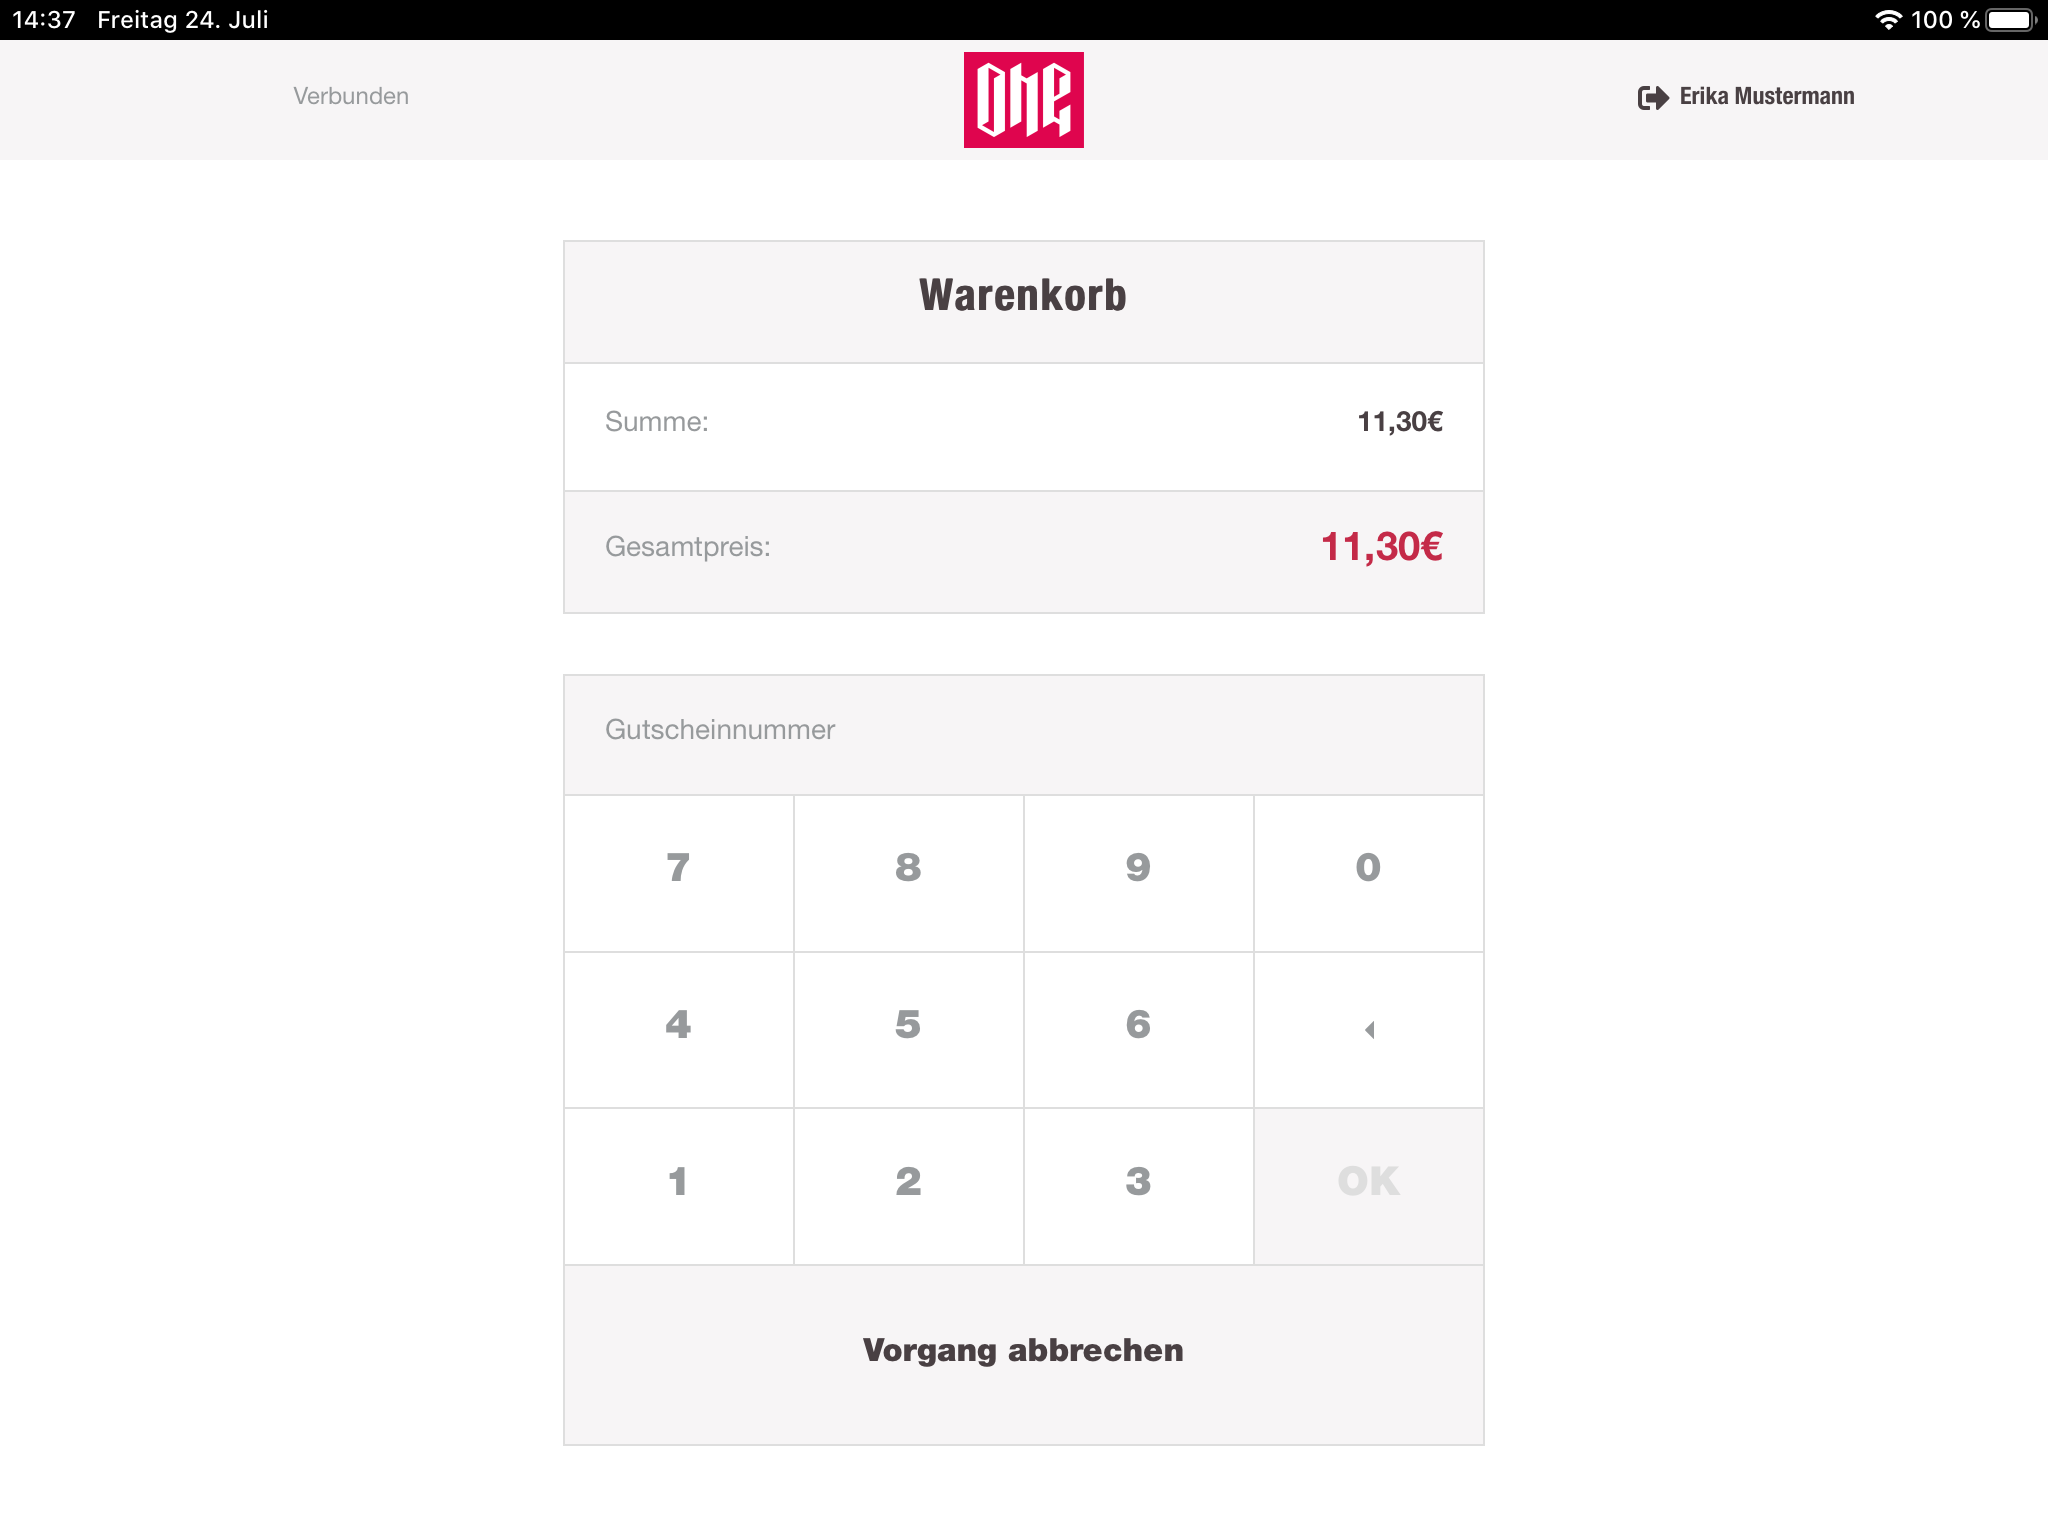
Gift card
Also here the remaining amount the customer has to pay will be displayed. The cashier can enter the gift card number manually via the numpad or can just use the hand scanner and scan the barcode of the gift card. payment-service will check the gift card balance and subtract the cart sum if there is some money on the card. If the gift card can pay the whole amount, the payment will be successful, a receipt will be printed and the cashregister navigates to the cart view with an empty cart. If the gift card can not pay the whole cart sum completely, the gift card payment will be a partial payment and the cashregister will navigate back to the cart view, where the gift card payment is listed down in the payment details. The remaining amount has to be paid, to complete the payment.
Sozialschein
The Sozialschein can only be used once. So it is not possible to pay with only one part of the Sozialschein. The cashier has to take the Sozialschein from the customer once he paid any valid amount with it. Valid is every amount with the same or a lower amount which the Sozialschein provides. For that reason the cashregister allows an amount entry only with the same or a lower value than the cart sum or the remaining cart sum. After successfully using the Sozialschein the payment can be completed or used as a partial payment as the other payments (except pinpad).
Coupon
Absolute and relative Coupons can be used in the cashregister. The cashier has to select the type in the dynamic button group. The cart view will switch, and the cashier can see a form for the coupon number and the value of the coupon (absolute or relative). After submitting the coupon data, the cart sum will be reduced and the payment details will be updated. With coupons only partial payment is possible.
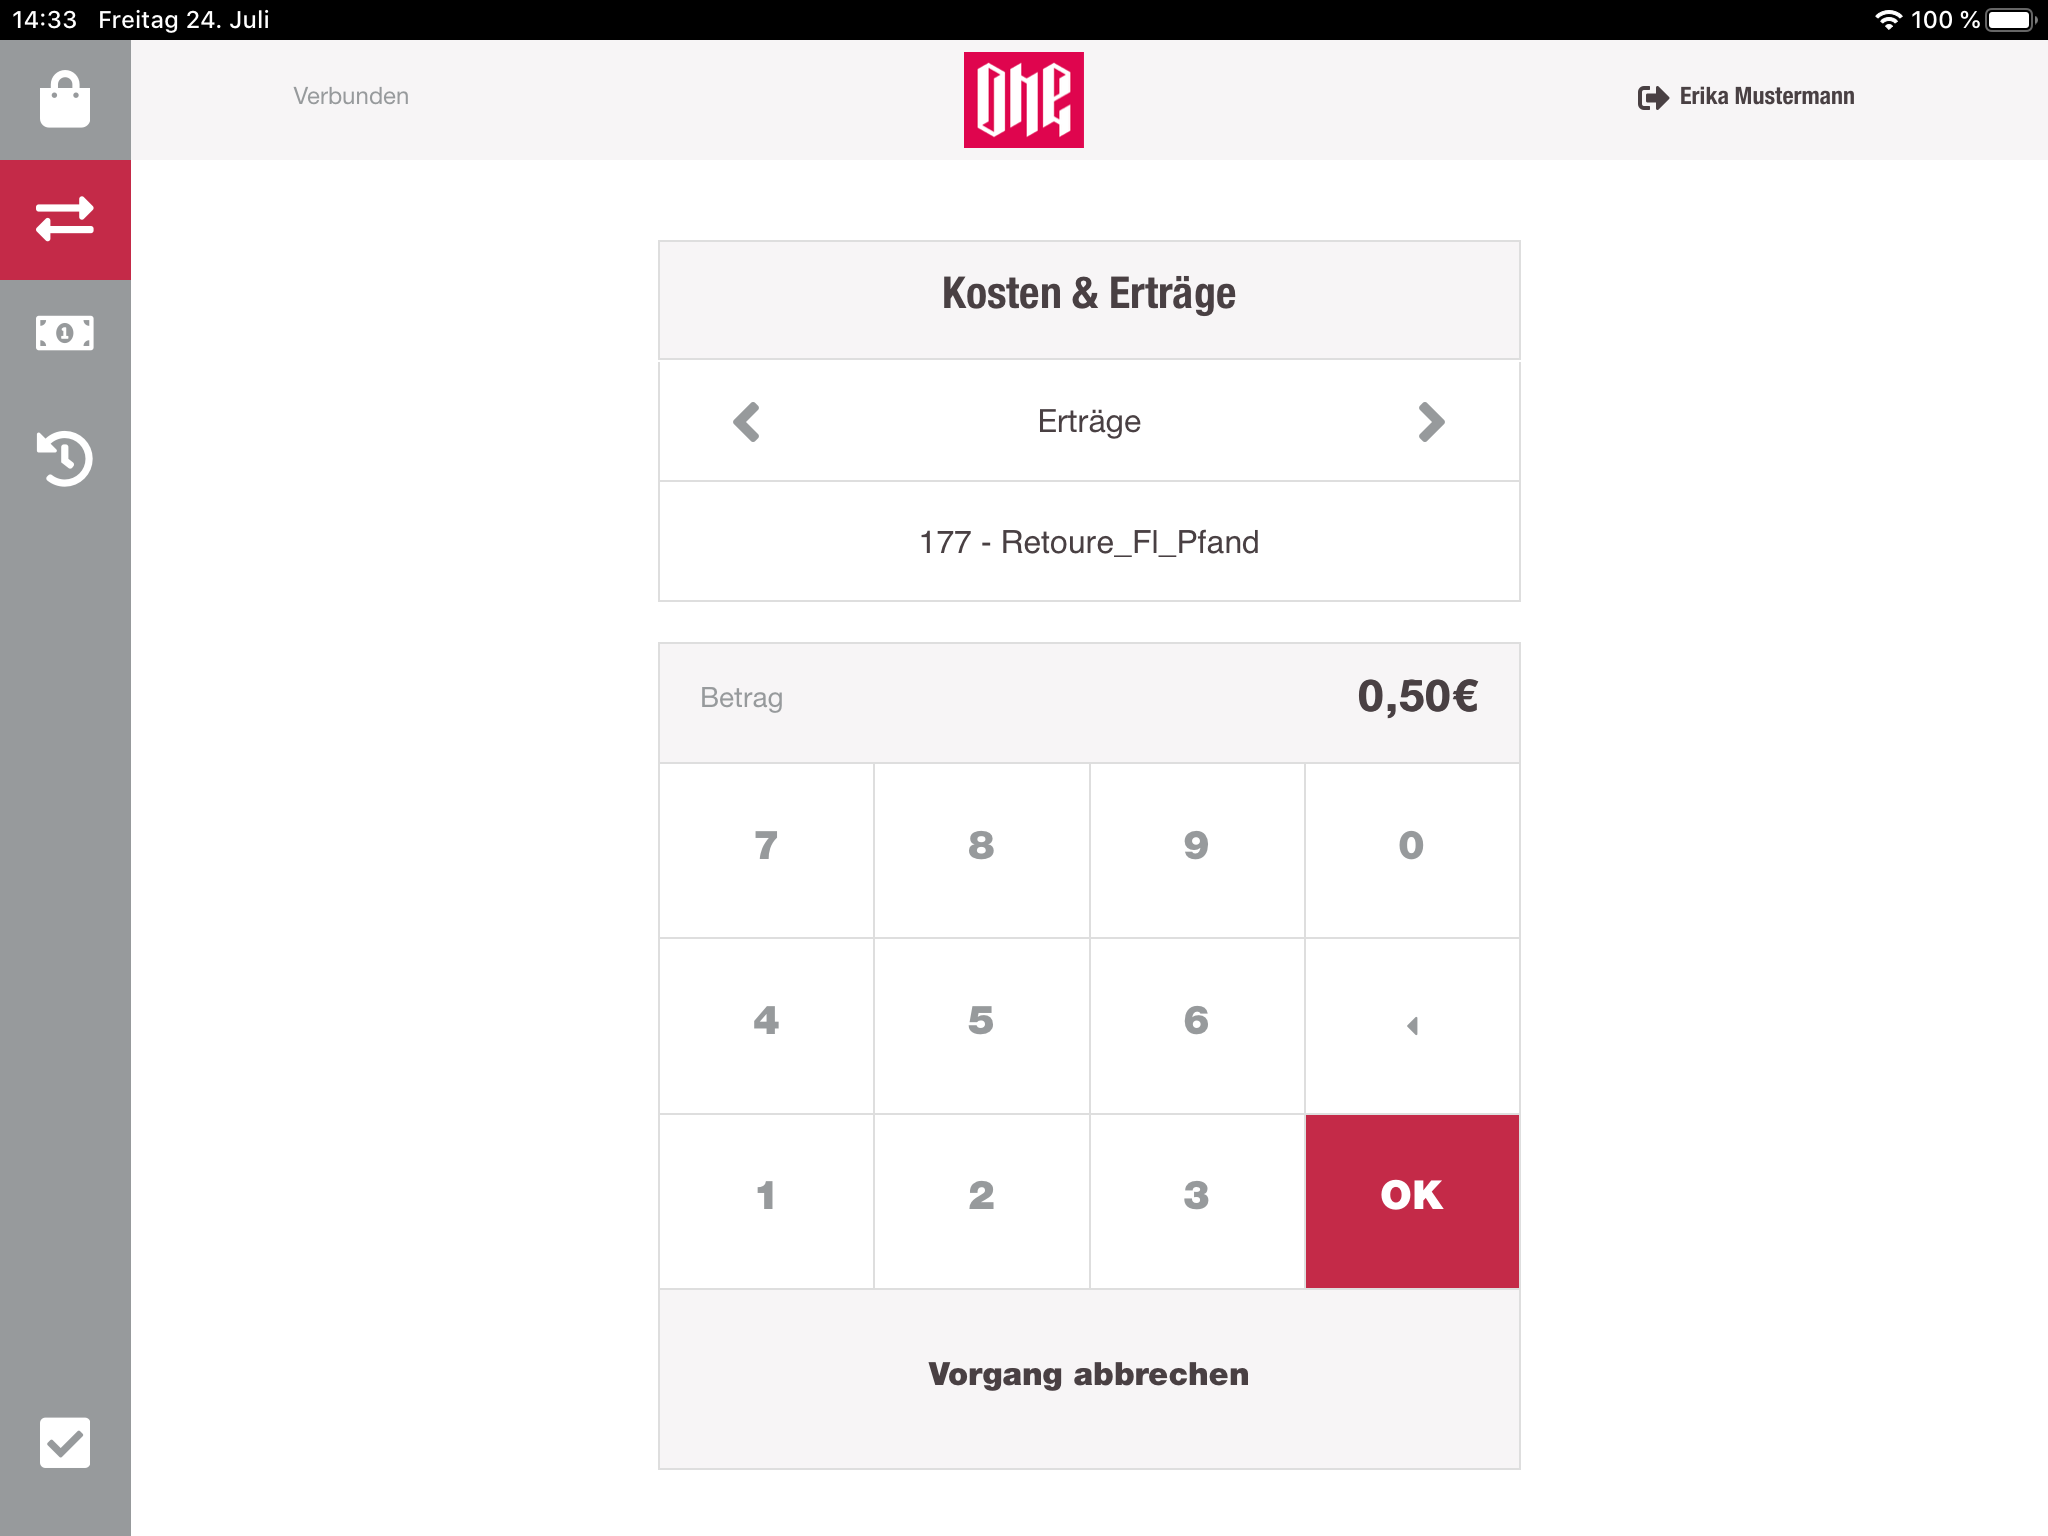
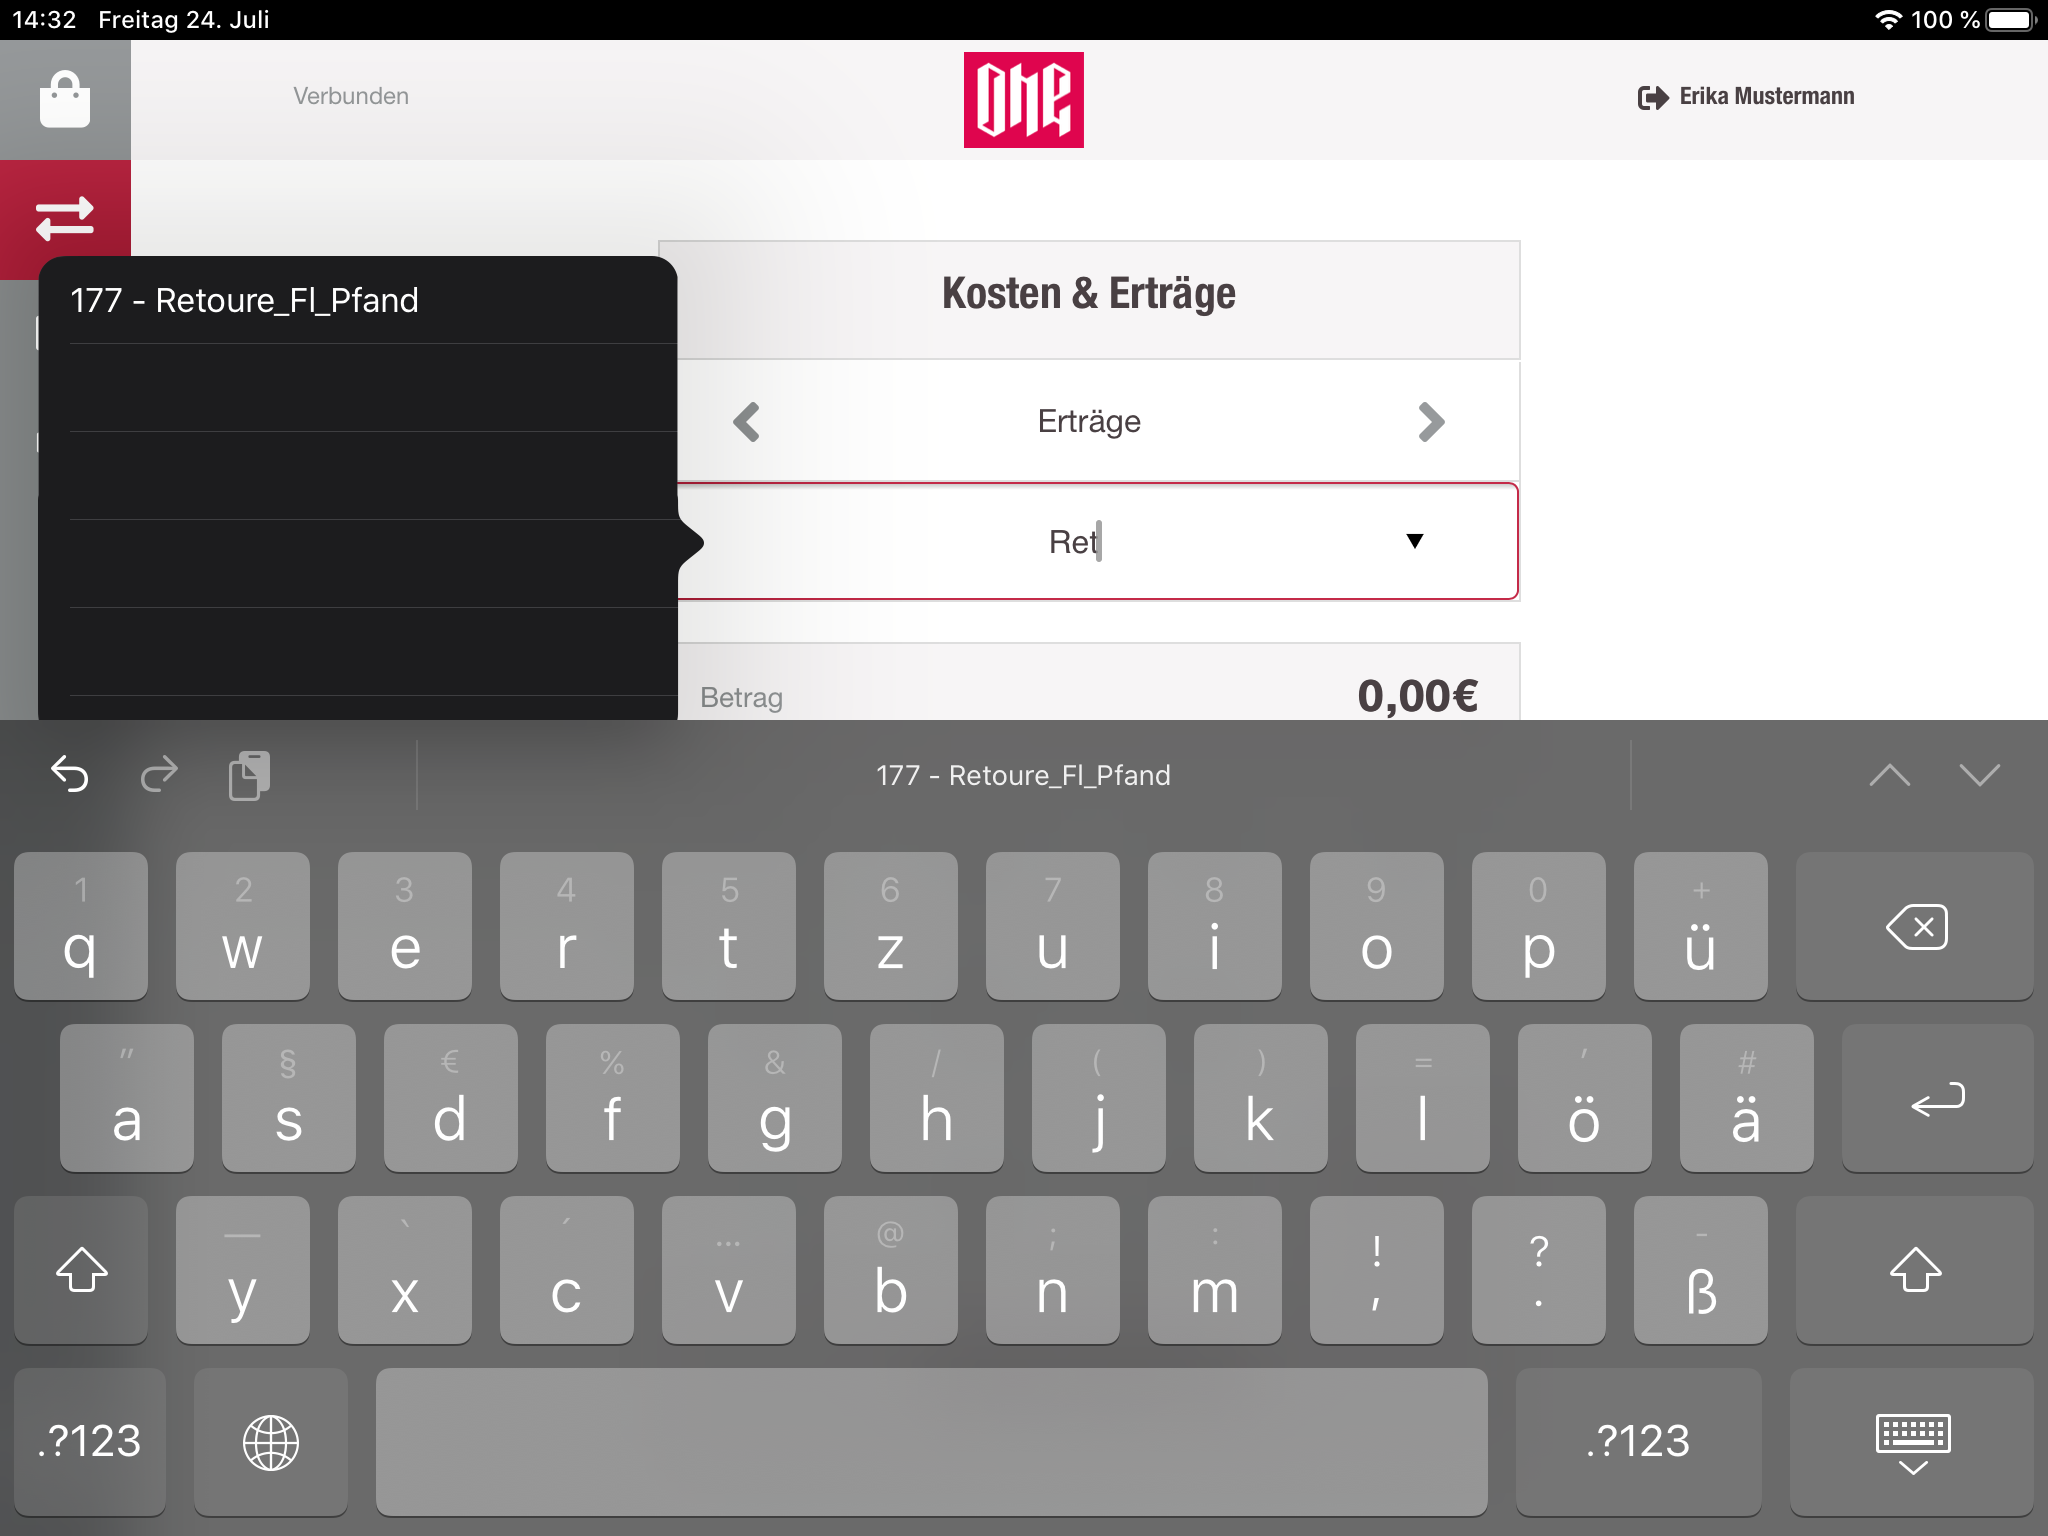
Misc. incomes and expenses
Here the cashier can manage incomes and expensed. First the cashier has to select the type (income or expense), provide the reason and then enter the amount. The reasons are listed down in a dropdown menu and switch between the two types. It is possible to search in the list by typing. Once the form is filled out and submitted, a small note will be printed with the given informations and the drawer will be opened.
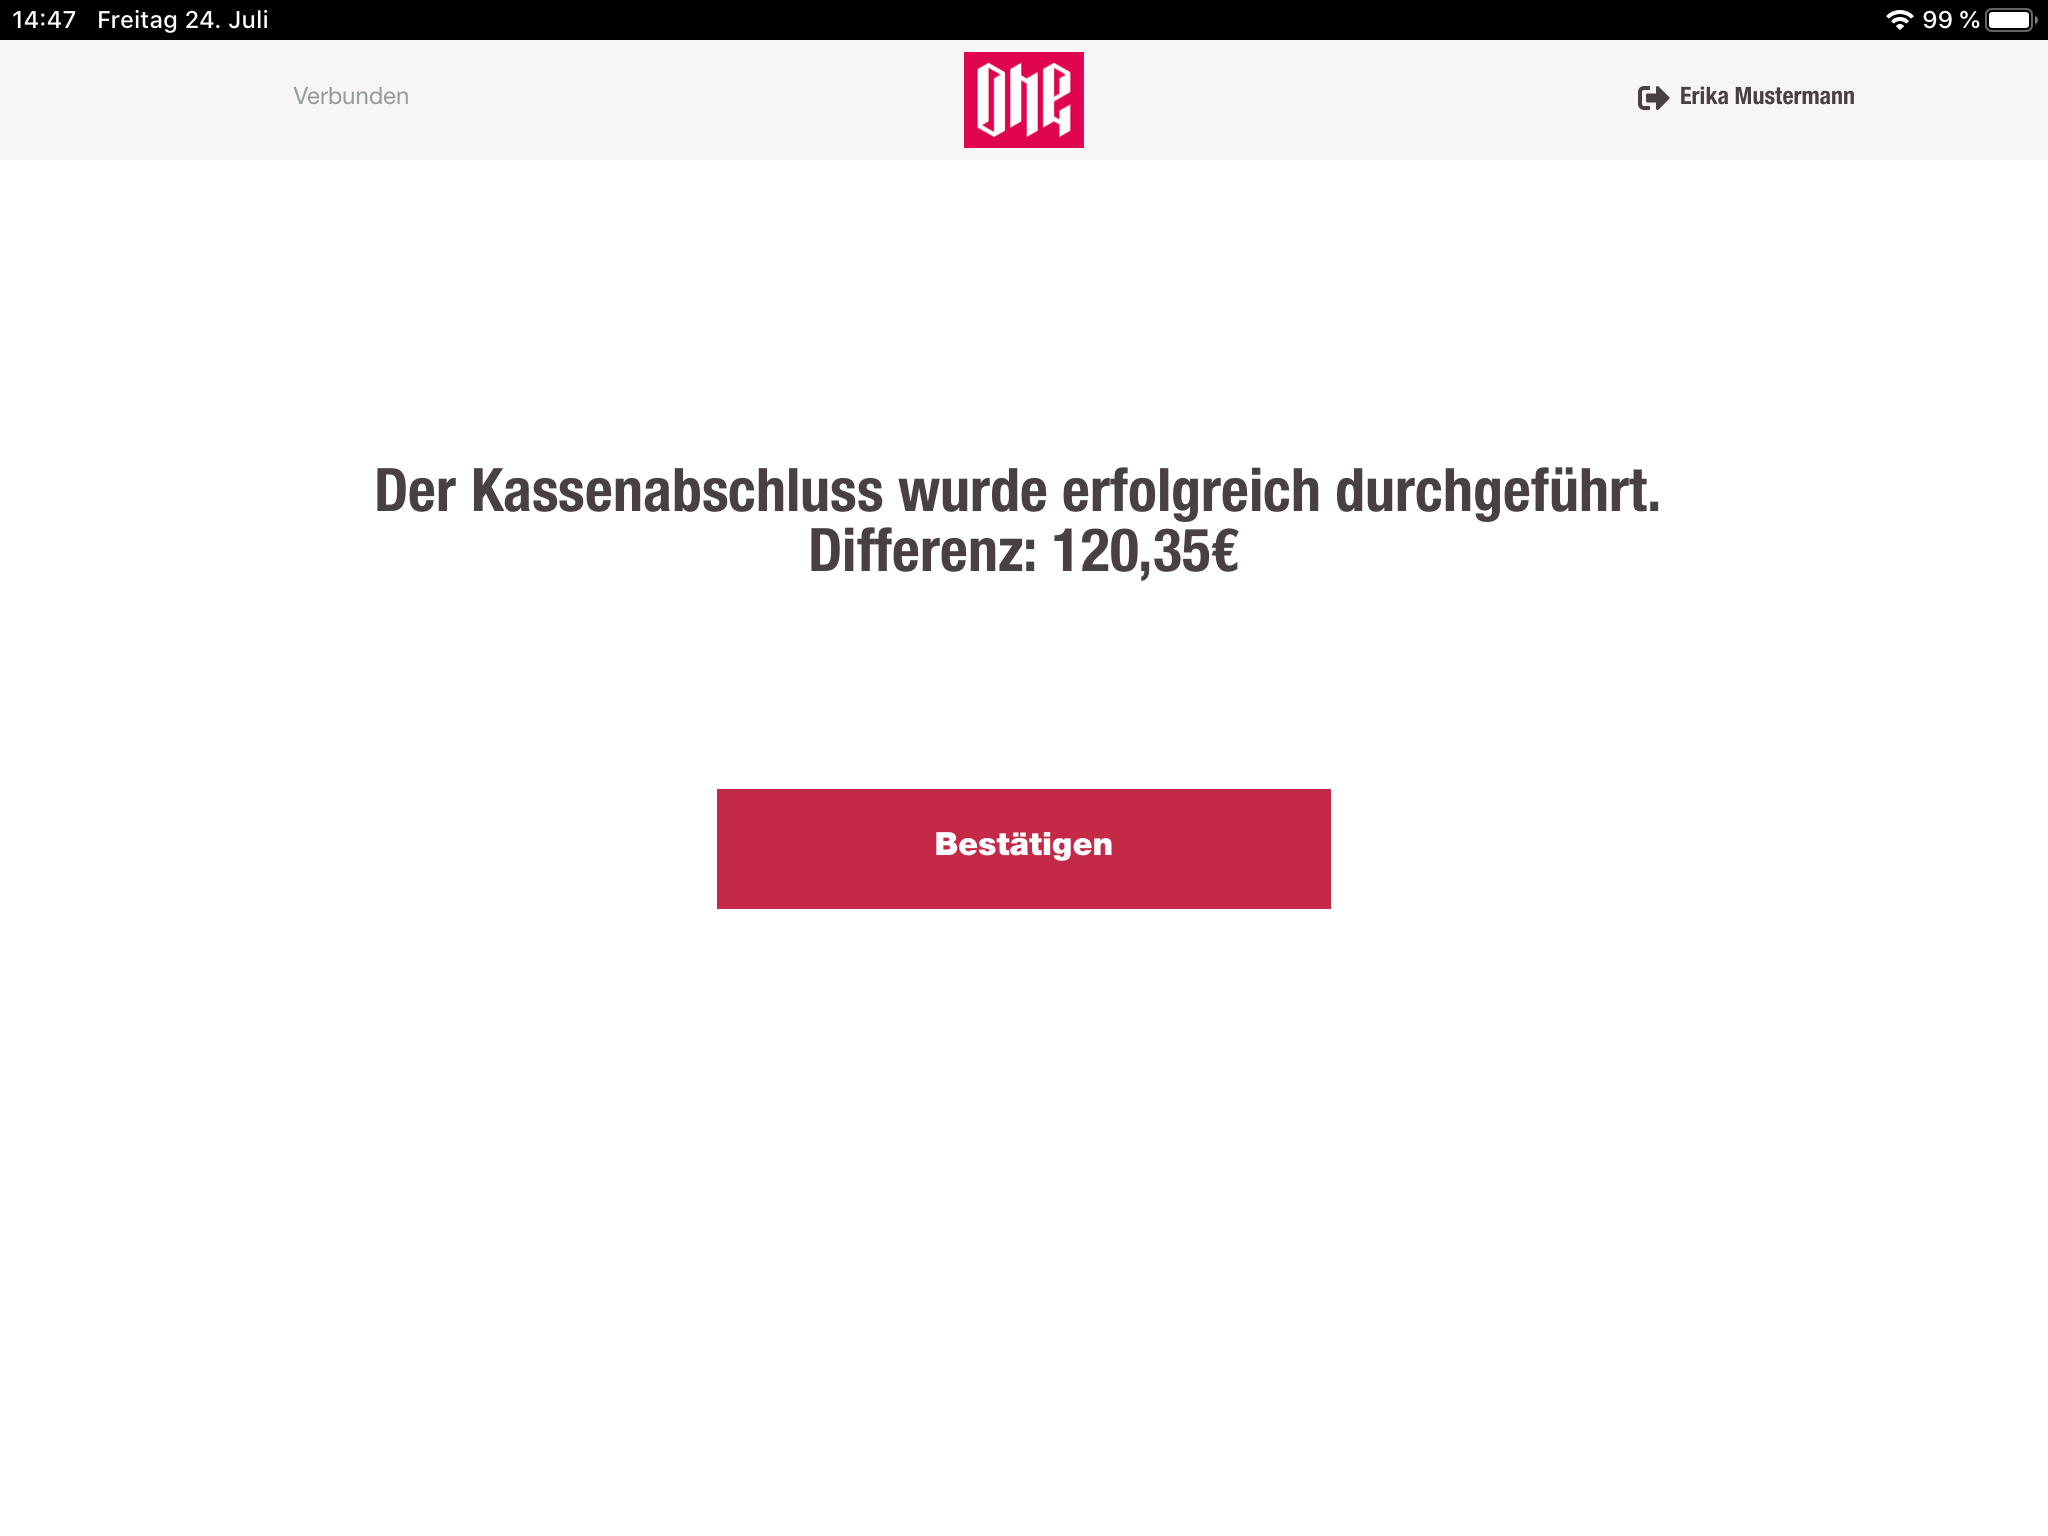
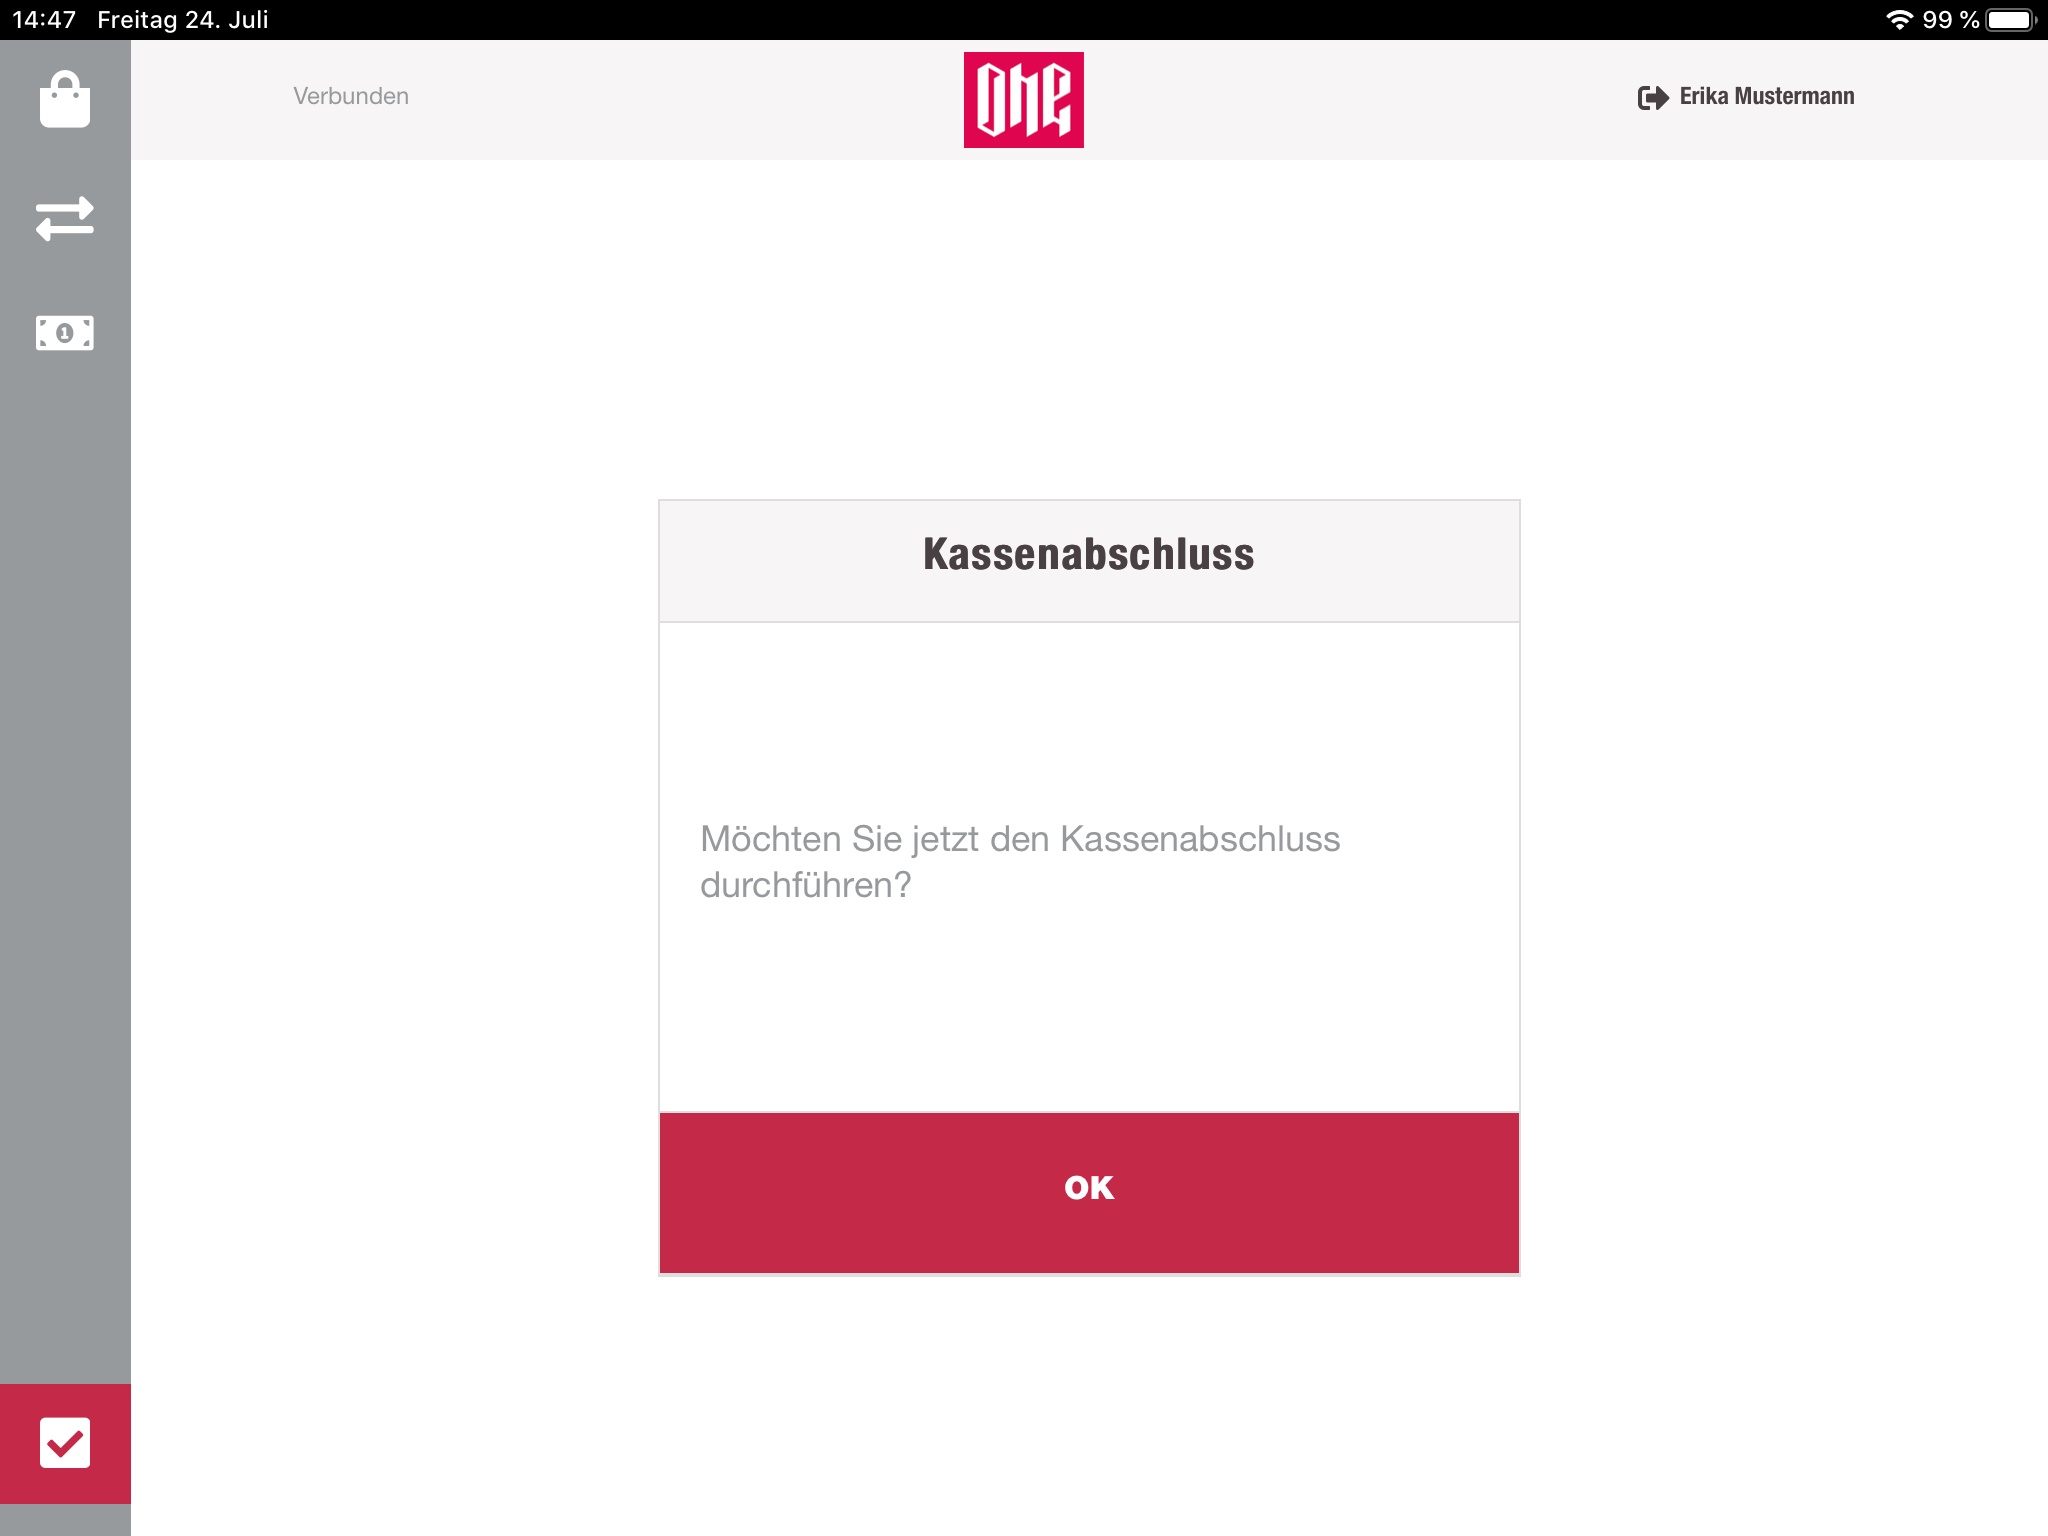
Close settlement
At the end of a working day, the cashier have to count the money in the drawer and close the settlement. This process can be done on the last point of the sidebar.
First the cashier has to navigate to that page and confirm that they want to close the settlement. After the confirmation the settlement will switch his state from OPEN to COUNTING. The cash drawer will be opened, and the cashier can take out the money of the drawer.
Now the cashier has to count the money and provide the counted money in the form. It is also possible to log out and to provide the amount later in the "manage cashregister" section.
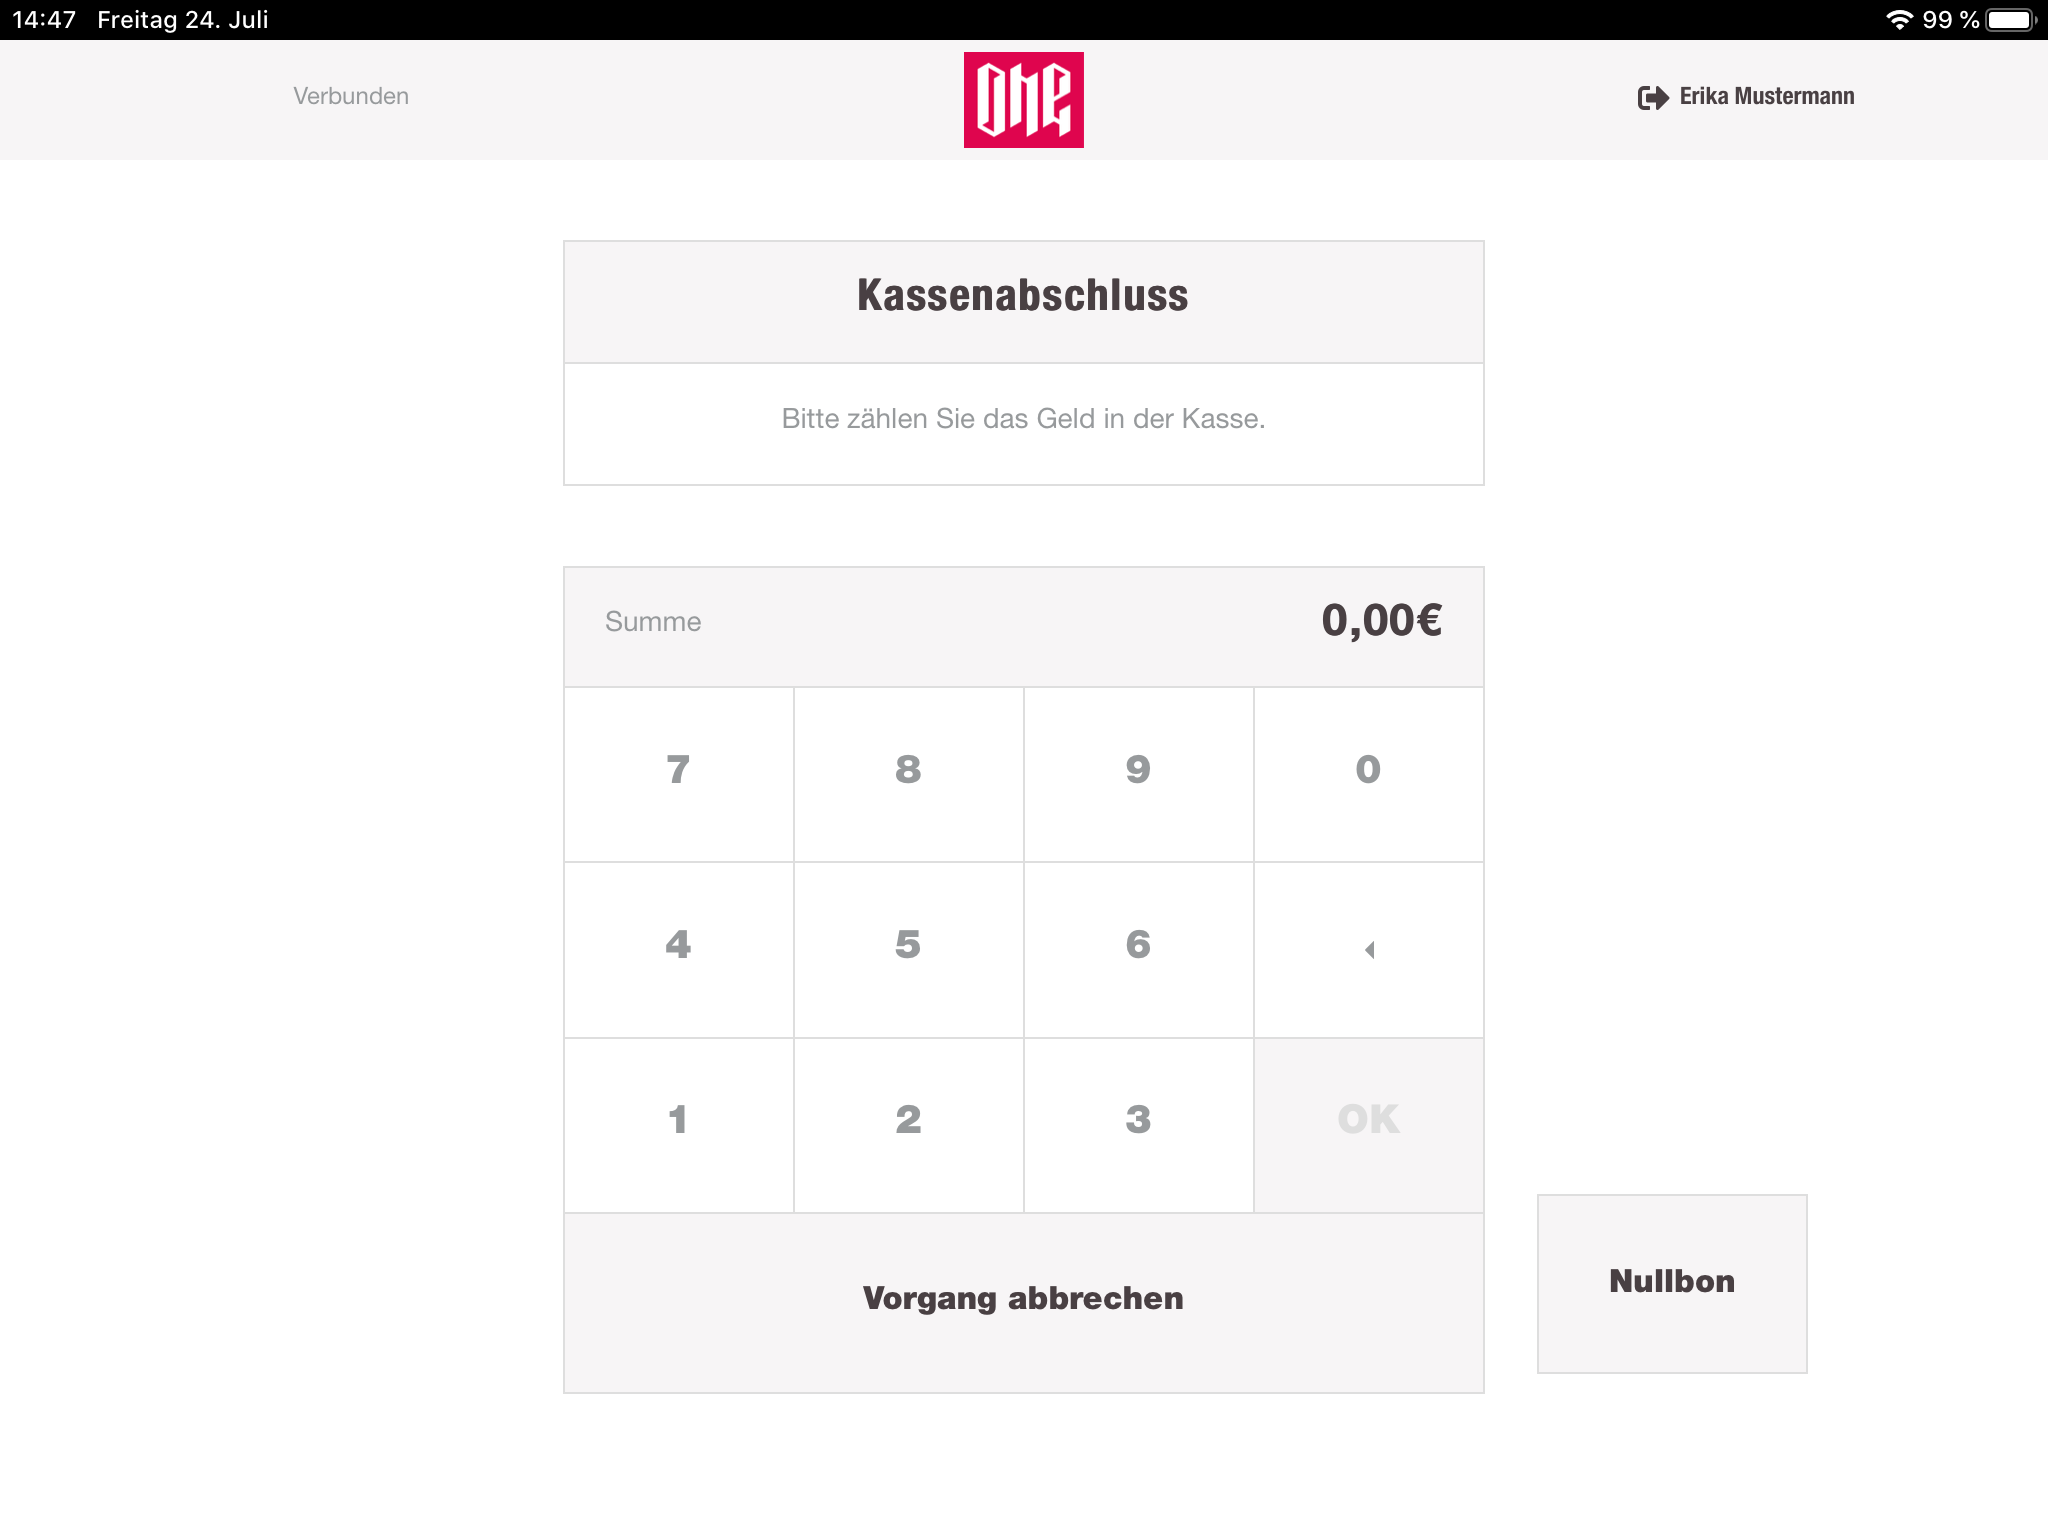
After the entered amount is submitted, the cashregister will display whether the amount does match the counted amount of the cashbook-service or not. If the amount does match, the settlement will be closed successfully. If not, the cashier will be prompted with the message that the amount does not match. The cashier has in total 3 tries to enter the amount.

So from here it is possible to recount the money and enter the value again or just continue with the closing process. After submitting the difference will be displayed and protocolled in the reports.